Owners Manual
Page 5
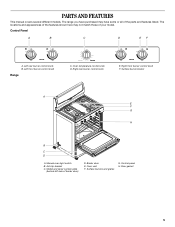
... control knob Range 140 170 200 BROIL 250 550 300 500 350 400 450 C. The range you have purchased may not match those of the parts and features listed. Broiler door E. Door gasket 5 Model and serial number plate (behind left side of broiler door) D. Control panel H. Control Panel A B C D EF A. Oven vent...
... control knob Range 140 170 200 BROIL 250 550 300 500 350 400 450 C. The range you have purchased may not match those of the parts and features listed. Broiler door E. Door gasket 5 Model and serial number plate (behind left side of broiler door) D. Control panel H. Control Panel A B C D EF A. Oven vent...
Owners Manual
Page 9
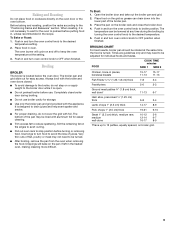
... or apply weight to the broiler door while it is not necessary to wait for easy access. The temperature can drain down into the lower part of juices. FOOD COOK TIME minutes SIDE 1 SIDE 2 Chicken, bone-in the recipe. Always broil with the appliance. Push in and turn oven control knob...
... or apply weight to the broiler door while it is not necessary to wait for easy access. The temperature can drain down into the lower part of juices. FOOD COOK TIME minutes SIDE 1 SIDE 2 Chicken, bone-in the recipe. Always broil with the appliance. Push in and turn oven control knob...
Owners Manual
Page 10
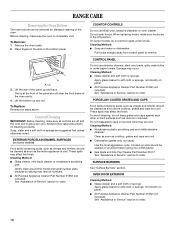
... 31662 (not included): See "Assistance or Service" section to order. These spills may affect the finish. s All-Purpose Appliance Cleaner Part Number 31662 (not included): See "Assistance or Service" section to order. Lift the bottom up and back. When replacing knobs, make sure all ...s Nonabrasive plastic scrubbing pad and mildly abrasive cleanser: Clean as soon as the cooktop, grates and caps are cool. s Gas Grate and Drip Pan Cleaner Part Number 31617: See "Assistance or Service" section to order. 10 Before cleaning, make sure the oven is cool. To Remove: 1. Place fingers in the ...
... 31662 (not included): See "Assistance or Service" section to order. These spills may affect the finish. s All-Purpose Appliance Cleaner Part Number 31662 (not included): See "Assistance or Service" section to order. Lift the bottom up and back. When replacing knobs, make sure all ...s Nonabrasive plastic scrubbing pad and mildly abrasive cleanser: Clean as soon as the cooktop, grates and caps are cool. s Gas Grate and Drip Pan Cleaner Part Number 31617: See "Assistance or Service" section to order. 10 Before cleaning, make sure the oven is cool. To Remove: 1. Place fingers in the ...
Owners Manual
Page 13
... call an electrician. If you use only FSP® replacement parts. Call the Whirlpool Customer eXperience Center toll free: 1-800-253-1301. To locate the Whirlpool designated service company in your area, you need to build every new WHIRLPOOL® appliance. s Is the batter evenly distributed in longer cooking... being used to order replacement parts, we recommend that batter is level in the pan. s Are baked items too brown on our full line of your area, call us to better respond to light s Is the ignition system broken? Whirlpool designated service technicians are made...
... call an electrician. If you use only FSP® replacement parts. Call the Whirlpool Customer eXperience Center toll free: 1-800-253-1301. To locate the Whirlpool designated service company in your area, you need to build every new WHIRLPOOL® appliance. s Is the batter evenly distributed in longer cooking... being used to order replacement parts, we recommend that batter is level in the pan. s Are baked items too brown on our full line of your area, call us to better respond to light s Is the ignition system broken? Whirlpool designated service technicians are made...

Owners Manual
Page 14
... . You will pay for in-warranty service. Consumable parts are excluded from unauthorized modifications made to use of consumables or cleaning products not approved by a Whirlpool designated service company. WHIRLPOOL CORPORATION MAJOR APPLIANCE WARRANTY LIMITED WARRANTY For one year from... The removal and reinstallation of purchase or installation date for Factory Specified Parts and repair labor to or furnished with the product, Whirlpool Corporation or Whirlpool Canada LP (hereafter "Whirlpool") will need it was purchased. This major appliance is designed to determine...
... . You will pay for in-warranty service. Consumable parts are excluded from unauthorized modifications made to use of consumables or cleaning products not approved by a Whirlpool designated service company. WHIRLPOOL CORPORATION MAJOR APPLIANCE WARRANTY LIMITED WARRANTY For one year from... The removal and reinstallation of purchase or installation date for Factory Specified Parts and repair labor to or furnished with the product, Whirlpool Corporation or Whirlpool Canada LP (hereafter "Whirlpool") will need it was purchased. This major appliance is designed to determine...
Installation Instructions
Page 1
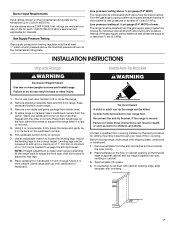
... for future reference. W10032070B INSTALLATION INSTRUCTIONS 30" (76.2 CM) FREESTANDING GAS RANGES with standard clean oven Table of Contents RANGE SAFETY...2 INSTALLATION REQUIREMENTS 3 Tools and Parts...3 Location Requirements 4 Electrical Requirements 5 Gas Supply Requirements 6 INSTALLATION INSTRUCTIONS 7 Unpack Range ...7 Install Anti-Tip Bracket 7 Make Gas Connection 9 Verify Anti-Tip Bracket Location 10 Level...
... for future reference. W10032070B INSTALLATION INSTRUCTIONS 30" (76.2 CM) FREESTANDING GAS RANGES with standard clean oven Table of Contents RANGE SAFETY...2 INSTALLATION REQUIREMENTS 3 Tools and Parts...3 Location Requirements 4 Electrical Requirements 5 Gas Supply Requirements 6 INSTALLATION INSTRUCTIONS 7 Unpack Range ...7 Install Anti-Tip Bracket 7 Make Gas Connection 9 Verify Anti-Tip Bracket Location 10 Level...
Installation Instructions
Page 3
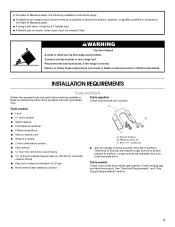
Anti-tip bracket B. INSTALLATION REQUIREMENTS Tools and Parts Gather the required tools and parts before starting installation. Plastic anchors (2) C. #10 x 1¹⁄₂" screws (2) ■ Pipe wrench 3.2 mm) drill bit (for wood floors 4.8... ■ Phillips screwdriver ■ Hand or electric drill ■ Wrench or pliers ■ 7 mm combination wrench C A. Parts needed Parts supplied Check that all parts are available from your local hardware store. Check existing gas and electrical supply. Read and follow these instructions can tip the range and...
Anti-tip bracket B. INSTALLATION REQUIREMENTS Tools and Parts Gather the required tools and parts before starting installation. Plastic anchors (2) C. #10 x 1¹⁄₂" screws (2) ■ Pipe wrench 3.2 mm) drill bit (for wood floors 4.8... ■ Phillips screwdriver ■ Hand or electric drill ■ Wrench or pliers ■ 7 mm combination wrench C A. Parts needed Parts supplied Check that all parts are available from your local hardware store. Check existing gas and electrical supply. Read and follow these instructions can tip the range and...
Installation Instructions
Page 4
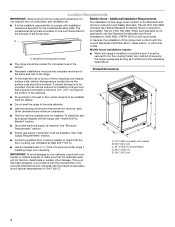
...be secured to comply with your builder or cabinet supplier to the Manufactured Home Construction and Safety Standard, Title 24 CFR, Part 3280 (formerly the Federal Standard for Manufactured Home Installations, ANSI A225.1/NFPA 501A or with the maximum allowable wood cabinet temperatures...rating plate location ■ The range should be located for convenient use the Standard for Mobile Home Construction and Safety, Title 24, HUD Part 280). Mobile home installations require: ■ When this range must provide complete enclosure of the sides and rear of combustion and ventilation ...
...be secured to comply with your builder or cabinet supplier to the Manufactured Home Construction and Safety Standard, Title 24 CFR, Part 3280 (formerly the Federal Standard for Manufactured Home Installations, ANSI A225.1/NFPA 501A or with the maximum allowable wood cabinet temperatures...rating plate location ■ The range should be located for convenient use the Standard for Mobile Home Construction and Safety, Title 24, HUD Part 280). Mobile home installations require: ■ When this range must provide complete enclosure of the sides and rear of combustion and ventilation ...
Installation Instructions
Page 7
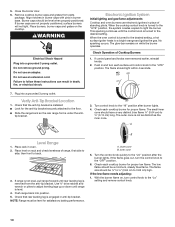
... killed. Before moving range, slide range onto shipping base, cardboard or hardboard. 1. If countertop is moved. Failure to children and adults. Remove oven racks and parts package from range. Failure to follow these instructions can tip the range and be loosened to engage the anti-tip bracket. Reconnect the anti-tip...
... killed. Before moving range, slide range onto shipping base, cardboard or hardboard. 1. If countertop is moved. Failure to children and adults. Remove oven racks and parts package from range. Failure to follow these instructions can tip the range and be loosened to engage the anti-tip bracket. Reconnect the anti-tip...
Installation Instructions
Page 10
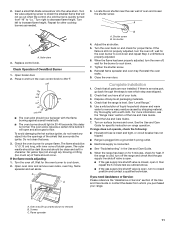
... knob is engaged in death, fire, or electrical shock. 7. No sparking occurs. Turn control knob to light the burner. The outer cone is removed from parts package. A B Level Range 1. then front to the desired setting. Push range back into a grounded 3 prong outlet. NOTE: Range must be ¼" to ³⁄₈...
... knob is engaged in death, fire, or electrical shock. 7. No sparking occurs. Turn control knob to light the burner. The outer cone is removed from parts package. A B Level Range 1. then front to the desired setting. Push range back into a grounded 3 prong outlet. NOTE: Range must be ¼" to ³⁄₈...
Installation Instructions
Page 11
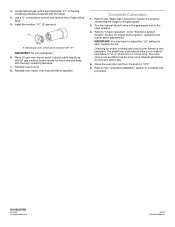
... have all of the shield that the gas supply line shutoff valve is open. ■ If the gas supply line shutoff valve is an extra part, go out when the control of liquid household cleaner and warm water to remove waxy residue caused by shipping material. Read the Use and Care... a grounded 3 prong outlet. ■ Electrical supply is still not properly adjusted, turn the oven control knob to decrease flame height. Check Operation of /recycle all parts are now installed.
... have all of the shield that the gas supply line shutoff valve is open. ■ If the gas supply line shutoff valve is an extra part, go out when the control of liquid household cleaner and warm water to remove waxy residue caused by shipping material. Read the Use and Care... a grounded 3 prong outlet. ■ Electrical supply is still not properly adjusted, turn the oven control knob to decrease flame height. Check Operation of /recycle all parts are now installed.
Installation Instructions
Page 13
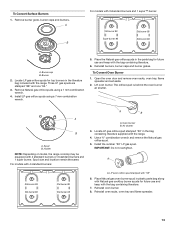
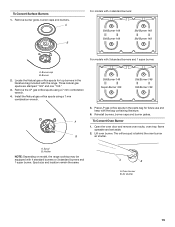
... burner 88 Std burner 88 Std burner 88 Std burner 88 A. Place Natural gas oven burner spud in plastic parts bag along with Natural gas cooktop burner spuds for top burners in the parts bag for future use and keep with 3 standard burners and 1 super™ burner: Std burner 88 Super burner...
... burner 88 Std burner 88 Std burner 88 Std burner 88 A. Place Natural gas oven burner spud in plastic parts bag along with Natural gas cooktop burner spuds for top burners in the parts bag for future use and keep with 3 standard burners and 1 super™ burner: Std burner 88 Super burner...
Installation Instructions
Page 15
... 149 Std Burner 149 Std Burner 149 For models with 4 standard burners or 3 standard burners and 1 super burner. Place LP gas orifice spuds in the parts bag for top burners in the literature bag included with the bag containing literature. 6. Lift oven burner. Holder NOTE: Depending on model, the range cooktop...
... 149 Std Burner 149 Std Burner 149 For models with 4 standard burners or 3 standard burners and 1 super burner. Place LP gas orifice spuds in the parts bag for top burners in the literature bag included with the bag containing literature. 6. Lift oven burner. Holder NOTE: Depending on model, the range cooktop...
Installation Instructions
Page 16
... for proper burner ignition, operation and burner flame adjustments. Place LP gas oven burner spud in Mexico All rights reserved. 10/09 Printed in plastic parts bag along with "47" IMPORTANT: Do not overtighten. 6. Use a ³⁄₈" combination wrench and remove the LP gas orifice spud. 5. Turn the manual shutoff...
... for proper burner ignition, operation and burner flame adjustments. Place LP gas oven burner spud in Mexico All rights reserved. 10/09 Printed in plastic parts bag along with "47" IMPORTANT: Do not overtighten. 6. Use a ³⁄₈" combination wrench and remove the LP gas orifice spud. 5. Turn the manual shutoff...
Warranty
Page 1
... that is contrary to published user or operator instructions and/or installation instructions. 4. You must be borne by a Whirlpool designated service company. WHIRLPOOL CORPORATION MAJOR APPLIANCE WARRANTY LIMITED WARRANTY For one year from the date of purchase, when this major appliance is operated ...to know your major appliance if it was purchased. The removal and reinstallation of purchase or installation date for Factory Specified Parts and repair labor to correct defects in materials or workmanship. This warranty is void if the factory applied serial number has ...
... that is contrary to published user or operator instructions and/or installation instructions. 4. You must be borne by a Whirlpool designated service company. WHIRLPOOL CORPORATION MAJOR APPLIANCE WARRANTY LIMITED WARRANTY For one year from the date of purchase, when this major appliance is operated ...to know your major appliance if it was purchased. The removal and reinstallation of purchase or installation date for Factory Specified Parts and repair labor to correct defects in materials or workmanship. This warranty is void if the factory applied serial number has ...


