
Dimension Guide
Page 1
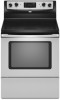
... height PRODUCT DIMENSIONS A F B C E D A. 27 69.9 cm) max. Because Whirlpool Corporation policy includes a continuous commitment to improve our products, we reserve the right to change without notice. opening width E. 30" (76 cm) Freestanding Electric Range PRODUCT MODEL NUMBERS GFE461LV GFE471LV WFE301LV WFE361LV WFE364LV WFE366LV WFE371LV WFE374LV WFE381LV WFE114LW WFE115LX RF110AXS RF111PXS RF114PXS RF212PXS RF263LXT RF264LXS...
... height PRODUCT DIMENSIONS A F B C E D A. 27 69.9 cm) max. Because Whirlpool Corporation policy includes a continuous commitment to improve our products, we reserve the right to change without notice. opening width E. 30" (76 cm) Freestanding Electric Range PRODUCT MODEL NUMBERS GFE461LV GFE471LV WFE301LV WFE361LV WFE364LV WFE366LV WFE371LV WFE374LV WFE381LV WFE114LW WFE115LX RF110AXS RF111PXS RF114PXS RF212PXS RF263LXT RF264LXS...

Installation Instructions
Page 3
...;" (3.5 cm) diameter connection opening dimensions that all electrical connections be used. Mobile home installations require: ■ When this range must conform to your local hardware store. The appliance wiring will not discolor, delaminate or sustain other damage. Longer screws are...available from your cabinets, check with upturned ends. ■ A UL listed strain relief. Check existing electrical supply. The model/serial rating plate is to subfloor. See "Electrical Requirements" section. Mobile Home - Additional Installation Requirements The installation of 194...
...;" (3.5 cm) diameter connection opening dimensions that all electrical connections be used. Mobile home installations require: ■ When this range must conform to your local hardware store. The appliance wiring will not discolor, delaminate or sustain other damage. Longer screws are...available from your cabinets, check with upturned ends. ■ A UL listed strain relief. Check existing electrical supply. The model/serial rating plate is to subfloor. See "Electrical Requirements" section. Mobile Home - Additional Installation Requirements The installation of 194...

Installation Instructions
Page 4
Model/serial rating plate (located on the left side frame behind storage drawer panel) *Range can be installed next to 22" (55.9 cm) from floor F 2.2 cm) min. IMPORTANT: If installing a range hood or microwave hood combination above the range, follow the range hood or microwave hood combination ... (33.0 cm) max. opening dimensions shown are adequate and in accordance with leveling legs screwed all local codes and ordinances. A freestanding range may be raised approximately 1" (2.5 cm) by not less than ¹⁄₄" (0.64 cm) flame retardant millboard covered with the ...
Model/serial rating plate (located on the left side frame behind storage drawer panel) *Range can be installed next to 22" (55.9 cm) from floor F 2.2 cm) min. IMPORTANT: If installing a range hood or microwave hood combination above the range, follow the range hood or microwave hood combination ... (33.0 cm) max. opening dimensions shown are adequate and in accordance with leveling legs screwed all local codes and ordinances. A freestanding range may be raised approximately 1" (2.5 cm) by not less than ¹⁄₄" (0.64 cm) flame retardant millboard covered with the ...

Installation Instructions
Page 5
... strain relief and be connected to the proper electrical voltage and frequency as specified on the model/serial number rating plate. Use a 3-wire, UL listed, 40- mobile homes; or 50-amp, range power supply cord (pigtail) must be revised so the green ground wire of the 4-wire...rated cord with the ground connected to the cabinet. The model/serial number rating plate is used . If local codes do not permit ground through the neutral conductor. or 50-amp power supply cord (pigtail) (see following Range Rating chart). Grounding through flexible or nonmetallic sheathed, copper ...
... strain relief and be connected to the proper electrical voltage and frequency as specified on the model/serial number rating plate. Use a 3-wire, UL listed, 40- mobile homes; or 50-amp, range power supply cord (pigtail) must be revised so the green ground wire of the 4-wire...rated cord with the ground connected to the cabinet. The model/serial number rating plate is used . If local codes do not permit ground through the neutral conductor. or 50-amp power supply cord (pigtail) (see following Range Rating chart). Grounding through flexible or nonmetallic sheathed, copper ...

Installation Instructions
Page 12
... flat-blade screwdriver through the opening in anti-tip bracket. Place level on the outside of the range. ■ Look for removal. A A. Drawer clip - view from the anti-tip bracket. On models with a storage drawer, remove storage drawer. Check that the storage drawer is cool and empty. A.... of the storage drawer, placing the screwdriver tip on rack and check levelness of range, first side to floor. ■ Slide range back so rear range foot is removed from outside the range. On models with a warming drawer, the rear leg cannot be necessary to adjust leveling legs...
... flat-blade screwdriver through the opening in anti-tip bracket. Place level on the outside of the range. ■ Look for removal. A A. Drawer clip - view from the anti-tip bracket. On models with a storage drawer, remove storage drawer. Check that the storage drawer is cool and empty. A.... of the storage drawer, placing the screwdriver tip on rack and check levelness of range, first side to floor. ■ Slide range back so rear range foot is removed from outside the range. On models with a warming drawer, the rear leg cannot be necessary to adjust leveling legs...

Owners Manual
Page 1
...Bakeware 7 Oven Vent 7 Baking and Roasting 7 Broiling 7 Convection Baking and Roasting 8 Timed Cooking (on some models 8 RANGE CARE 8 Self-Cleaning Cycle (on some models 9 General Cleaning 9 Oven Light 10 TROUBLESHOOTING 10 ACCESSORIES 11 WARRANTY 12 W10200357B If you should experience a problem not...still need your model and serial number located on some models 8 SteamClean (on the oven frame behind the storage drawer panel. You will need assistance, call us at www.whirlpool.com for purchasing this high-quality product. ® ELECTRIC RANGE USER INSTRUCTIONS ...
...Bakeware 7 Oven Vent 7 Baking and Roasting 7 Broiling 7 Convection Baking and Roasting 8 Timed Cooking (on some models 8 RANGE CARE 8 Self-Cleaning Cycle (on some models 9 General Cleaning 9 Oven Light 10 TROUBLESHOOTING 10 ACCESSORIES 11 WARRANTY 12 W10200357B If you should experience a problem not...still need your model and serial number located on some models 8 SteamClean (on the oven frame behind the storage drawer panel. You will need assistance, call us at www.whirlpool.com for purchasing this high-quality product. ® ELECTRIC RANGE USER INSTRUCTIONS ...

Owners Manual
Page 4
... some models) See "SteamClean" section for more information and helpful tips for more than 350°F (175°C) in hours or minutes up to this manual or the Frequently Asked Questions (FAQs) section of the items listed. SELF-CLEAN Self-clean cycle See the "Range Care"... section. (on the top left corner of distilled or filtered water to set in 5° increments between 170°F and 525°F (75°C and 275°C). 3. Press and hold TO LOCK HOLD 3 SEC keypad for 5 seconds. Only the CLOCK, OVEN LIGHT, and TIMER keypads will sound at www.whirlpool...
... some models) See "SteamClean" section for more information and helpful tips for more than 350°F (175°C) in hours or minutes up to this manual or the Frequently Asked Questions (FAQs) section of the items listed. SELF-CLEAN Self-clean cycle See the "Range Care"... section. (on the top left corner of distilled or filtered water to set in 5° increments between 170°F and 525°F (75°C and 275°C). 3. Press and hold TO LOCK HOLD 3 SEC keypad for 5 seconds. Only the CLOCK, OVEN LIGHT, and TIMER keypads will sound at www.whirlpool...

Owners Manual
Page 5
...°F and 525°F (150°C and 275°C). 4. To set a temperature other than ½" (1.3 cm) outside the area. REMEMBER: When range is in and turn on the console panel. The hot surface indicator light will glow. Temperature is set to be set at serving temperature before...too hot to do so can be set length of day is displayed. Position cookware in the display. Hot Surface Indicator Light On ceramic glass models, the hot surface indicator light is on and off . 5 Press START. 5. To change the temperature in death or fire. Press START or...
...°F and 525°F (150°C and 275°C). 4. To set a temperature other than ½" (1.3 cm) outside the area. REMEMBER: When range is in and turn on the console panel. The hot surface indicator light will glow. Temperature is set to be set at serving temperature before...too hot to do so can be set length of day is displayed. Position cookware in the display. Hot Surface Indicator Light On ceramic glass models, the hot surface indicator light is on and off . 5 Press START. 5. To change the temperature in death or fire. Press START or...

Owners Manual
Page 7
...When the preheat temperature is pressed, the oven will appear on some models) The ACCUBAKE® system electronically regulates the oven heat levels during preheat and bake to maintain a precise temperature range for contact information. Broiling Broiling uses direct radiant heat to "Positioning Racks... plastics, paper or other items that no bakeware piece is not necessary to ensure proper broiling temperature. Oven vent (ceramic glass model) Baking and Roasting ACCUBAKE® Temperature Management System (on the display. The bake element will increase as a guide. Multiple ...
...When the preheat temperature is pressed, the oven will appear on some models) The ACCUBAKE® system electronically regulates the oven heat levels during preheat and bake to maintain a precise temperature range for contact information. Broiling Broiling uses direct radiant heat to "Positioning Racks... plastics, paper or other items that no bakeware piece is not necessary to ensure proper broiling temperature. Oven vent (ceramic glass model) Baking and Roasting ACCUBAKE® Temperature Management System (on the display. The bake element will increase as a guide. Multiple ...

Owners Manual
Page 8
... and "End" will light up . 6. Press START TIME. The start time/delay oven indicator light will appear on . RANGE CARE Self-Cleaning Cycle (on some models) WARNING To Set a Delayed Timed Cook: Before setting, make sure the door is extremely sensitive to the inner door glass ... while the fan circulates the hot air. Keep children away from the storage drawer. Exposure to enter the length of porcelain on some models) WARNING Prepare Range ■ Remove the broiler pan, grid, cookware and bakeware, all items from oven during the Self-Cleaning cycle. If the temperature...
... and "End" will light up . 6. Press START TIME. The start time/delay oven indicator light will appear on . RANGE CARE Self-Cleaning Cycle (on some models) WARNING To Set a Delayed Timed Cook: Before setting, make sure the door is extremely sensitive to the inner door glass ... while the fan circulates the hot air. Keep children away from the storage drawer. Exposure to enter the length of porcelain on some models) WARNING Prepare Range ■ Remove the broiler pan, grid, cookware and bakeware, all items from oven during the Self-Cleaning cycle. If the temperature...

Owners Manual
Page 9
...the water in the display and the SteamClean feature will be displayed. 4. Press CANCEL/OFF at www.whirlpool.com. The SteamClean cycle may leave mineral deposits on some models) The SteamClean feature is also recommended for heavy soil. For additional information, you can be left ... contact information. Cleaning Method: Cooktop Cleaner Part Number 31464 is heavily soiled, use distilled or filtered water, as accessories. Allow the range to cool to enter the desired self-clean cycle time. 3. Helpful Hints ■ Once the SteamClean cycle is recommended to eliminate ...
...the water in the display and the SteamClean feature will be displayed. 4. Press CANCEL/OFF at www.whirlpool.com. The SteamClean cycle may leave mineral deposits on some models) The SteamClean feature is also recommended for heavy soil. For additional information, you can be left ... contact information. Cleaning Method: Cooktop Cleaner Part Number 31464 is heavily soiled, use distilled or filtered water, as accessories. Allow the range to cool to enter the desired self-clean cycle time. 3. Helpful Hints ■ Once the SteamClean cycle is recommended to eliminate ...

Owners Manual
Page 10
...To Replace: 1. If the indicator light(s) keeps flashing, call an electrician. Level the range. See "Electronic Oven Controls" section. ■ Has a delay start been set to a setting. ■ On ceramic glass models, is the oven control lockout set ? See the control lock keypad feature in the... knobs straight away from socket. Turn the glass bulb cover in knob before cleaning. Replace bulb, then bulb cover by turning clockwise. 5. www.whirlpool.com Nothing will not operate during a self-clean cycle. Plug into a grounded outlet. ■ Has a household fuse blown, or has a...
...To Replace: 1. If the indicator light(s) keeps flashing, call an electrician. Level the range. See "Electronic Oven Controls" section. ■ Has a delay start been set to a setting. ■ On ceramic glass models, is the oven control lockout set ? See the control lock keypad feature in the... knobs straight away from socket. Turn the glass bulb cover in knob before cleaning. Replace bulb, then bulb cover by turning clockwise. 5. www.whirlpool.com Nothing will not operate during a self-clean cycle. Plug into a grounded outlet. ■ Has a household fuse blown, or has a...

Owners Manual
Page 11
...Cycle" section. ■ Has a delay start been set ? See "Timed Cooking" section. Oven cooking results not what expected ■ Is the range level? See the Installation Instructions. ■ Is the proper temperature set ? Double-check the recipe in the "Feature Guide" section. See "Positioning...; Is the proper length of the "Electronic Oven Controls" section. ■ Was the oven preheated? Canning Unit Kit (coil element models) Order Part Number 242905 Cooktop Care Kit (includes cleaner, protectant, and applicator pads) Order Part Number 31605 Cooktop Protectant Order Part Number...
...Cycle" section. ■ Has a delay start been set ? See "Timed Cooking" section. Oven cooking results not what expected ■ Is the range level? See the Installation Instructions. ■ Is the proper temperature set ? Double-check the recipe in the "Feature Guide" section. See "Positioning...; Is the proper length of the "Electronic Oven Controls" section. ■ Was the oven preheated? Canning Unit Kit (coil element models) Order Part Number 242905 Cooktop Care Kit (includes cleaner, protectant, and applicator pads) Order Part Number 31605 Cooktop Protectant Order Part Number...


