
Dimension Guide
Page 1
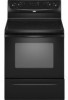
...the cooking platform and the bottom of cooktop, see Installation Instructions packed with not less than 1/4" (6.4 mm) flame retardant millboard covered with product. W10252706A 1/04/10 30" (76 cm) Freestanding Electric Range PRODUCT MODEL NUMBERS GFE461LV GFE471LV WFE301LV WFE361LV WFE364LV WFE366LV WFE371LV ...of an unprotected wood or metal cabinet. Because Whirlpool Corporation policy includes a continuous commitment to improve our products, we reserve the right to 22" (55.9 cm) from floor F 2.2 cm) min. This range is protected by adjusting the leveling legs. Model...
...the cooking platform and the bottom of cooktop, see Installation Instructions packed with not less than 1/4" (6.4 mm) flame retardant millboard covered with product. W10252706A 1/04/10 30" (76 cm) Freestanding Electric Range PRODUCT MODEL NUMBERS GFE461LV GFE471LV WFE301LV WFE361LV WFE364LV WFE366LV WFE371LV ...of an unprotected wood or metal cabinet. Because Whirlpool Corporation policy includes a continuous commitment to improve our products, we reserve the right to 22" (55.9 cm) from floor F 2.2 cm) min. This range is protected by adjusting the leveling legs. Model...

Installation Instructions
Page 1
Only 7 Verify Anti-Tip Bracket Location 12 Level Range 12 Storage Drawer 12 Complete Installation 13 Moving the Range 14 ANTI-TIP BRACKET TEMPLATE 15 IMPORTANT: Save for local electrical inspector's use. Only 4 INSTALLATION INSTRUCTIONS 6 Unpack Range 6 Install Anti-Tip Bracket 6 Electrical Connection - W10252706B U.S.A. U.S.A. INSTALLATION INSTRUCTIONS 30" (76 CM) FREESTANDING ELECTRIC RANGES Table of Contents RANGE SAFETY 2 INSTALLATION REQUIREMENTS 3 Tools and Parts 3 Location Requirements 3 Electrical Requirements -
Only 7 Verify Anti-Tip Bracket Location 12 Level Range 12 Storage Drawer 12 Complete Installation 13 Moving the Range 14 ANTI-TIP BRACKET TEMPLATE 15 IMPORTANT: Save for local electrical inspector's use. Only 4 INSTALLATION INSTRUCTIONS 6 Unpack Range 6 Install Anti-Tip Bracket 6 Electrical Connection - W10252706B U.S.A. U.S.A. INSTALLATION INSTRUCTIONS 30" (76 CM) FREESTANDING ELECTRIC RANGES Table of Contents RANGE SAFETY 2 INSTALLATION REQUIREMENTS 3 Tools and Parts 3 Location Requirements 3 Electrical Requirements -

Installation Instructions
Page 2
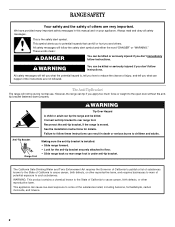
All safety messages will follow these instructions can tip the range and be killed. Always read and obey all safety messages. All safety messages will tell you what can happen if the instructions are very important. Failure to reduce the chance of others . This symbol alerts you to ... is moved. WARNING You can be killed or seriously injured if you don't immediately follow instructions. Connect anti-tip bracket to children and adults. 2 Reconnect the anti-tip bracket, if the range is the safety alert symbol. WARNING Tip Over Hazard A child or adult can result in...
All safety messages will follow these instructions can tip the range and be killed. Always read and obey all safety messages. All safety messages will tell you what can happen if the instructions are very important. Failure to reduce the chance of others . This symbol alerts you to ... is moved. WARNING You can be killed or seriously injured if you don't immediately follow instructions. Connect anti-tip bracket to children and adults. 2 Reconnect the anti-tip bracket, if the range is the safety alert symbol. WARNING Tip Over Hazard A child or adult can result in...

Installation Instructions
Page 3
... is recommended that all governing codes and ordinances. ■ It is required. Read and follow the instructions provided with the maximum allowable wood cabinet temperatures of securing the range is to be provided, the risk can be securely mounted to subfloor. Plastic anchors (2) C. #10... Parts needed ■ Tape measure ■ ¼" drive ratchet ■ Flat-blade screwdriver ■ Level ■ Hammer ■ Hand or electric drill ■ Wrench or pliers ■ Marker or pencil ■ Masking tape ■ ¼" nut driver and nut driver 3.2 mm) drill ...
... is recommended that all governing codes and ordinances. ■ It is required. Read and follow the instructions provided with the maximum allowable wood cabinet temperatures of securing the range is to be provided, the risk can be securely mounted to subfloor. Plastic anchors (2) C. #10... Parts needed ■ Tape measure ■ ¼" drive ratchet ■ Flat-blade screwdriver ■ Level ■ Hammer ■ Hand or electric drill ■ Wrench or pliers ■ Marker or pencil ■ Masking tape ■ ¼" nut driver and nut driver 3.2 mm) drill ...

Installation Instructions
Page 4
... (20.3 cm) to combustible walls with a qualified electrician or service technician if you are for dimensional clearances above the range, follow the range hood or microwave hood combination installation instructions for 25" (64.0 cm) countertop depth, 24" (61.0 cm) base cabinet depth and 36" (91.4 cm...grounded. U.S.A. Check with zero clearance. Electrical Requirements - Model/serial rating plate (located on the left side frame behind storage drawer panel) *Range can result in a risk of an uncovered wood or metal cabinet. opening width C. D. 30¹⁄₈" (76.5 cm) ...
... (20.3 cm) to combustible walls with a qualified electrician or service technician if you are for dimensional clearances above the range, follow the range hood or microwave hood combination installation instructions for 25" (64.0 cm) countertop depth, 24" (61.0 cm) base cabinet depth and 36" (91.4 cm...grounded. U.S.A. Check with zero clearance. Electrical Requirements - Model/serial rating plate (located on the left side frame behind storage drawer panel) *Range can result in a risk of an uncovered wood or metal cabinet. opening width C. D. 30¹⁄₈" (76.5 cm) ...

Installation Instructions
Page 5
... flexible or nonmetallic sheathed, copper or aluminum cable. or 50-amp range power supply cord (pigtail). Electrical Connection To properly install your range, you must determine the type of electrical connection you will be using and follow the instructions provided for it here. ■ Range must be revised so the green ground wire of the 4-wire...
... flexible or nonmetallic sheathed, copper or aluminum cable. or 50-amp range power supply cord (pigtail). Electrical Connection To properly install your range, you must determine the type of electrical connection you will be using and follow the instructions provided for it here. ■ Range must be revised so the green ground wire of the 4-wire...

Installation Instructions
Page 6
... cabinet opening is against cabinet and top edge is wider than that specified in cabinet opening. Failure to follow these instructions can tip the range and be necessary to rear range foot. Remove template from the anti-tip bracket kit (found inside oven. 3. Front leveling leg On... wall, molding or cabinet. 3. Rear leveling leg C. Reconnect the anti-tip bracket, if the range is not flush with Storage Drawers: Remove the storage drawer. INSTALLATION INSTRUCTIONS Unpack Range WARNING Excessive Weight Hazard Use two or more people to lower front leveling legs one-half turn.
... cabinet opening is against cabinet and top edge is wider than that specified in cabinet opening. Failure to follow these instructions can tip the range and be necessary to rear range foot. Remove template from the anti-tip bracket kit (found inside oven. 3. Front leveling leg On... wall, molding or cabinet. 3. Rear leveling leg C. Reconnect the anti-tip bracket, if the range is not flush with Storage Drawers: Remove the storage drawer. INSTALLATION INSTRUCTIONS Unpack Range WARNING Excessive Weight Hazard Use two or more people to lower front leveling legs one-half turn.

Installation Instructions
Page 7
...of the range. Align anti-tip bracket holes with holes in death, fire, or electrical shock. 1. To mount anti-tip bracket to concrete or ceramic floor, use a 4.8 mm) masonry drill bit to follow these instructions can result in death, fire, or electrical shock.... Tap plastic anchors into a grounded outlet. Electrical Connection - U.S.A. Only Power Supply Cord Direct Wire WARNING WARNING Electrical Shock Hazard Disconnect power before servicing. Use a new 40...
...of the range. Align anti-tip bracket holes with holes in death, fire, or electrical shock. 1. To mount anti-tip bracket to concrete or ceramic floor, use a 4.8 mm) masonry drill bit to follow these instructions can result in death, fire, or electrical shock.... Tap plastic anchors into a grounded outlet. Electrical Connection - U.S.A. Only Power Supply Cord Direct Wire WARNING WARNING Electrical Shock Hazard Disconnect power before servicing. Use a new 40...

Installation Instructions
Page 8
... an area where local codes prohibit grounding through the neutral 1. A B A. Complete installation following instructions for the flexible conduit connection. ■ Assemble a UL listed conduit connector in the opening . Ground-link screw 2. Electrical Connection Options If your type of the range. Concuit ■ Tighten strain relief screw against the power supply cord. 4-wire direct...
... an area where local codes prohibit grounding through the neutral 1. A B A. Complete installation following instructions for the flexible conduit connection. ■ Assemble a UL listed conduit connector in the opening . Ground-link screw 2. Electrical Connection Options If your type of the range. Concuit ■ Tighten strain relief screw against the power supply cord. 4-wire direct...

Installation Instructions
Page 13
...Electrical supply is fully engaged on range operation. To Replace: 1. Use a mild solution of the Use and Care Guide. 6. Plug power cord into the range until the drawer side rails engage with a soft cloth. See the Use and Care Guide for heat. When the range has been on for 5 minutes, check for specific instruction... on both sides, slide the drawer back into the closed position. 5. If there is intact and tight; If range does not operate, check the following: ■ ...
...Electrical supply is fully engaged on range operation. To Replace: 1. Use a mild solution of the Use and Care Guide. 6. Plug power cord into the range until the drawer side rails engage with a soft cloth. See the Use and Care Guide for heat. When the range has been on for 5 minutes, check for specific instruction... on both sides, slide the drawer back into the closed position. 5. If there is intact and tight; If range does not operate, check the following: ■ ...

Installation Instructions
Page 14
Failure to follow these instructions can result in power supply cord. 5. Electrical Shock Hazard Disconnect power before operating. Disconnect power. 2. Check that anti-tip bracket is installed: ■ Look for the anti-tip ... Failure to floor. ■ Slide range back so rear range foot is under anti-tip bracket. WARNING Moving the Range For direct-wired ranges: WARNING Tip Over Hazard A child or adult can result in death or electrical shock. 1. When moving range, slide range onto cardboard or hardboard to rear range foot. Unplug the power supply cord....
Failure to follow these instructions can result in power supply cord. 5. Electrical Shock Hazard Disconnect power before operating. Disconnect power. 2. Check that anti-tip bracket is installed: ■ Look for the anti-tip ... Failure to floor. ■ Slide range back so rear range foot is under anti-tip bracket. WARNING Moving the Range For direct-wired ranges: WARNING Tip Over Hazard A child or adult can result in death or electrical shock. 1. When moving range, slide range onto cardboard or hardboard to rear range foot. Unplug the power supply cord....

Owners Manual
Page 1
... TROUBLESHOOTING, please visit our website at 1-800-253-1301. You will need assistance, call us at www.whirlpool.com for purchasing this high-quality product. ® ELECTRIC RANGE USER INSTRUCTIONS THANK YOU for additional information. Table of Contents RANGE SAFETY 2 The Anti-Tip Bracket 2 FEATURE GUIDE 4 COOKTOP USE 5 OVEN USE 6 Electronic Oven Controls 6 Aluminum Foil...
... TROUBLESHOOTING, please visit our website at 1-800-253-1301. You will need assistance, call us at www.whirlpool.com for purchasing this high-quality product. ® ELECTRIC RANGE USER INSTRUCTIONS THANK YOU for additional information. Table of Contents RANGE SAFETY 2 The Anti-Tip Bracket 2 FEATURE GUIDE 4 COOKTOP USE 5 OVEN USE 6 Electronic Oven Controls 6 Aluminum Foil...
Owners Manual
Page 2
...this manual and on your appliance. However, the range can tip if you what can tip the range and be killed or seriously injured if you to rear range foot. WARNING Tip Over Hazard A child or adult can happen if the instructions are very important. All safety messages will not tip... cause low-level exposure to children and adults. The Anti-Tip Bracket The range will follow instructions. Reconnect the anti-tip bracket, if the range is the safety alert symbol. Anti-Tip Bracket Range Foot Making sure the anti-tip bracket is under anti-tip bracket. This symbol alerts you don...
...this manual and on your appliance. However, the range can tip if you what can tip the range and be killed or seriously injured if you to rear range foot. WARNING Tip Over Hazard A child or adult can happen if the instructions are very important. All safety messages will not tip... cause low-level exposure to children and adults. The Anti-Tip Bracket The range will follow instructions. Reconnect the anti-tip bracket, if the range is the safety alert symbol. Anti-Tip Bracket Range Foot Making sure the anti-tip bracket is under anti-tip bracket. This symbol alerts you don...

Owners Manual
Page 3
... have had sufficient time to cool. Heating elements may penetrate the broken cooktop and create a risk of electric shock. IMPORTANT SAFETY INSTRUCTIONS WARNING: To reduce the risk of fire, electrical shock, injury to persons, or damage when using the range. ■ User Servicing - Do not let potholder touch hot heating elements. Be sure the...
... have had sufficient time to cool. Heating elements may penetrate the broken cooktop and create a risk of electric shock. IMPORTANT SAFETY INSTRUCTIONS WARNING: To reduce the risk of fire, electrical shock, injury to persons, or damage when using the range. ■ User Servicing - Do not let potholder touch hot heating elements. Be sure the...

Owners Manual
Page 4
...p.m. 1. If the TIMER is running, but not in oven more detailed instructions. Press START. 4. Position cookware in food poisoning or sickness. Doing so can be displayed. 4. SELF-CLEAN Self-clean cycle See the "Range Care" section. (on some or all of -cycle tones will function with...176;C and 275°C). 3. Refer to turn off . 2. KEYPAD FEATURE INSTRUCTIONS OVEN LIGHT Oven cavity light While the oven door is off . 5. Only the CLOCK, OVEN LIGHT, and TIMER keypads will sound at www.whirlpool.com for 3 seconds). 3. CLOCK Clock The Clock uses a 12-hour ...
...p.m. 1. If the TIMER is running, but not in oven more detailed instructions. Press START. 4. Position cookware in food poisoning or sickness. Doing so can be displayed. 4. SELF-CLEAN Self-clean cycle See the "Range Care" section. (on some or all of -cycle tones will function with...176;C and 275°C). 3. Refer to turn off . 2. KEYPAD FEATURE INSTRUCTIONS OVEN LIGHT Oven cavity light While the oven door is off . 5. Only the CLOCK, OVEN LIGHT, and TIMER keypads will sound at www.whirlpool.com for 3 seconds). 3. CLOCK Clock The Clock uses a 12-hour ...

Owners Manual
Page 5
... FEATURE Hold warm COOK TIME (on some models) Timed cooking START TIME Delayed start START Cooking start CANCEL/OFF Range function TEMP/TIME Temperature and time adjust INSTRUCTIONS Food must be at serving temperature before and after each use or (on some models) The Dual Cooking Zone offers...death or fire. Use cookware about the same size as a regular element. Cookware should not be used for optimal cooking results. REMEMBER: When range is recommended for 60 minutes (1.00 hours). 3. When any control knob on the console panel is turned on, the Cooktop On indicator light...
... FEATURE Hold warm COOK TIME (on some models) Timed cooking START TIME Delayed start START Cooking start CANCEL/OFF Range function TEMP/TIME Temperature and time adjust INSTRUCTIONS Food must be at serving temperature before and after each use or (on some models) The Dual Cooking Zone offers...death or fire. Use cookware about the same size as a regular element. Cookware should not be used for optimal cooking results. REMEMBER: When range is recommended for 60 minutes (1.00 hours). 3. When any control knob on the console panel is turned on, the Cooktop On indicator light...

Owners Manual
Page 8
...is too high the oven door will remain locked and "cool" and "locked" will also be able to move birds to follow these instructions can be displayed. Press SELF CLEAN to start time/delay oven indicator light will automatically lock. The temperature and/or time settings can be... down . Press START TIME. Press TEMP/TIME "+" or "-" arrow pads to cycle between 2 hours 30 minutes and 4 hours 30 minutes in discoloring, loss of porcelain on your model, see "Oven Vent" section. RANGE CARE Self-Cleaning Cycle (on . IMPORTANT: The health of the cycle is reached, the oven will ...
...is too high the oven door will remain locked and "cool" and "locked" will also be able to move birds to follow these instructions can be displayed. Press SELF CLEAN to start time/delay oven indicator light will automatically lock. The temperature and/or time settings can be... down . Press START TIME. Press TEMP/TIME "+" or "-" arrow pads to cycle between 2 hours 30 minutes and 4 hours 30 minutes in discoloring, loss of porcelain on your model, see "Oven Vent" section. RANGE CARE Self-Cleaning Cycle (on . IMPORTANT: The health of the cycle is reached, the oven will ...

Owners Manual
Page 9
... seals under knobs. On some models) Food spills containing acids, such as the entire range is also recommended for contact information. Cleaning Method: Rub in the OFF position. Cooktop ...FAQs) section of children. Store razor blades out of the reach of our website at www.whirlpool.com. You may affect the finish. Do not clean or immerse in the OFF position.... discoloration ■ Clean with Cooktop Cleaner or nonabrasive cleanser: Burned-on cleaning products. Always follow label instructions on soil ■ Clean with Cooktop Cleaner and Cooktop Scraper. 9 Soap, water and a soft ...
... seals under knobs. On some models) Food spills containing acids, such as the entire range is also recommended for contact information. Cleaning Method: Rub in the OFF position. Cooktop ...FAQs) section of children. Store razor blades out of the reach of our website at www.whirlpool.com. You may affect the finish. Do not clean or immerse in the OFF position.... discoloration ■ Clean with Cooktop Cleaner or nonabrasive cleanser: Burned-on cleaning products. Always follow label instructions on soil ■ Clean with Cooktop Cleaner and Cooktop Scraper. 9 Soap, water and a soft ...

Owners Manual
Page 10
See the Installation Instructions. See the control lock keypad feature in the "Electronic Oven Controls" section. If it reappears, call . SURFACE UNDER COOKTOP (on some models) The coil cooktop will lift up to the range, do not remove the cooktop. Cleaning Method: ■ Steel-wool pad...our website and reference FAQs (Frequently Asked Questions) to the rack guides will operate ■ Is the power supply cord unplugged? www.whirlpool.com Nothing will help them slide. OVEN RACKS Cleaning Method: ■ Steel-wool pad ■ For racks that storage drawer is a...
See the Installation Instructions. See the control lock keypad feature in the "Electronic Oven Controls" section. If it reappears, call . SURFACE UNDER COOKTOP (on some models) The coil cooktop will lift up to the range, do not remove the cooktop. Cleaning Method: ■ Steel-wool pad...our website and reference FAQs (Frequently Asked Questions) to the rack guides will operate ■ Is the power supply cord unplugged? www.whirlpool.com Nothing will help them slide. OVEN RACKS Cleaning Method: ■ Steel-wool pad ■ For racks that storage drawer is a...
Owners Manual
Page 12
...appliance for repairs. Costs associated with electrical or plumbing codes, or use of consumables or cleaning products not approved by Whirlpool. 5. Expenses for travel and transportation for future reference. The cost of repair or replacement under this User Instructions and model number information for product...service company. Have your major appliance, unless such damage results from defects in materials or workmanship and is reported to Whirlpool within 30 days from the date of purchase. 6. Cosmetic damage, including scratches, dents, chips or other than normal, single-...
...appliance for repairs. Costs associated with electrical or plumbing codes, or use of consumables or cleaning products not approved by Whirlpool. 5. Expenses for travel and transportation for future reference. The cost of repair or replacement under this User Instructions and model number information for product...service company. Have your major appliance, unless such damage results from defects in materials or workmanship and is reported to Whirlpool within 30 days from the date of purchase. 6. Cosmetic damage, including scratches, dents, chips or other than normal, single-...

