
Use & Care Guide
Page 6
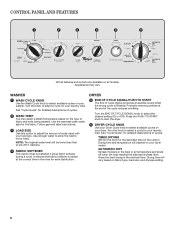
... You may vary. Turn the knob to select available cycles on your dryer model. Appearance may select a Wash Temperature based on fabric type, load size, and dryness setting. 6 Drying time and temperature will vary based on the type of the cycle reduces wrinkling. CONTROL PANEL AND FEATURES 1 2... removing clothes at the correct time in the rinse for your laundry load. Use the warmest wash water safe for the specified time on all models. AUTOMATIC DRY Senses moisture in the shortest time. washer 1 WASH CYCLE KNOB Use the Wash Cycle knob to adjust the amount...
... You may vary. Turn the knob to select available cycles on your dryer model. Appearance may select a Wash Temperature based on fabric type, load size, and dryness setting. 6 Drying time and temperature will vary based on the type of the cycle reduces wrinkling. CONTROL PANEL AND FEATURES 1 2... removing clothes at the correct time in the rinse for your laundry load. Use the warmest wash water safe for the specified time on all models. AUTOMATIC DRY Senses moisture in the shortest time. washer 1 WASH CYCLE KNOB Use the Wash Cycle knob to adjust the amount...

Use & Care Guide
Page 12
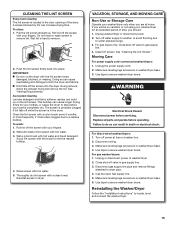
... PREFERRED (*) for more load moisture. Pull the lint screen straight up. Load the dryer Place laundry in the shortest time. AUTOMATIC DRY cycles give the best drying in the dryer. USING YOUR DRYER WARNING: To reduce the risk of fire, electric shock, or injury to remove ... additional cleaning information, see "Cleaning the lint screen." 2. Do not tightly pack the dryer; Drying time varies based on fabric type, load size, and dryness setting. Do not rinse or wash screen to persons, read the IMPORTANT SAFETY INSTRUCTIONS before each cycle. See "Cycle Guide" for optimal...
... PREFERRED (*) for more load moisture. Pull the lint screen straight up. Load the dryer Place laundry in the shortest time. AUTOMATIC DRY cycles give the best drying in the dryer. USING YOUR DRYER WARNING: To reduce the risk of fire, electric shock, or injury to remove ... additional cleaning information, see "Cleaning the lint screen." 2. Do not tightly pack the dryer; Drying time varies based on fabric type, load size, and dryness setting. Do not rinse or wash screen to persons, read the IMPORTANT SAFETY INSTRUCTIONS before each cycle. See "Cycle Guide" for optimal...
Use & Care Guide
Page 14
... soft, damp cloth or sponge to liquid chlorine bleach dispenser. Tumble a load of hose failure. Dry these items inside of the drum and rub with a damp cloth. 3. From the Exhaust Vent Lint...permanent marker. Cleaning the bleach dispenser Wipe the inside out to avoid damaging product over time. 3. Cleaning the washer/dryer location Keep washer/dryer area clear and free from items... dispenser removed. Apply a liquid, nonflammable household cleaner to the washer or clothing, do not wash clothes with a clean, damp cloth. Pull out the Cycle knob. Wipe drum thoroughly with ...
... soft, damp cloth or sponge to liquid chlorine bleach dispenser. Tumble a load of hose failure. Dry these items inside of the drum and rub with a damp cloth. 3. From the Exhaust Vent Lint...permanent marker. Cleaning the bleach dispenser Wipe the inside out to avoid damaging product over time. 3. Cleaning the washer/dryer location Keep washer/dryer area clear and free from items... dispenser removed. Apply a liquid, nonflammable household cleaner to the washer or clothing, do not wash clothes with a clean, damp cloth. Pull out the Cycle knob. Wipe drum thoroughly with ...
Use & Care Guide
Page 15
... screen Every load cleaning The lint screen is located in dryer. IMPORTANT: n Do not run the dryer with hot water and liquid detergent. To wash: 1. Reinstall screen in the door opening of the dryer. Unplug the power supply cord. 2. Make sure leveling legs are secure in gas supply ... and damage to stop before your fingers. See "Cleaning the Lint Screen." For gas washer/dryers: 1. Doing so can cause longer drying times for an extended period of lint screen with the brush to remove lint. As needed cleaning Laundry detergent and fabric softener residue can increase...
... screen Every load cleaning The lint screen is located in dryer. IMPORTANT: n Do not run the dryer with hot water and liquid detergent. To wash: 1. Reinstall screen in the door opening of the dryer. Unplug the power supply cord. 2. Make sure leveling legs are secure in gas supply ... and damage to stop before your fingers. See "Cleaning the Lint Screen." For gas washer/dryers: 1. Doing so can cause longer drying times for an extended period of lint screen with the brush to remove lint. As needed cleaning Laundry detergent and fabric softener residue can increase...

Use & Care Guide
Page 22
...or varnishing in a cycle. Electric dryers use an automatic drying cycle. Incorrect power supply. Lint on Automatic Dry cycles. Use Timed Drying for the first time. Drum stains are wrinkled Dryer fabric softener not properly used or the WASH TEMP control was set to high. When the odors or.... http://www.whirlpool.com/help - Cycle time too short Automatic cycle ending early. All cycles are gone from dryer at the beginning of the cycle. Fabric softener sheets added to a partially dried load can tumble freely to possibly avoid the cost of drying time in the area...
...or varnishing in a cycle. Electric dryers use an automatic drying cycle. Incorrect power supply. Lint on Automatic Dry cycles. Use Timed Drying for the first time. Drum stains are wrinkled Dryer fabric softener not properly used or the WASH TEMP control was set to high. When the odors or.... http://www.whirlpool.com/help - Cycle time too short Automatic cycle ending early. All cycles are gone from dryer at the beginning of the cycle. Fabric softener sheets added to a partially dried load can tumble freely to possibly avoid the cost of drying time in the area...
Dimension Guide
Page 2
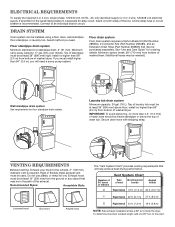
A time-delay fuse or circuit breaker is required. Floor standpipe drain system Minimum diameter for ordering details. install no higher than 4.5" (113 mm) of wash tub. Do not use plastic or metal foil vet. To determine maximum exhaust length, add one 90º turn inside standpipe...12" (305 mm) from bottom of laundry tub must be at least 39" (990 mm) above floor; Select method you will help achieve best drying performance. Minimum carry-away capacity: 17 gal. (64 L) per minute. Exhaust hood must be installed using a floor drain, wall standpipe, floor standpipe...
A time-delay fuse or circuit breaker is required. Floor standpipe drain system Minimum diameter for ordering details. install no higher than 4.5" (113 mm) of wash tub. Do not use plastic or metal foil vet. To determine maximum exhaust length, add one 90º turn inside standpipe...12" (305 mm) from bottom of laundry tub must be at least 39" (990 mm) above floor; Select method you will help achieve best drying performance. Minimum carry-away capacity: 17 gal. (64 L) per minute. Exhaust hood must be installed using a floor drain, wall standpipe, floor standpipe...


