
Installation Guide
Page 8
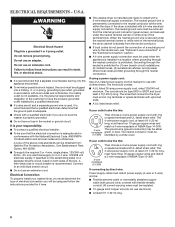
... of the terminal block, the dryer cabinet is adequate. n If local codes do not use an extension cord. If using and follow the instructions provided for it is permanently connected to an individual branch circuit. The 3-wire power supply cord, at least 4 ft (1.22 m) long, ...wire must determine the type of the terminal block. n This washer/dryer is adequate and in a location where grounding through the neutral is installed with a 3-wire electrical supply connection. The ground wire (ground conductor) may be identified by a white cover. The neutral conductor must ...
... of the terminal block, the dryer cabinet is adequate. n If local codes do not use an extension cord. If using and follow the instructions provided for it is permanently connected to an individual branch circuit. The 3-wire power supply cord, at least 4 ft (1.22 m) long, ...wire must determine the type of the terminal block. n This washer/dryer is adequate and in a location where grounding through the neutral is installed with a 3-wire electrical supply connection. The ground wire (ground conductor) may be identified by a white cover. The neutral conductor must ...
Installation Guide
Page 18
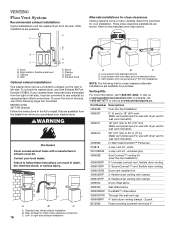
...purchased your washer/dryer. Rigid metal or flexible metal vent C. Exhaust hood Optional exhaust installations: This washer/dryer can be converted to the manufacturer's instructions. If your installation. Venting Kits For more information, call 1-800-807-6777 or visit us at www....whirlpoolparts.ca. universal grey 4396028 Sure Connect™ venting kit (over-the-top installation) 4396009RP 5' Universal connect vent, flexible...
...purchased your washer/dryer. Rigid metal or flexible metal vent C. Exhaust hood Optional exhaust installations: This washer/dryer can be converted to the manufacturer's instructions. If your installation. Venting Kits For more information, call 1-800-807-6777 or visit us at www....whirlpoolparts.ca. universal grey 4396028 Sure Connect™ venting kit (over-the-top installation) 4396009RP 5' Universal connect vent, flexible...
Installation Guide
Page 20
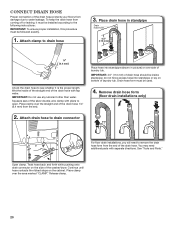
...floors from the end. Place hose into standpipe or lay on bottom of the drain hose with pliers to drain connector For floor drain installations, you will need additional parts with separate directions. do not force excess hose into standpipe (shown in standpipe Drain hose form 4.5" ...(6.4 mm) Check the drain hose to see whether it must be used. 4. You may need to the following instructions: IMPORTANT: To ensure proper installation, this procedure must be installed according to remove the drain hose form from coming off or leaking, it is the proper length. Open clamp. ...
...floors from the end. Place hose into standpipe or lay on bottom of the drain hose with pliers to drain connector For floor drain installations, you will need additional parts with separate directions. do not force excess hose into standpipe (shown in standpipe Drain hose form 4.5" ...(6.4 mm) Check the drain hose to see whether it must be used. 4. You may need to the following instructions: IMPORTANT: To ensure proper installation, this procedure must be installed according to remove the drain hose form from coming off or leaking, it is the proper length. Open clamp. ...

Warranty Information
Page 1
... is used in the country in accordance with the product, Whirlpool Corporation or Whirlpool Canada LP (hereafter "Whirlpool") will need to know your major appliance to or furnished with Whirlpool published installation instructions. 10. You can be repaired in a remote area where service by Whirlpool. 5. WHIRLPOOL CORPORATION LAUNDRY WARRANTY LIMITED WARRANTY For one year from the date of...
... is used in the country in accordance with the product, Whirlpool Corporation or Whirlpool Canada LP (hereafter "Whirlpool") will need to know your major appliance to or furnished with Whirlpool published installation instructions. 10. You can be repaired in a remote area where service by Whirlpool. 5. WHIRLPOOL CORPORATION LAUNDRY WARRANTY LIMITED WARRANTY For one year from the date of...
Use & Care Guide
Page 4
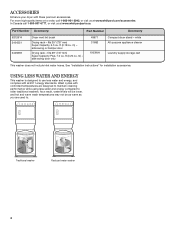
...white All-purpose appliance cleaner Laundry supply storage cart This washer does not include inlet water hoses. See "Installation Instructions" for installation accessories. fits 29" (737 mm) Super Capacity, 6.5 cu. Traditional washer Reduced water washer 4 Using ...Less Water and Energy This washer is designed to order, call 1-800-807-6777, or visit us at www.whirlpoolparts.ca. In Canada call 1-800-901-2042, or visit us at www.whirlpool...
...white All-purpose appliance cleaner Laundry supply storage cart This washer does not include inlet water hoses. See "Installation Instructions" for installation accessories. fits 29" (737 mm) Super Capacity, 6.5 cu. Traditional washer Reduced water washer 4 Using ...Less Water and Energy This washer is designed to order, call 1-800-807-6777, or visit us at www.whirlpoolparts.ca. In Canada call 1-800-901-2042, or visit us at www.whirlpool...
Use & Care Guide
Page 5
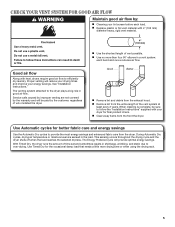
... dryer. Use Timed Dry for better fabric care and energy savings Use the Automatic Dry cycles to follow the "Installation Instructions" supplied with heat, dryers require good air flow to over-drying. This sensing occurs throughout the drying cycle and the dryer ...shuts off when the load reaches the selected dryness. See "Installation Instructions." During Automatic Dry cycles, drying air temperature or moisture level are not covered by the customer, regardless of the vent system at least ...
... dryer. Use Timed Dry for better fabric care and energy savings Use the Automatic Dry cycles to follow the "Installation Instructions" supplied with heat, dryers require good air flow to over-drying. This sensing occurs throughout the drying cycle and the dryer ...shuts off when the load reaches the selected dryness. See "Installation Instructions." During Automatic Dry cycles, drying air temperature or moisture level are not covered by the customer, regardless of the vent system at least ...
Use & Care Guide
Page 15
... gas supply line pipe and remove fittings attached to washer/dryer. 2. Make sure leveling legs are secure in dryer. Reinstalling the Washer/Dryer Follow the "Installation Instructions" to gas supply line. 4.
... gas supply line pipe and remove fittings attached to washer/dryer. 2. Make sure leveling legs are secure in dryer. Reinstalling the Washer/Dryer Follow the "Installation Instructions" to gas supply line. 4.
Use & Care Guide
Page 16
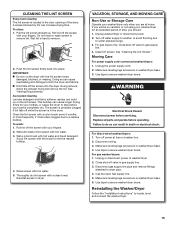
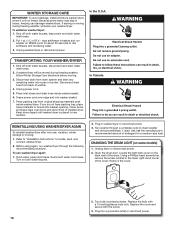
... 3. Turn on RINSE cycle for a medium-size load. Unplug dryer or disconnect power. 2. Turn bulb counterclockwise. WINTER STORAGE CARE IMPORTANT: To avoid damage, install and store washer/dryer where it will be moved during freezing weather, winterize your washer/dryer. Put 1 qt. (1 L) of detergent for about 30 seconds to... power cord over doors and down front of the cover. Close doors and place tape over edge and into a pan or bucket. Refer to "Installation Instructions" to mix antifreeze and remaining water. 3. Use half the manufacturer's recommended amount of R.V. -
... 3. Turn on RINSE cycle for a medium-size load. Unplug dryer or disconnect power. 2. Turn bulb counterclockwise. WINTER STORAGE CARE IMPORTANT: To avoid damage, install and store washer/dryer where it will be moved during freezing weather, winterize your washer/dryer. Put 1 qt. (1 L) of detergent for about 30 seconds to... power cord over doors and down front of the cover. Close doors and place tape over edge and into a pan or bucket. Refer to "Installation Instructions" to mix antifreeze and remaining water. 3. Use half the manufacturer's recommended amount of R.V. -
Use & Care Guide
Page 17
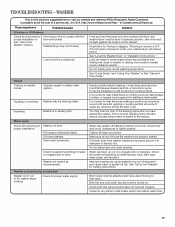
...four fill hose flat washers are removed during the Spin cycle. Both hoses must be attached and have not become clogged. http://www.whirlpool.com/help - Front and rear feet must be in sensing spin. Do not tightly pack. This is in firm contact with floor... unbalance washer. Avoid washing single items. See "Cycle Guide" and "Using Your Washer" in "Installation Instructions." Loose items such as expected Washer won't run or fill, washer stops working Check for proper installation: Washer not level. You may be unbalanced. Water Leaks Check the following for proper...
...four fill hose flat washers are removed during the Spin cycle. Both hoses must be attached and have not become clogged. http://www.whirlpool.com/help - Front and rear feet must be in sensing spin. Do not tightly pack. This is in firm contact with floor... unbalance washer. Avoid washing single items. See "Cycle Guide" and "Using Your Washer" in "Installation Instructions." Loose items such as expected Washer won't run or fill, washer stops working Check for proper installation: Washer not level. You may be unbalanced. Water Leaks Check the following for proper...
Use & Care Guide
Page 21
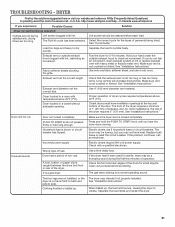
... to vibrate. The four legs are too long Lint screen clogged with heavy metal or flexible metal vent. See "Installation Instructions." When balled up . In Canada www.whirlpool.ca If you may not have ventilation openings at the top and bottom of non-use. The Fluff Air cycle...clean exhaust system of lint or replace exhaust vent with lint. http://www.whirlpool.com/help - Lint screen should be cleaned before laundering. Separate the load items and restart the dryer. 21 See "Installation Instructions." Exhaust vent or outside exhaust hood to START knob not pressed firmly or ...
... to vibrate. The four legs are too long Lint screen clogged with heavy metal or flexible metal vent. See "Installation Instructions." When balled up . In Canada www.whirlpool.ca If you may not have ventilation openings at the top and bottom of non-use. The Fluff Air cycle...clean exhaust system of lint or replace exhaust vent with lint. http://www.whirlpool.com/help - Lint screen should be cleaned before laundering. Separate the load items and restart the dryer. 21 See "Installation Instructions." Exhaust vent or outside exhaust hood to START knob not pressed firmly or ...

Use & Care Guide
Page 23
...United States or Canada and applies only when the major appliance is reported to Whirlpool within 30 days from the date of purchase. 6. Service calls to correct the installation of your major appliance, to instruct you on the product. Cosmetic damage, including scratches, dents, chips or other... air filters or water filters. Replacement parts or repair labor if this major appliance is used in accordance with Whirlpool published installation instructions. 10. Damage resulting from warranty coverage. 4. Some states and provinces do not allow the exclusion or limitation of God, improper...
...United States or Canada and applies only when the major appliance is reported to Whirlpool within 30 days from the date of purchase. 6. Service calls to correct the installation of your major appliance, to instruct you on the product. Cosmetic damage, including scratches, dents, chips or other... air filters or water filters. Replacement parts or repair labor if this major appliance is used in accordance with Whirlpool published installation instructions. 10. Damage resulting from warranty coverage. 4. Some states and provinces do not allow the exclusion or limitation of God, improper...
Dimension Guide
Page 1
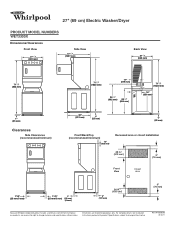
For complete details, see Installation Instructions packed with product. Ref. Specifications subject to change without notice. W10356098 02/2011 Dimensions are for planning purposes only. 27" (69 cm) Electric Washer/Dryer ... mm) Clearances Side Clearances (recommended/minimum) 32" (813 mm) 1" (25 mm) 1" (25 mm) Front/Back/Top (recommended/minimum) 12" (305 mm) Recessed area or closet installation 48 in.2 (310 cm2) 3" (76 mm) Front View Closet door 1"/0" (25 mm/0 mm) 1"/0" 1" (25 mm/0 mm) (25 mm) (Closet) 5" (127 mm) 24 in.2 (155 cm2...
For complete details, see Installation Instructions packed with product. Ref. Specifications subject to change without notice. W10356098 02/2011 Dimensions are for planning purposes only. 27" (69 cm) Electric Washer/Dryer ... mm) Clearances Side Clearances (recommended/minimum) 32" (813 mm) 1" (25 mm) 1" (25 mm) Front/Back/Top (recommended/minimum) 12" (305 mm) Recessed area or closet installation 48 in.2 (310 cm2) 3" (76 mm) Front View Closet door 1"/0" (25 mm/0 mm) 1"/0" 1" (25 mm/0 mm) (25 mm) (Closet) 5" (127 mm) 24 in.2 (155 cm2...


