Installation Instructions
Page 5
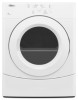
... appliance spacing should also be considered. Door open view: 481/8" (1238 mm) 471/8" (1197 mm) ■■ Additional spacing should be considered on sides and rear. ■■ Additional spacing should be considered for ease of installation and servicing. ■■ Additional clearances might be required for exhaust vent with elbow...
... appliance spacing should also be considered. Door open view: 481/8" (1238 mm) 471/8" (1197 mm) ■■ Additional spacing should be considered on sides and rear. ■■ Additional spacing should be considered for ease of installation and servicing. ■■ Additional clearances might be required for exhaust vent with elbow...
Installation Instructions
Page 10
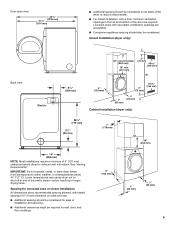
.... Finally, reinsert tab of terminal block cover into slot of dryer rear panel. Finally, reinsert tab of terminal block cover into slot of power supply cord to center terminal block screw (B). Connect remaining wires 2. Connect remaining wires 3-...
.... Finally, reinsert tab of terminal block cover into slot of dryer rear panel. Finally, reinsert tab of terminal block cover into slot of power supply cord to center terminal block screw (B). Connect remaining wires 2. Connect remaining wires 3-...

Installation Instructions
Page 12
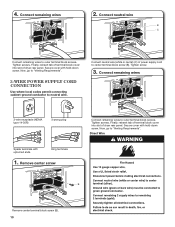
... outer covering. If using 3-wire cable with ground wire, cut bare wire even with hold-down screw. Remove center screw B Place hooked ends of dryer rear panel. Strip insulation back 1" (25 mm). Strip 31/2" (89 mm) of outer covering from end of terminal block (B). Prepare your 3-wire cable for direct connection...
... outer covering. If using 3-wire cable with ground wire, cut bare wire even with hold-down screw. Remove center screw B Place hooked ends of dryer rear panel. Strip insulation back 1" (25 mm). Strip 31/2" (89 mm) of outer covering from end of terminal block (B). Prepare your 3-wire cable for direct connection...
Installation Instructions
Page 13
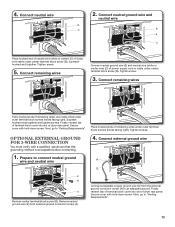
Tighten screw. 5. Finally, reinsert tab of terminal block cover into slot of dryer rear panel. Secure cover with hold -down screw. Remove neutral ground wire (E) from the external ground conductor screw (A) to connect neutral ground wire and ...of remaining direct wire cable wires under outer terminal block screws (hooks facing right). Finally, reinsert tab of terminal block cover into slot of dryer rear panel. Connect remaining wires Place hooked ends of remaining wires under outer terminal block screws (hooks facing right). Connect a separate copper ground wire (G)...
Tighten screw. 5. Finally, reinsert tab of terminal block cover into slot of dryer rear panel. Secure cover with hold -down screw. Remove neutral ground wire (E) from the external ground conductor screw (A) to connect neutral ground wire and ...of remaining direct wire cable wires under outer terminal block screws (hooks facing right). Finally, reinsert tab of terminal block cover into slot of dryer rear panel. Connect remaining wires Place hooked ends of remaining wires under outer terminal block screws (hooks facing right). Connect a separate copper ground wire (G)...
Installation Instructions
Page 15
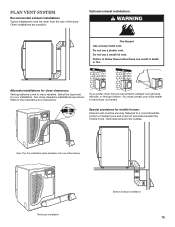
... through bottom. Two close clearances Venting systems come in death or fire. Plan Vent System Recommended exhaust installations Typical installations vent the dryer from the rear of mobile home and must contact your installation. Alternate installations for mobile homes: Exhaust vent must be converted to follow these instructions can result in...
... through bottom. Two close clearances Venting systems come in death or fire. Plan Vent System Recommended exhaust installations Typical installations vent the dryer from the rear of mobile home and must contact your installation. Alternate installations for mobile homes: Exhaust vent must be converted to follow these instructions can result in...
Owners Manual
Page 7
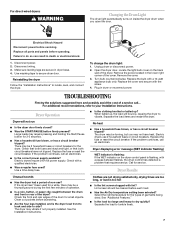
... flashing: If the WET indicator on the dryer control panel is the dryer level front to back and side to vibrate. Check the front and rear edges of the drum for 2-5 seconds. ■ Has a household fuse blown, or has a circuit breaker tripped? See the Installation Instructions. For ...dryer light automatically turns on inside the dryer drum when you may not have not tripped. Check with a pause between the drum and front or rear of garments being dried. No heat ■ Has a household fuse blown, or has a circuit breaker tripped? Clothes are not drying satisfactorily, ...
... flashing: If the WET indicator on the dryer control panel is the dryer level front to back and side to vibrate. Check the front and rear edges of the drum for 2-5 seconds. ■ Has a household fuse blown, or has a circuit breaker tripped? See the Installation Instructions. For ...dryer light automatically turns on inside the dryer drum when you may not have not tripped. Check with a pause between the drum and front or rear of garments being dried. No heat ■ Has a household fuse blown, or has a circuit breaker tripped? Clothes are not drying satisfactorily, ...
Owners Manual
Page 8
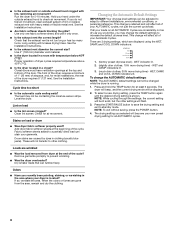
... Instructions. ■ Are fabric softener sheets blocking the grille? Cycle time too short ■ Is the automatic cycle ending early? Check for most installations, the rear of the dryer requires 5" (127 mm). Loads are wrinkled ■ Was the load removed from the area, rewash and dry the clothing. Remove garments promptly...
... Instructions. ■ Are fabric softener sheets blocking the grille? Cycle time too short ■ Is the automatic cycle ending early? Check for most installations, the rear of the dryer requires 5" (127 mm). Loads are wrinkled ■ Was the load removed from the area, rewash and dry the clothing. Remove garments promptly...