
Installation Guide
Page 4
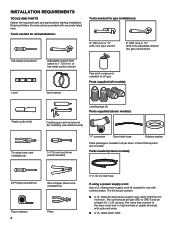
... needed (steam models): #2 Phillips screwdriver Wire stripper (direct wire installations) Tape measure 4 Pliers 5' (1.52 m) inlet hose If using a power supply cord: Use a UL listed power supply cord kit marked for gas connections) Flat-blade screwdriver Adjustable wrench that all models): Plastic putty knife Tin snips (new vent installations) Leveling legs... (203 mm) or 10" (254 mm) pipe wrench 8" (203 mm) or 10" (254 mm) adjustable wrench (for use with clothes dryers. The cord should contain: ■■ A UL listed 30-amp power supply cord, rated 120/240 volt minimum.
... needed (steam models): #2 Phillips screwdriver Wire stripper (direct wire installations) Tape measure 4 Pliers 5' (1.52 m) inlet hose If using a power supply cord: Use a UL listed power supply cord kit marked for gas connections) Flat-blade screwdriver Adjustable wrench that all models): Plastic putty knife Tin snips (new vent installations) Leveling legs... (203 mm) or 10" (254 mm) pipe wrench 8" (203 mm) or 10" (254 mm) adjustable wrench (for use with clothes dryers. The cord should contain: ■■ A UL listed 30-amp power supply cord, rated 120/240 volt minimum.
Installation Guide
Page 5
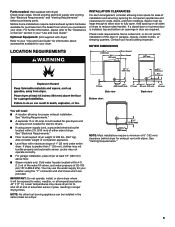
..." and "Venting Requirements" before purchasing parts. Optional Equipment: (Not supplied with elbow. If slope is installed, top and bottom air openings in your washer using power supply cord, a grounded electrical outlet located within 4 ft. (1.2 m) of the water fill valves, and water pressure of automatic sensor cycles, resulting in longer drying times. Also...
..." and "Venting Requirements" before purchasing parts. Optional Equipment: (Not supplied with elbow. If slope is installed, top and bottom air openings in your washer using power supply cord, a grounded electrical outlet located within 4 ft. (1.2 m) of the water fill valves, and water pressure of automatic sensor cycles, resulting in longer drying times. Also...
Installation Guide
Page 6
.... If the dryer is installed in your dealer. The kit should contain: ■■ A UL listed 30-amp power supply cord, rated 120/240 volt minimum. The cord should be type SRD or SRDT and be made in mobile homes to the neutral wire, see "Assistance or Service" section... to an individual branch circuit. The installation must determine the type of electrical connection you will be using a power supply cord: Use a UL listed power supply cord kit marked for use an extension cord. ■■ If codes permit and a separate ground wire is used when the appliance is installed with...
.... If the dryer is installed in your dealer. The kit should contain: ■■ A UL listed 30-amp power supply cord, rated 120/240 volt minimum. The cord should be type SRD or SRDT and be made in mobile homes to the neutral wire, see "Assistance or Service" section... to an individual branch circuit. The installation must determine the type of electrical connection you will be using a power supply cord: Use a UL listed power supply cord kit marked for use an extension cord. ■■ If codes permit and a separate ground wire is used when the appliance is installed with...
Installation Guide
Page 7
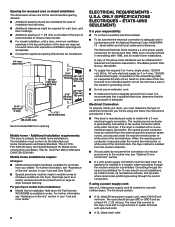
...on a separate 30-amp circuit, fused on both sides of dryer's final location. 4-wire receptacle (14-30R) If using a replacement power supply cord, it will reduce the risk of least resistance for electric current. A copy of NEMA Type 14-30 R. In the event of ...installer. ■■ To be insulated. ■■ 10-gauge solid copper wire (do not use Power Supply Cord Replacement Part Number 9831317. The cord is equipped with a CSA International Certified Power Cord intended to an individual branch circuit. ■■ This dryer is 5 ft. (1.52 m) long. ...
...on a separate 30-amp circuit, fused on both sides of dryer's final location. 4-wire receptacle (14-30R) If using a replacement power supply cord, it will reduce the risk of least resistance for electric current. A copy of NEMA Type 14-30 R. In the event of ...installer. ■■ To be insulated. ■■ 10-gauge solid copper wire (do not use Power Supply Cord Replacement Part Number 9831317. The cord is equipped with a CSA International Certified Power Cord intended to an individual branch circuit. ■■ This dryer is 5 ft. (1.52 m) long. ...
Installation Guide
Page 8
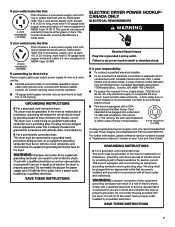
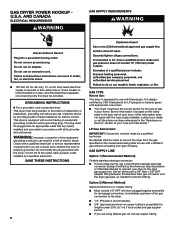
... or electrical shock. ■■ 120 Volt, 60 Hz, AC only, 15- GROUNDING INSTRUCTIONS I For a grounded, cord-connected dryer: This dryer must be grounded. The plug must be plugged into a grounded 3 prong outlet. SAVE THESE INSTRUCTIONS... Association or CSA International) to connect your gas company. Burner information is properly grounded. Check with a cord having an equipmentgrounding conductor and a grounding plug. Do not modify the plug provided with a different gas ... must have a proper outlet installed by a qualified technician. GAS DRYER POWER HOOKUP U.S.A.
... or electrical shock. ■■ 120 Volt, 60 Hz, AC only, 15- GROUNDING INSTRUCTIONS I For a grounded, cord-connected dryer: This dryer must be grounded. The plug must be plugged into a grounded 3 prong outlet. SAVE THESE INSTRUCTIONS... Association or CSA International) to connect your gas company. Burner information is properly grounded. Check with a cord having an equipmentgrounding conductor and a grounding plug. Do not modify the plug provided with a different gas ... must have a proper outlet installed by a qualified technician. GAS DRYER POWER HOOKUP U.S.A.

Installation Guide
Page 10
.... This connection may be used with the dryer cabinet and be in place. POWER SUPPLY CORD CONNECTION Power Supply Cord Strain Relief 1. MAKE ELECTRICAL CONNECTION - Only (EFFECTUER LE RACCORDEMENT ÉLECTRIQUE - ÉTATS-UNIS SEULEMENT) ELECTRICAL CONNECTION Power Supply Cord 2. Attach power supply cord strain relief Electrical Connection Options 1. The strain relief should have a tight fit with either...
.... This connection may be used with the dryer cabinet and be in place. POWER SUPPLY CORD CONNECTION Power Supply Cord Strain Relief 1. MAKE ELECTRICAL CONNECTION - Only (EFFECTUER LE RACCORDEMENT ÉLECTRIQUE - ÉTATS-UNIS SEULEMENT) ELECTRICAL CONNECTION Power Supply Cord 2. Attach power supply cord strain relief Electrical Connection Options 1. The strain relief should have a tight fit with either...

Installation Guide
Page 11
...." 11 Secure cover with upturned ends Ring terminals 1. Now, go to outer terminal block screws. Tighten screw. 3. Tighten screws. Power supply cord 3-wire receptacle (NEMA Type 10-30R): Go to external ground conductor screw (A). Reinstall ground conductor screw (A). Tighten screw. 4. Remove...ground wire (F) (green or bare) of dryer rear panel. If your outlet looks like this: Power supply cord 4-wire receptacle (NEMA Type 14-30R): Go to "4-Wire Power Supply Cord Connection". Connect remaining wires E B A Remove center terminal block screw (B). Finally, reinsert tab ...
...." 11 Secure cover with upturned ends Ring terminals 1. Now, go to outer terminal block screws. Tighten screw. 3. Tighten screws. Power supply cord 3-wire receptacle (NEMA Type 10-30R): Go to external ground conductor screw (A). Reinstall ground conductor screw (A). Tighten screw. 4. Remove...ground wire (F) (green or bare) of dryer rear panel. If your outlet looks like this: Power supply cord 4-wire receptacle (NEMA Type 14-30R): Go to "4-Wire Power Supply Cord Connection". Connect remaining wires E B A Remove center terminal block screw (B). Finally, reinsert tab ...

Installation Guide
Page 12
3-wire Power Supply Cord Connection Use where local codes permit connecting cabinet-ground conductor to outer terminal block screws. Secure cover with upturned ends Ring terminals 1. Remove center screw ... wires 3-wire receptacle (NEMA type 10-30R) 3-prong plug Spade terminals with hold-down screw. Finally, reinsert tab of terminal block cover into slot of power supply cord to "Venting Requirements."
3-wire Power Supply Cord Connection Use where local codes permit connecting cabinet-ground conductor to outer terminal block screws. Secure cover with upturned ends Ring terminals 1. Remove center screw ... wires 3-wire receptacle (NEMA type 10-30R) 3-prong plug Spade terminals with hold-down screw. Finally, reinsert tab of terminal block cover into slot of power supply cord to "Venting Requirements."

Installation Guide
Page 15
... terminal block screw (B). Tighten screw. Connect neutral ground wire and neutral wire E C B Connect neutral ground wire (E) and neutral wire (white or center wire) (C) of power supply cord or cable under outer terminal block screws (hooks facing right). Tighten screws. 4. Remove neutral ground wire (E) from the external ground conductor screw (A) to an adequate...
... terminal block screw (B). Tighten screw. Connect neutral ground wire and neutral wire E C B Connect neutral ground wire (E) and neutral wire (white or center wire) (C) of power supply cord or cable under outer terminal block screws (hooks facing right). Tighten screws. 4. Remove neutral ground wire (E) from the external ground conductor screw (A) to an adequate...

Installation Guide
Page 21
...first used. q If you live in the dryer. Do not select Air Only Temperature setting. q Dispose of/recycle all of your home power supply keeping the dryer's heater from turning on . q Remove film on dryer. For direct wire installation, turn on . This dryer ...runs an installation diagnostic routine at the start dryer. See "Troubleshooting." q Check that all parts are now installed. Electric Models: q For power supply cord installation, plug into an outlet and/or electrical supply is connected. • Household fuse is intact and tight, or circuit breaker has not...
...first used. q If you live in the dryer. Do not select Air Only Temperature setting. q Dispose of/recycle all of your home power supply keeping the dryer's heater from turning on . q Remove film on dryer. For direct wire installation, turn on . This dryer ...runs an installation diagnostic routine at the start dryer. See "Troubleshooting." q Check that all parts are now installed. Electric Models: q For power supply cord installation, plug into an outlet and/or electrical supply is connected. • Household fuse is intact and tight, or circuit breaker has not...
Use & Care Guide
Page 14
... Care Operate your inlet hose, record the date of time, you are at home. See "Cleaning the Lint Screen." 3. Unplug the power supply cord. 2. Steam models only: Shut off water faucet. 4. When replacing your dryer only when you should: 1. Turn on vacation or not... water faucet. 6. then drain the hose. Transport hose separately. 5. Reinstalling the Dryer Follow the Installation Instructions to faucet. Moving Care For power supply cord-connected dryers: 1. Periodically inspect and replace inlet hose if bulges, kinks, cuts, wear, or leaks are secure in dryer base. 8. ...
... Care Operate your inlet hose, record the date of time, you are at home. See "Cleaning the Lint Screen." 3. Unplug the power supply cord. 2. Steam models only: Shut off water faucet. 4. When replacing your dryer only when you should: 1. Turn on vacation or not... water faucet. 6. then drain the hose. Transport hose separately. 5. Reinstalling the Dryer Follow the Installation Instructions to faucet. Moving Care For power supply cord-connected dryers: 1. Periodically inspect and replace inlet hose if bulges, kinks, cuts, wear, or leaks are secure in dryer base. 8. ...
Use & Care Guide
Page 17
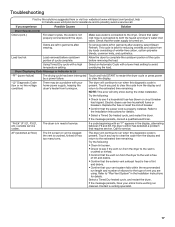
...Select a Timed Dry heated cycle, and restart the dryer. If the message persists, have your home power supply, keeping the dryer's heater from turning on . Check that the power cord is in garments after wearing, select Steam Refresh. Load too hot Load removed before removing the load....has blown or circuit breaker has tripped. Troubleshooting First try the solutions suggested here or visit our website at www.whirlpool.com/product_help In Canada www.whirlpool.ca for reducing wrinkles and odors from dry loads consisting of wrinkle-free cotton, cotton-polyester blends, common knits, ...
...Select a Timed Dry heated cycle, and restart the dryer. If the message persists, have your home power supply, keeping the dryer's heater from turning on . Check that the power cord is in garments after wearing, select Steam Refresh. Load too hot Load removed before removing the load....has blown or circuit breaker has tripped. Troubleshooting First try the solutions suggested here or visit our website at www.whirlpool.com/product_help In Canada www.whirlpool.ca for reducing wrinkles and odors from dry loads consisting of wrinkle-free cotton, cotton-polyester blends, common knits, ...


