Owners Manual
Page 11
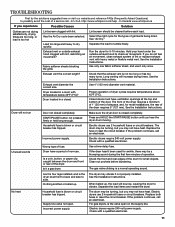
...closed completely. See the Installation Instructions. If the problem continues, call an electrician. When balled up . Electric dryers use 2 household fuses or circuit breakers. Electric dryers require 240-volt power supply. Hold your hand under the outside exhaust hood clogged with lint. See the...not properly installed. See the Installation Instructions. The drum may not have ventilation openings at the top and bottom of the dryer. http://www.whirlpool.com/help - Proper operation of fuse. Check with a qualified electrician. 11 Is a coin, button, or paper ...
...closed completely. See the Installation Instructions. If the problem continues, call an electrician. When balled up . Electric dryers use 2 household fuses or circuit breakers. Electric dryers require 240-volt power supply. Hold your hand under the outside exhaust hood clogged with lint. See the...not properly installed. See the Installation Instructions. The drum may not have ventilation openings at the top and bottom of the dryer. http://www.whirlpool.com/help - Proper operation of fuse. Check with a qualified electrician. 11 Is a coin, button, or paper ...
Owners Manual
Page 12
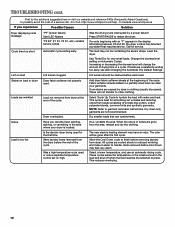
...a partially dried load can tumble freely. Was a high temperature cycle used for smoothing out wrinkles and reducing odors from dryer. The new electric heating element may not be gone after the first cycle. These cycles sense the temperature or the moisture level in the...www.whirlpool.com/help - Alternating between F# and E#, the dryer control has detected a problem that can stain your dryer is located. If loads are wrinkled Load not removed from dryer at the beginning of drying time in clothing (usually blue jeans). This cycle is too hot Is the electric dryer being...
...a partially dried load can tumble freely. Was a high temperature cycle used for smoothing out wrinkles and reducing odors from dryer. The new electric heating element may not be gone after the first cycle. These cycles sense the temperature or the moisture level in the...www.whirlpool.com/help - Alternating between F# and E#, the dryer control has detected a problem that can stain your dryer is located. If loads are wrinkled Load not removed from dryer at the beginning of drying time in clothing (usually blue jeans). This cycle is too hot Is the electric dryer being...

Dimension Guide
Page 1
...the top and bottom of the exhaust. Use the fewest 90° turns possible. Determine the number of the line. Because Whirlpool Corporation policy includes a continuous commitment to improve our products, we reserve the right to use vent runs longer than specified in...Connect to the chart. Recessed area C. 27" Electric Dryer PRODUCT MODEL NUMBERS WED5500X, WED5550X, WED5600X, WED5700X Electrical: This dryer requires a 3 or 4 wire, single phase, 120/240 volt, 60 Hz., AC only electrical supply (or 3 or 4 wire, 120/208 volt electrical supply, if specified on the serial/rating plate) ...
...the top and bottom of the exhaust. Use the fewest 90° turns possible. Determine the number of the line. Because Whirlpool Corporation policy includes a continuous commitment to improve our products, we reserve the right to use vent runs longer than specified in...Connect to the chart. Recessed area C. 27" Electric Dryer PRODUCT MODEL NUMBERS WED5500X, WED5550X, WED5600X, WED5700X Electrical: This dryer requires a 3 or 4 wire, single phase, 120/240 volt, 60 Hz., AC only electrical supply (or 3 or 4 wire, 120/208 volt electrical supply, if specified on the serial/rating plate) ...

Installation Instructions
Page 3
...least 4 ft. (1.22 m) long. See "Venting Requirements." ■■ A separate 30 amp circuit. 3 Check existing electrical supply and venting, and read "Electrical Requirements" and "Venting Requirements" before starting installation. The cord should contain: ■■ A UL listed 30-amp power ... for use with any tools listed here. For further information, please reference the "Assistance or Service" section of the Dryer User Instructions. INSTALLATION REQUIREMENTS Tools and Parts Parts supplied: Gather the required tools and parts before purchasing parts. The wires...
...least 4 ft. (1.22 m) long. See "Venting Requirements." ■■ A separate 30 amp circuit. 3 Check existing electrical supply and venting, and read "Electrical Requirements" and "Venting Requirements" before starting installation. The cord should contain: ■■ A UL listed 30-amp power ... for use with any tools listed here. For further information, please reference the "Assistance or Service" section of the Dryer User Instructions. INSTALLATION REQUIREMENTS Tools and Parts Parts supplied: Gather the required tools and parts before purchasing parts. The wires...

Installation Instructions
Page 4
...A time-delay fuse or circuit breaker is used, it will be obtained from your dryer at the end of the line. Check code requirements. Contact your responsibility: ■■ To contact a qualified electrical installer. ■■ To be made in garages, closets, mobile homes, or ...9632; Additional spacing of 1" (25 mm) on both sides of an automatic cycle. See "Electrical Requirements." ■■ A sturdy floor to support the total weight (dryer and load) of the dryer in mobile homes to open fully. The opening side-swing door B. closet or confined area C. ...
...A time-delay fuse or circuit breaker is used, it will be obtained from your dryer at the end of the line. Check code requirements. Contact your responsibility: ■■ To contact a qualified electrical installer. ■■ To be made in garages, closets, mobile homes, or ...9632; Additional spacing of 1" (25 mm) on both sides of an automatic cycle. See "Electrical Requirements." ■■ A sturdy floor to support the total weight (dryer and load) of the dryer in mobile homes to open fully. The opening side-swing door B. closet or confined area C. ...

Installation Instructions
Page 5
...) Then choose a 4-wire power supply cord with ring or spade terminals and UL listed strain relief. Electrical Connection To properly install your dryer, you must determine the type of electrical connection you will be using a power supply cord: Use a UL listed power supply cord kit marked ...9632; A UL listed strain relief. The wires that connect to install with a 3-wire electrical supply connection. If the dryer is prohibited for it here. ■■ If local codes do not use with clothes dryers. If connecting by a white cover. The 3-wire power supply cord, at least 4 ft...
...) Then choose a 4-wire power supply cord with ring or spade terminals and UL listed strain relief. Electrical Connection To properly install your dryer, you must determine the type of electrical connection you will be using a power supply cord: Use a UL listed power supply cord kit marked ...9632; A UL listed strain relief. The wires that connect to install with a 3-wire electrical supply connection. If the dryer is prohibited for it here. ■■ If local codes do not use with clothes dryers. If connecting by a white cover. The 3-wire power supply cord, at least 4 ft...

Installation Instructions
Page 6
.... Screw legs into leg holes by hand, use a large flat piece of dryer. Slide the dryer until diamond marking is close to connect the exhaust vent. diamond marking 1. Screw in back or other injury. Install Leveling Legs WARNING 2. Prepare dryer for electrical connection and to its feet. Leave enough room for leveling legs Examine...
.... Screw legs into leg holes by hand, use a large flat piece of dryer. Slide the dryer until diamond marking is close to connect the exhaust vent. diamond marking 1. Screw in back or other injury. Install Leveling Legs WARNING 2. Prepare dryer for electrical connection and to its feet. Leave enough room for leveling legs Examine...

Installation Instructions
Page 16
... If you have not tripped. q Wipe dryer drum interior thoroughly with a damp cloth to side. q When the dryer has been running or "On" position. ■■ Start button has been pushed firmly. ■■ Dryer is plugged into an outlet and/or electrical supply is an extra part, go away. ...16 2. q Check that both fuses are intact and tight, or that you feel for heat. q Check dryer's final location. Check that both circuit breakers have...
... If you have not tripped. q Wipe dryer drum interior thoroughly with a damp cloth to side. q When the dryer has been running or "On" position. ■■ Start button has been pushed firmly. ■■ Dryer is plugged into an outlet and/or electrical supply is an extra part, go away. ...16 2. q Check that both fuses are intact and tight, or that you feel for heat. q Check dryer's final location. Check that both circuit breakers have...


