Installation Guide
Page 2
TABLE OF CONTENTS DISHWASHER SAFETY 3 INSTALLATION REQUIREMENTS 4 Tools and Parts 4 Location Requirements 6 Product and Cabinet Opening Dimensions 7 Drain Requirements 8 Water Supply Requirements 8 Electrical Requirements 8 INSTALLATION INSTRUCTIONS 9 Prepare Cabinet Opening - New Utilities 9 Install Optional Moisture Barrier 9 ...
TABLE OF CONTENTS DISHWASHER SAFETY 3 INSTALLATION REQUIREMENTS 4 Tools and Parts 4 Location Requirements 6 Product and Cabinet Opening Dimensions 7 Drain Requirements 8 Water Supply Requirements 8 Electrical Requirements 8 INSTALLATION INSTRUCTIONS 9 Prepare Cabinet Opening - New Utilities 9 Install Optional Moisture Barrier 9 ...
Installation Guide
Page 4
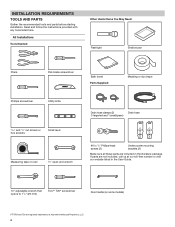
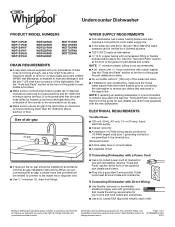
...(on some models) †®TORX and T20 are included in the literature package. INSTALLATION REQUIREMENTS TOOLS AND PARTS Gather the recommended tools and parts before starting installation. Read and follow the instructions provided with any tools listed here. All Installations Tools Needed:... Other Useful Items You May Need: Flashlight Shallow pan Pliers Flat-blade screwdriver Bath towel Parts Supplied: Masking or duct tape Phillips screwdriver Utility knife 5/16" and 1/4" nut drivers or hex sockets Small level Measuring tape ...
...(on some models) †®TORX and T20 are included in the literature package. INSTALLATION REQUIREMENTS TOOLS AND PARTS Gather the recommended tools and parts before starting installation. Read and follow the instructions provided with any tools listed here. All Installations Tools Needed:... Other Useful Items You May Need: Flashlight Shallow pan Pliers Flat-blade screwdriver Bath towel Parts Supplied: Masking or duct tape Phillips screwdriver Utility knife 5/16" and 1/4" nut drivers or hex sockets Small level Measuring tape ...
Installation Guide
Page 5
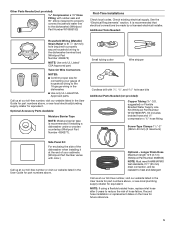
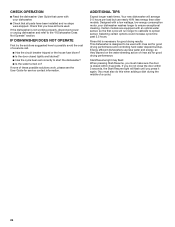
...: Household Wiring (Metallic) Strain Relief to fit 7/8" (22 mm) hole (required to properly secure household wiring to the dishwasher) (Whirlpool Part Number W10685193) First-Time Installations Check local codes. NOTE: If using a flexible braided hose, replace inlet hose after 5 years to reduce...and 90° elbow (required to properly connect household water line to the dishwasher terminal box) (Whirlpool Part Number 4396672) NOTE: Use only UL Listed/ CSA Approved part. Kit includes braided hose and 3/8" compression x 3/4" hose fitting. Check existing electrical supply. Longer Drain...
...: Household Wiring (Metallic) Strain Relief to fit 7/8" (22 mm) hole (required to properly secure household wiring to the dishwasher) (Whirlpool Part Number W10685193) First-Time Installations Check local codes. NOTE: If using a flexible braided hose, replace inlet hose after 5 years to reduce...and 90° elbow (required to properly connect household water line to the dishwasher terminal box) (Whirlpool Part Number 4396672) NOTE: Use only UL Listed/ CSA Approved part. Kit includes braided hose and 3/8" compression x 3/4" hose fitting. Check existing electrical supply. Longer Drain...
Installation Guide
Page 6
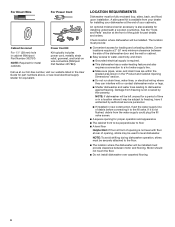
... access for metal cabinets Power Cord Kit Kit typically includes power cord, metallic strain relief, grommet, and twist-on wire connectors (Whirlpool Part Number 4317824). If it is not flushed, debris from freezing is available from your dealer for installing underneath a wooden countertop. A... side panel kit is not covered by authorized service personnel. ■■ If installed in cabinet (Whirlpool Part Number 302797) NOTE: Required for loading and unloading dishes. For Direct Wire For Power Cord Cabinet Grommet For 11/2" (38 mm)...
... access for metal cabinets Power Cord Kit Kit typically includes power cord, metallic strain relief, grommet, and twist-on wire connectors (Whirlpool Part Number 4317824). If it is not flushed, debris from freezing is available from your dealer for installing underneath a wooden countertop. A... side panel kit is not covered by authorized service personnel. ■■ If installed in cabinet (Whirlpool Part Number 302797) NOTE: Required for loading and unloading dishes. For Direct Wire For Power Cord Cabinet Grommet For 11/2" (38 mm)...
Installation Guide
Page 8
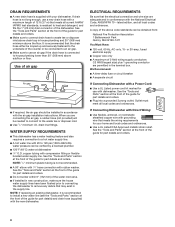
...or nonmetallic sheathed copper wire with grounding wire that meets the wiring requirements for use with the new dishwasher. Use of the guide for part details and orders. 8 ELECTRICAL REQUIREMENTS Be sure that the drain hose either be installed in house plumbing and 20" (508 mm) minimum... Cord: ■■ Use a UL Listed power cord kit marked for your dishwasher. copper tubing with rubber washer. See the "Tools and Parts" section at the front of the counter or be obtained from: National Fire Protection Association 1 Batterymarch Park Quincy, MA 02169-7471 You Must Have...
...or nonmetallic sheathed copper wire with grounding wire that meets the wiring requirements for use with the new dishwasher. Use of the guide for part details and orders. 8 ELECTRICAL REQUIREMENTS Be sure that the drain hose either be installed in house plumbing and 20" (508 mm) minimum... Cord: ■■ Use a UL Listed power cord kit marked for your dishwasher. copper tubing with rubber washer. See the "Tools and Parts" section at the front of the counter or be obtained from: National Fire Protection Association 1 Batterymarch Park Quincy, MA 02169-7471 You Must Have...
Installation Guide
Page 9
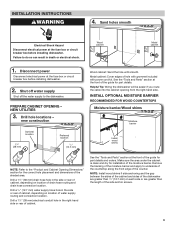
.... Remove the backing of the moisture barrier and apply to the "Product and Cabinet Opening Dimensions" section for installation of the guide for part details. INSTALLATION INSTRUCTIONS WARNING 4. Disconnect power Disconnect electrical power at the front of the moisture barrier. Drill a 11/2" (38 mm) ...Disconnect electrical power at the front of the shaded area. Failure to the dishwasher. Wood cabinet Metal cabinet 1. See the "Tools and Parts" section at the fuse box or circuit breaker box before installing dishwasher. 2. Make sure the area under the cabinet is clean and...
.... Remove the backing of the moisture barrier and apply to the "Product and Cabinet Opening Dimensions" section for installation of the guide for part details. INSTALLATION INSTRUCTIONS WARNING 4. Disconnect power Disconnect electrical power at the front of the moisture barrier. Drill a 11/2" (38 mm) ...Disconnect electrical power at the front of the shaded area. Failure to the dishwasher. Wood cabinet Metal cabinet 1. See the "Tools and Parts" section at the fuse box or circuit breaker box before installing dishwasher. 2. Make sure the area under the cabinet is clean and...
Installation Guide
Page 13
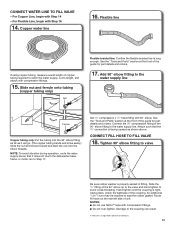
...with compression fittings. 15. Tighten 90° elbow fitting to avoid cross-threading. Hand tighten until the coupling is a registered trademark of the guide for part details and orders. For Flexible Line, begin with Step 14 - NOTES: ■■ Do not use Teflon®† tape with Step 16 14....the water supply line so that the 3/4" connection is properly seated in fitting. CONNECT FILL HOSE TO FILL VALVE 18. See the "Tools and Parts" section at the front of Chemours. 13 Copper water line 16. Route fill hose out the rear left side of the 90° elbow fitting...
...with compression fittings. 15. Tighten 90° elbow fitting to avoid cross-threading. Hand tighten until the coupling is a registered trademark of the guide for part details and orders. For Flexible Line, begin with Step 14 - NOTES: ■■ Do not use Teflon®† tape with Step 16 14....the water supply line so that the 3/4" connection is properly seated in fitting. CONNECT FILL HOSE TO FILL VALVE 18. See the "Tools and Parts" section at the front of Chemours. 13 Copper water line 16. Route fill hose out the rear left side of the 90° elbow fitting...

Installation Guide
Page 14
... onto connector POWER CORD CONNECTION NOTE: If removing a previous dishwasher with the power cord kit. Retain for part details and orders. 24. Install a UL Listed/CSA Approved metallic strain relief. See the "Tools and Parts" section at the front of the guide for later use. 23. Connect drain hose Small clamp Rubber... facing to the drain hose stop Using pliers, squeeze open the small drain hose clamp, and slide it does not touch dishwasher motor or lower part of the dishwasher. Power cord - NOTE: A maximum of the drain hose.
... onto connector POWER CORD CONNECTION NOTE: If removing a previous dishwasher with the power cord kit. Retain for part details and orders. 24. Install a UL Listed/CSA Approved metallic strain relief. See the "Tools and Parts" section at the front of the guide for later use. 23. Connect drain hose Small clamp Rubber... facing to the drain hose stop Using pliers, squeeze open the small drain hose clamp, and slide it does not touch dishwasher motor or lower part of the dishwasher. Power cord - NOTE: A maximum of the drain hose.
Installation Guide
Page 15
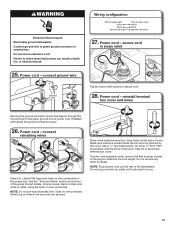
... nut driver, or Torx® T20® screwdriver, and the screw removed in death, fire, or electrical shock. 27. See the "Tools and Parts" section at the front of cover. Twist on wire connectors of the proper size. WARNING Wiring configuration Electrical Shock Hazard Electrically ground dishwasher. Make sure...wire Tighten strain relief screws to do so. Gently tug on wires to white, using the twist-on left side of the guide for part details. Connect ground wire to maximize the cord length. connect remaining wires Place wires inside the box and not pinched by the cover. NOTE...
... nut driver, or Torx® T20® screwdriver, and the screw removed in death, fire, or electrical shock. 27. See the "Tools and Parts" section at the front of cover. Twist on wire connectors of the proper size. WARNING Wiring configuration Electrical Shock Hazard Electrically ground dishwasher. Make sure...wire Tighten strain relief screws to do so. Gently tug on wires to white, using the twist-on left side of the guide for part details. Connect ground wire to maximize the cord length. connect remaining wires Place wires inside the box and not pinched by the cover. NOTE...
Installation Guide
Page 17
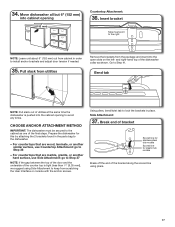
... bracket SSccoorree lliinnee ffoorr ppllaassttiicc ttuubb mmooddeellss Scored line for stainless steel tub models Scored line for this by attaching the 2 brackets found in the parts bag to lock the brackets in order to the cabinet as shown. For countertops that are marble, granite, or another similar surface, use Side Attachment...
... bracket SSccoorree lliinnee ffoorr ppllaassttiicc ttuubb mmooddeellss Scored line for stainless steel tub models Scored line for this by attaching the 2 brackets found in the parts bag to lock the brackets in order to the cabinet as shown. For countertops that are marble, granite, or another similar surface, use Side Attachment...
Installation Guide
Page 20
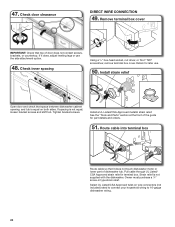
...Check that top of the guide for later use the side attachment option. 48. See the "Tools and Parts" section at the front of door does not contact screws, brackets, or countertop. Retain for part details and orders. 51. Install a UL Listed/CSA Approved metallic strain relief. 47. If it does... not touch dishwasher motor or lower part of dishwasher tub. Check inner spacing Using a 1/4" hex-head socket, nut driver, or Torx® T20® screwdriver, remove terminal box cover. If ...
...Check that top of the guide for later use the side attachment option. 48. See the "Tools and Parts" section at the front of door does not contact screws, brackets, or countertop. Retain for part details and orders. 51. Install a UL Listed/CSA Approved metallic strain relief. 47. If it does... not touch dishwasher motor or lower part of dishwasher tub. Check inner spacing Using a 1/4" hex-head socket, nut driver, or Torx® T20® screwdriver, remove terminal box cover. If ...
Installation Guide
Page 21
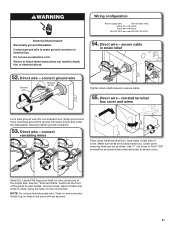
...death, fire, or electrical shock. 54. Gently tug on wires to white, using the twist-on left side of the guide for part details. Do not use an extension cord. connect ground wire Ground wire Ground screw Tighten strain relief screws to green ground connector in ...strain relief 52. Securely tighten ground connector. 53. Direct wire - Insert tabs on wire connectors. See the "Tools and Parts" section at the front of cover. WARNING Wiring configuration Electrical Shock Hazard Electrically ground dishwasher. Wrap ground wire hook clockwise around the ground ...
...death, fire, or electrical shock. 54. Gently tug on wires to white, using the twist-on left side of the guide for part details. Do not use an extension cord. connect ground wire Ground wire Ground screw Tighten strain relief screws to green ground connector in ...strain relief 52. Securely tighten ground connector. 53. Direct wire - Insert tabs on wire connectors. See the "Tools and Parts" section at the front of cover. WARNING Wiring configuration Electrical Shock Hazard Electrically ground dishwasher. Wrap ground wire hook clockwise around the ground ...

Installation Guide
Page 24
... hose clamp Rubber hose connector Drain hose COMPLETE INSTALLATION Check that the power supply wire or cord does not touch dishwasher motor or the lower part of drain hose to complete the shortest wash cycle. Power supply cord - Connect rubber end of the dishwasher tub. 1 Rubber end...
... hose clamp Rubber hose connector Drain hose COMPLETE INSTALLATION Check that the power supply wire or cord does not touch dishwasher motor or the lower part of drain hose to complete the shortest wash cycle. Power supply cord - Connect rubber end of the dishwasher tub. 1 Rubber end...
Installation Guide
Page 26
... with a low wattage, low energy consumption motor, your dishwasher. ■■ Check that you have been installed and no steps were skipped. Check that all parts have all tools used with an optical water sensor, so the first cycle will flash until you do not close the door within 3 seconds. Certain...
... with a low wattage, low energy consumption motor, your dishwasher. ■■ Check that you have been installed and no steps were skipped. Check that all parts have all tools used with an optical water sensor, so the first cycle will flash until you do not close the door within 3 seconds. Certain...
Dimension Guide
Page 1
...to heat and detergent, and fits the 1" (25 mm) drain connector of the counter or be installed in the terminal box. Because Whirlpool Corporation policy includes a continuous commitment to improve our products, we reserve the right to 862 kPa) water pressure can be verified by a...) minimum above subfloor or floor. Specifications subject to the waste tee or disposer inlet. ■■ Use 1/2" minimum I.D. See the "Tools and Parts" section at dishwasher ■■ 3/8" O.D. copper tubing with rubber washer. NOTE: If replacing an existing dishwasher, it is recommended to install a ...
...to heat and detergent, and fits the 1" (25 mm) drain connector of the counter or be installed in the terminal box. Because Whirlpool Corporation policy includes a continuous commitment to improve our products, we reserve the right to 862 kPa) water pressure can be verified by a...) minimum above subfloor or floor. Specifications subject to the waste tee or disposer inlet. ■■ Use 1/2" minimum I.D. See the "Tools and Parts" section at dishwasher ■■ 3/8" O.D. copper tubing with rubber washer. NOTE: If replacing an existing dishwasher, it is recommended to install a ...


