
Use & Care Guide
Page 7
... ensure no rings or spots on top of the cycle. Heavier cycles and options affect cycle length. Push door firmly closed. Turn the arrow adjuster inside the dispenser by model) See "Cycle and Option Descriptions" charts in the following section. arrow and turning. max - - --- --- - - -- Lock fill - -- 6 5 4 -- - --- Turn off . The door latches...
... ensure no rings or spots on top of the cycle. Heavier cycles and options affect cycle length. Push door firmly closed. Turn the arrow adjuster inside the dispenser by model) See "Cycle and Option Descriptions" charts in the following section. arrow and turning. max - - --- --- - - -- Lock fill - -- 6 5 4 -- - --- Turn off . The door latches...

Use & Care Guide
Page 11
in the door: 1. Grasp the tip of lower rack can be hung on the door, the bottom rack, or placed inside the bottom rack. To open the ANYWARE™ PLUS silverware basket: To unlock, grasp the front panel, pull up and rotate 90° as cups, .... 2. To move left -hand and right-hand sides of items may have some or all the way before closing the dishwasher door. Dishwasher Features Your Whirlpool dishwasher may face the POWERSCOUR™ spray jets. POWERSCOUR™ Wash Area The POWERSCOUR™ wash area is completely locked into place. Gently push the...
in the door: 1. Grasp the tip of lower rack can be hung on the door, the bottom rack, or placed inside the bottom rack. To open the ANYWARE™ PLUS silverware basket: To unlock, grasp the front panel, pull up and rotate 90° as cups, .... 2. To move left -hand and right-hand sides of items may have some or all the way before closing the dishwasher door. Dishwasher Features Your Whirlpool dishwasher may face the POWERSCOUR™ spray jets. POWERSCOUR™ Wash Area The POWERSCOUR™ wash area is completely locked into place. Gently push the...
Installation Instructions
Page 7
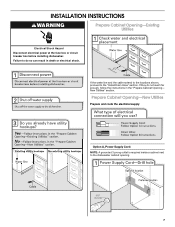
... death or electrical shock. Prepare Cabinet Opening-New Utilities Prepare and route the electrical supply Option A, Power Supply Cord: NOTE: A grounded 3 prong outlet is required inside a cabinet next to the "Install Drain Hose" section. New Utilities" section. If the water line and the cable extend to the locations shown, proceed to...
... death or electrical shock. Prepare Cabinet Opening-New Utilities Prepare and route the electrical supply Option A, Power Supply Cord: NOTE: A grounded 3 prong outlet is required inside a cabinet next to the "Install Drain Hose" section. New Utilities" section. If the water line and the cable extend to the locations shown, proceed to...

Installation Instructions
Page 14
... to do so. 14 Visit www.whirlpool.com/electrical under FAQ tab. NOTE: Do not pre-twist stranded wire. NOTE: Do not plug into outlet until instructed to green ground connector in death, fire, or electrical shock. Place wires inside box. Close cover ensuring wires are tucked inside terminal box. WARNING Connect wires...
... to do so. 14 Visit www.whirlpool.com/electrical under FAQ tab. NOTE: Do not pre-twist stranded wire. NOTE: Do not plug into outlet until instructed to green ground connector in death, fire, or electrical shock. Place wires inside box. Close cover ensuring wires are tucked inside terminal box. WARNING Connect wires...

Installation Instructions
Page 21
... and side-to-side in Cabinet Opening If needed, see website for animated representation of dishwasher. Secure Dishwasher in cabinet opening. Place wires inside box. Tighten strain relief screws to secure cover. Make sure wires are securing the dishwasher. Open dishwasher door, remove lower dish rack, .... Connect wires black to black and white to white, using UL Listed/CSA Approved twist-on left side of dishwasher. 21 Visit www.whirlpool.com/electrical under FAQ tab. This will keep screws from falling into bottom of cover. Insert tabs on wire connectors (not included). Use...
... and side-to-side in Cabinet Opening If needed, see website for animated representation of dishwasher. Secure Dishwasher in cabinet opening. Place wires inside box. Tighten strain relief screws to secure cover. Make sure wires are securing the dishwasher. Open dishwasher door, remove lower dish rack, .... Connect wires black to black and white to white, using UL Listed/CSA Approved twist-on left side of dishwasher. 21 Visit www.whirlpool.com/electrical under FAQ tab. This will keep screws from falling into bottom of cover. Insert tabs on wire connectors (not included). Use...


