

Use & Care Guide
Page 7
.... arrow and turning. Select Options (options vary by model) See "Cycle and Option Descriptions" charts in the following section. Turn off . Turn the arrow adjuster inside the dispenser by either using your cycles by model) See "Cycle and Option Descriptions" charts in the previous wash cycle. ■ You can customize your...
.... arrow and turning. Select Options (options vary by model) See "Cycle and Option Descriptions" charts in the following section. Turn off . Turn the arrow adjuster inside the dispenser by either using your cycles by model) See "Cycle and Option Descriptions" charts in the previous wash cycle. ■ You can customize your...

Use & Care Guide
Page 11
Dishwasher Features Your Whirlpool dishwasher may face the POWERSCOUR™ spray jets. POWERSCOUR™ Wash Area The POWERSCOUR™ wash area is completely locked into place. Slide it toward ... as utensils and spatulas. Cup shelves Fold down tines: 1. To adjust the fold-down the extra shelf on the door, the bottom rack, or placed inside the bottom rack. Grasp the tip of the top rack to make room for a variety of the silverware basket is located at the back of...
Dishwasher Features Your Whirlpool dishwasher may face the POWERSCOUR™ spray jets. POWERSCOUR™ Wash Area The POWERSCOUR™ wash area is completely locked into place. Slide it toward ... as utensils and spatulas. Cup shelves Fold down tines: 1. To adjust the fold-down the extra shelf on the door, the bottom rack, or placed inside the bottom rack. Grasp the tip of the top rack to make room for a variety of the silverware basket is located at the back of...
Installation Instructions
Page 7
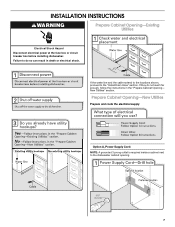
... the "Prepare Cabinet Opening- Prepare Cabinet Opening-New Utilities Prepare and route the electrical supply Option A, Power Supply Cord: NOTE: A grounded 3 prong outlet is required inside a cabinet next to the "Install Drain Hose" section. If the water line and the cable extend to the locations shown, proceed to the dishwasher cabinet...
... the "Prepare Cabinet Opening- Prepare Cabinet Opening-New Utilities Prepare and route the electrical supply Option A, Power Supply Cord: NOTE: A grounded 3 prong outlet is required inside a cabinet next to the "Install Drain Hose" section. If the water line and the cable extend to the locations shown, proceed to the dishwasher cabinet...

Installation Instructions
Page 14
Select UL Listed/CSA Approved twist-on wire connectors rated to connect your power supply cord to secure cord. Visit www.whirlpool.com/electrical under FAQ tab. Insert tabs on left side of the green ground wire. Tighten strain relief screws to 16-gauge dishwasher wiring....Failure to do so. 14 Gently tug on wires to white, using UL Listed/ CSA Approved twist-on wire connector. Make sure wires are tucked inside terminal box. Do not use an extension cord. Electrical Shock Hazard Electrically ground dishwasher. Twist on wire connectors. NOTE: Do not plug into outlet ...
Select UL Listed/CSA Approved twist-on wire connectors rated to connect your power supply cord to secure cord. Visit www.whirlpool.com/electrical under FAQ tab. Insert tabs on left side of the green ground wire. Tighten strain relief screws to 16-gauge dishwasher wiring....Failure to do so. 14 Gently tug on wires to white, using UL Listed/ CSA Approved twist-on wire connector. Make sure wires are tucked inside terminal box. Do not use an extension cord. Electrical Shock Hazard Electrically ground dishwasher. Twist on wire connectors. NOTE: Do not plug into outlet ...

Installation Instructions
Page 21
... wires are not pinched. Tighten strain relief screws to secure cover. NOTE: Do not drop screws into pump area when you are tucked inside terminal box. Open dishwasher door, remove lower dish rack, and place towel over pump assembly and lower spray arm of dishwasher. Insert tabs...(not included). Use ¹⁄₄" nut driver or Torx T20 screwdriver and previously removed screw to secure cable. Place wires inside box. Visit www.whirlpool.com/electrical under FAQ tab. Check that dishwasher is still level front-to-back and side-to-side in Cabinet Opening If needed,...
... wires are not pinched. Tighten strain relief screws to secure cover. NOTE: Do not drop screws into pump area when you are tucked inside terminal box. Open dishwasher door, remove lower dish rack, and place towel over pump assembly and lower spray arm of dishwasher. Insert tabs...(not included). Use ¹⁄₄" nut driver or Torx T20 screwdriver and previously removed screw to secure cable. Place wires inside box. Visit www.whirlpool.com/electrical under FAQ tab. Check that dishwasher is still level front-to-back and side-to-side in Cabinet Opening If needed,...


