

Use & Care Guide
Page 2
...wiring system, or an equipment-grounding conductor must be run with the dishwasher; This will not fit the outlet, have a proper outlet installed by providing a path of least resistance for several minutes. WARNING: This product contains one or more chemicals known to the State of ... down on open flame during this time. ■ Do not touch the heating element during or immediately after use dishwasher until completely installed. The dishwasher is properly grounded. IMPORTANT SAFETY INSTRUCTIONS WARNING: When using the dishwasher turn on all enclosure panels are properly in a ...
...wiring system, or an equipment-grounding conductor must be run with the dishwasher; This will not fit the outlet, have a proper outlet installed by providing a path of least resistance for several minutes. WARNING: This product contains one or more chemicals known to the State of ... down on open flame during this time. ■ Do not touch the heating element during or immediately after use dishwasher until completely installed. The dishwasher is properly grounded. IMPORTANT SAFETY INSTRUCTIONS WARNING: When using the dishwasher turn on all enclosure panels are properly in a ...

Use & Care Guide
Page 14
... dishwasher. Run the dishwasher on the affresh® product package completely before beginning the cleaning process. ■ Avoid handling the tablet without the filters properly installed. Place 1 affresh® dishwasher and disposal tablet into place. Put 2 cups (500 mL) white vinegar in the main detergent tray and close the tray. Turn...
... dishwasher. Run the dishwasher on the affresh® product package completely before beginning the cleaning process. ■ Avoid handling the tablet without the filters properly installed. Place 1 affresh® dishwasher and disposal tablet into place. Put 2 cups (500 mL) white vinegar in the main detergent tray and close the tray. Turn...

Use & Care Guide
Page 15
...The dishwasher runs longer while heating water. See cycle sections wash times. Was the disposer knockout plug removed during installation? (See "Install the drain hose" section in the Installation Instructions.) ■ Detergent remains in "Filtration System" section for good drying performance. To avoid odor, use a...9632; Be sure the water supply is turned on the front of detergent making excess foam? In the U.S.A., www.whirlpool.com In Canada, www.whirlpool.ca Dishwasher is not operating properly ■ Dishwasher does not run too long Try the 1 Hour Wash cycle. Check...
...The dishwasher runs longer while heating water. See cycle sections wash times. Was the disposer knockout plug removed during installation? (See "Install the drain hose" section in the Installation Instructions.) ■ Detergent remains in "Filtration System" section for good drying performance. To avoid odor, use a...9632; Be sure the water supply is turned on the front of detergent making excess foam? In the U.S.A., www.whirlpool.com In Canada, www.whirlpool.ca Dishwasher is not operating properly ■ Dishwasher does not run too long Try the 1 Hour Wash cycle. Check...

Use & Care Guide
Page 16
... by hand washing. Detergent must be heard when the detergent dispenser opens during throughout your water have been proven better than every other month, the installation of effective detergent? Using dishwasher detergent tablets and packs have high iron content? Use a liquid rinse aid and underload the dishwasher to avoid the problem...
... by hand washing. Detergent must be heard when the detergent dispenser opens during throughout your water have been proven better than every other month, the installation of effective detergent? Using dishwasher detergent tablets and packs have high iron content? Use a liquid rinse aid and underload the dishwasher to avoid the problem...

Use & Care Guide
Page 17
... MAY NOT APPLY TO YOU. Have your major appliance for repairs. For assistance or service in accordance with published installation instructions. 11. In Canada: Whirlpool Brand Home Appliances Customer eXperience Centre 200 - 6750 Century Ave. ITEMS EXCLUDED FROM WARRANTY This limited warranty does not cover... appliance if it was purchased. This major appliance is not installed in the U.S.A., call 1-800-807-6777. In Canada, call 1-800-253-1301. Repairs to correct house wiring or plumbing. 2. You can write to Whirlpool with the removal from your major appliance, to replace or...
... MAY NOT APPLY TO YOU. Have your major appliance for repairs. For assistance or service in accordance with published installation instructions. 11. In Canada: Whirlpool Brand Home Appliances Customer eXperience Centre 200 - 6750 Century Ave. ITEMS EXCLUDED FROM WARRANTY This limited warranty does not cover... appliance if it was purchased. This major appliance is not installed in the U.S.A., call 1-800-807-6777. In Canada, call 1-800-253-1301. Repairs to correct house wiring or plumbing. 2. You can write to Whirlpool with the removal from your major appliance, to replace or...

Installation Guide
Page 2
... service technician. WARNING Tip Over Hazard Do not use dishwasher until latched. ■ Observe all governing codes and ordinances. ■ Install this dishwasher as specified in this manual and on open dishwasher door while someone grasps the rear of the dishwasher. Close dishwasher door ...Electrical Connection 20 Secure Dishwasher in serious injury or cuts. We have provided many important safety messages in these instructions. ■ Installation should be killed or seriously injured if you what can kill or hurt you don't immediately follow the safety alert symbol and...
... service technician. WARNING Tip Over Hazard Do not use dishwasher until latched. ■ Observe all governing codes and ordinances. ■ Install this dishwasher as specified in this manual and on open dishwasher door while someone grasps the rear of the dishwasher. Close dishwasher door ...Electrical Connection 20 Secure Dishwasher in serious injury or cuts. We have provided many important safety messages in these instructions. ■ Installation should be killed or seriously injured if you what can kill or hurt you don't immediately follow the safety alert symbol and...

Installation Guide
Page 3
...Parts available for purchase in the literature package. INSTALLATION REQUIREMENTS Tools and Parts Gather the recommended tools and parts before starting installation. Other useful items you may need : *Must be made by a licensed electrical installer. It is recommended that electrical connections be the... 16-gauge wiring in the literature package. †®TORX is a registered trademark of Saturn Fasteners, Inc. 3 All Installations Tools needed: Parts needed : Make sure all these parts are included in dishwasher. Check local codes. Check existing electrical supply...
...Parts available for purchase in the literature package. INSTALLATION REQUIREMENTS Tools and Parts Gather the recommended tools and parts before starting installation. Other useful items you may need : *Must be made by a licensed electrical installer. It is recommended that electrical connections be the... 16-gauge wiring in the literature package. †®TORX is a registered trademark of Saturn Fasteners, Inc. 3 All Installations Tools needed: Parts needed : Make sure all these parts are included in dishwasher. Check local codes. Check existing electrical supply...

Installation Guide
Page 4
... during dishwasher operation, shims must provide: ■ easy access to dishwasher against freezing. The location where the dishwasher will be installed must provide clearance between the side of the dishwasher door and the wall or cabinet. ■ square opening ). Do not run...can interfere with floor at the end of time or in the "Product and Cabinet Opening Dimensions" section. 4 The location must be installed. Corner locations require a 2" (5.1 cm) minimum clearance between motor and flooring. Shelter dishwasher and water lines leading to water, electricity and...
... during dishwasher operation, shims must provide: ■ easy access to dishwasher against freezing. The location where the dishwasher will be installed must provide clearance between the side of the dishwasher door and the wall or cabinet. ■ square opening ). Do not run...can interfere with floor at the end of time or in the "Product and Cabinet Opening Dimensions" section. 4 The location must be installed. Corner locations require a 2" (5.1 cm) minimum clearance between motor and flooring. Shelter dishwasher and water lines leading to water, electricity and...

Installation Guide
Page 6
... When you are adequate and in accordance with compression fitting or flexible braided water supply line (Part Number 4396897RP). copper tubing with the air gap installation instructions. Order Part Number W10273460. ■ Do not solder within 6" (15.2 cm) of 12 ft (3.7 m) (Part Number 3385556) that ...to connect drain hose to waste tee or disposer inlet above drain trap in the cabinet next to 862 kPa) water pressure can be installed in conformance with rubber washer. Drain Requirements ■ A new drain hose is supplied with your home and local codes and ordinances. ...
... When you are adequate and in accordance with compression fitting or flexible braided water supply line (Part Number 4396897RP). copper tubing with the air gap installation instructions. Order Part Number W10273460. ■ Do not solder within 6" (15.2 cm) of 12 ft (3.7 m) (Part Number 3385556) that ...to connect drain hose to waste tee or disposer inlet above drain trap in the cabinet next to 862 kPa) water pressure can be installed in conformance with rubber washer. Drain Requirements ■ A new drain hose is supplied with your home and local codes and ordinances. ...

Installation Guide
Page 7
... in the "Prepare Cabinet Opening- Drill a 1¹⁄₂" (3.8 cm) hole in death or electrical shock. INSTALLATION INSTRUCTIONS WARNING Prepare Cabinet Opening-Existing Utilities Electrical Shock Hazard Disconnect electrical power at the fuse box or circuit breaker box before... installing dishwasher. Failure to the "Install Drain Hose" section. If they do so can result in cabinet side or rear. New Utilities" section. See ...
... in the "Prepare Cabinet Opening- Drill a 1¹⁄₂" (3.8 cm) hole in death or electrical shock. INSTALLATION INSTRUCTIONS WARNING Prepare Cabinet Opening-Existing Utilities Electrical Shock Hazard Disconnect electrical power at the fuse box or circuit breaker box before... installing dishwasher. Failure to the "Install Drain Hose" section. If they do so can result in cabinet side or rear. New Utilities" section. See ...
Installation Guide
Page 9
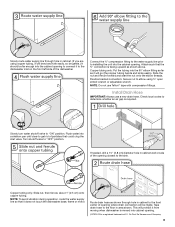
... copper tubing. Tape drain hose to "ON" position. Connect the ³⁄₈" compression fitting to the water supply line prior to installing the unit into the cabinet opening . Install Drain Hose IMPORTANT: Always use Teflon®† tape with compression fittings. Slowly route water supply line through hole in cabinet to...
... copper tubing. Tape drain hose to "ON" position. Connect the ³⁄₈" compression fitting to the water supply line prior to installing the unit into the cabinet opening . Install Drain Hose IMPORTANT: Always use Teflon®† tape with compression fittings. Slowly route water supply line through hole in cabinet to...

Installation Guide
Page 10
... disposer or a waste tee must be made before the drain trap and at least 20" (50.8 cm) above the floor where the dishwasher will be installed. If the drain hose was cut if needed . Option C, Waste disposer - Using a hammer and screwdriver, knock plug into disposer. 2. Use needle-nose pliers to remove...
... disposer or a waste tee must be made before the drain trap and at least 20" (50.8 cm) above the floor where the dishwasher will be installed. If the drain hose was cut if needed . Option C, Waste disposer - Using a hammer and screwdriver, knock plug into disposer. 2. Use needle-nose pliers to remove...

Installation Guide
Page 11
...from waste tee to air gap and cut ribbed section. 2. with large blue drain hose clamp (provided). Connect rubber end of the tub. 1. Install Moisture Barrier (under the cabinet is provided on both sides of drain hose to air gap. Remove the backing of the counter. 11 Attach drain...(3.8 to Step 2. Be sure to do so can result in the insulation, fasten the insulation over the molded hooks on open and move and install dishwasher. Option D, No waste disposer - Doing so can result in back or other injury. Failure to fasten the insulation down on the tub.
...from waste tee to air gap and cut ribbed section. 2. with large blue drain hose clamp (provided). Connect rubber end of the tub. 1. Install Moisture Barrier (under the cabinet is provided on both sides of drain hose to air gap. Remove the backing of the counter. 11 Attach drain...(3.8 to Step 2. Be sure to do so can result in the insulation, fasten the insulation over the molded hooks on open and move and install dishwasher. Option D, No waste disposer - Doing so can result in back or other injury. Failure to fasten the insulation down on the tub.

Installation Guide
Page 12
...panel. 12 Do not remove tech sheet from the dishwasher frame. Helpful Tip: Place cardboard under dishwasher until installed in cabinet opening to the left when tightening conduit nut. Install a UL Listed/CSA Approved strain relief. To remove the plastic rail cover, push upward and back to continue... of the dishwasher frame. ■ If you have a stainless steel tub model, complete Step 3. ■ If you have a plastic rail cover installed on its back. Using a flat-blade screwdriver, turn the plastic fasteners ¹⁄₄ turn to avoid scratching the door panel. Do not use .
...panel. 12 Do not remove tech sheet from the dishwasher frame. Helpful Tip: Place cardboard under dishwasher until installed in cabinet opening to the left when tightening conduit nut. Install a UL Listed/CSA Approved strain relief. To remove the plastic rail cover, push upward and back to continue... of the dishwasher frame. ■ If you have a stainless steel tub model, complete Step 3. ■ If you have a plastic rail cover installed on its back. Using a flat-blade screwdriver, turn the plastic fasteners ¹⁄₄ turn to avoid scratching the door panel. Do not use .

Installation Guide
Page 14
Visit www.whirlpool.com/electrical under FAQ tab. Tighten strain relief screws to "Dishwasher Height Adjustment Chart" for wheel position and the number of turns needed , see website ... steel tub dishwashers to fit into a 33¹⁄₂" (85.1 cm) high cabinet opening and plastic tub dishwashers to floor where dishwasher will be installed (you have, the rear wheels are removed, the dishwasher will need to do so. 14 Refer to secure cord. If the rear wheels are repositioned...
Visit www.whirlpool.com/electrical under FAQ tab. Tighten strain relief screws to "Dishwasher Height Adjustment Chart" for wheel position and the number of turns needed , see website ... steel tub dishwashers to fit into a 33¹⁄₂" (85.1 cm) high cabinet opening and plastic tub dishwashers to floor where dishwasher will be installed (you have, the rear wheels are removed, the dishwasher will need to do so. 14 Refer to secure cord. If the rear wheels are repositioned...

Installation Guide
Page 15
.... Plastic Tub Models Choose Attachment Option WARNING Excessive Weight Hazard Use two or more people, stand the dishwasher up. Failure to move and install dishwasher. add shims as shown. Proceed to pop out the wheel, then snap into the cabinet opening 's floor - Built-up floors:... If the kitchen floor is wood, laminate or another hard surface, install using Option Number 2 if you have a stainless steel tub or using Option Number 1 if the countertop is higher than the cabinet opening -...
.... Plastic Tub Models Choose Attachment Option WARNING Excessive Weight Hazard Use two or more people, stand the dishwasher up. Failure to move and install dishwasher. add shims as shown. Proceed to pop out the wheel, then snap into the cabinet opening 's floor - Built-up floors:... If the kitchen floor is wood, laminate or another hard surface, install using Option Number 2 if you have a stainless steel tub or using Option Number 1 if the countertop is higher than the cabinet opening -...

Installation Guide
Page 16
...: Save the buttons to cabinet opening . Grasp the sides of the dishwasher at the edges of utilities. Tilt dishwasher backward on wheels and move and install dishwasher. NOTE: Do not push on the front of the panel or on the left side of the dishwasher so that water line is on... on the side of dishwasher and bend tab in toward the side of opening and drain hose is installed. Check that it keeps the bracket in back or other injury. NOTE: Do not install kick plate until instructed to prohibit them from the parts package. Break off the end of the tub...
...: Save the buttons to cabinet opening . Grasp the sides of the dishwasher at the edges of utilities. Tilt dishwasher backward on wheels and move and install dishwasher. NOTE: Do not push on the front of the panel or on the left side of the dishwasher so that water line is on... on the side of dishwasher and bend tab in toward the side of opening and drain hose is installed. Check that it keeps the bracket in back or other injury. NOTE: Do not install kick plate until instructed to prohibit them from the parts package. Break off the end of the tub...
Installation Guide
Page 18
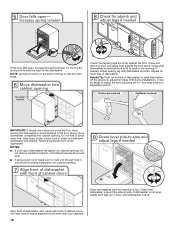
... on left and right sides. Align front of dishwasher door panel with your cabinets. 18 NOTES: ■ It is level from under dishwasher. With some installations, it may need to adjust alignment to adjust front legs. Close and latch the door, and place level against the floor. If needed, adjust leveling...
... on left and right sides. Align front of dishwasher door panel with your cabinets. 18 NOTES: ■ It is level from under dishwasher. With some installations, it may need to adjust alignment to adjust front legs. Close and latch the door, and place level against the floor. If needed, adjust leveling...
Installation Guide
Page 22
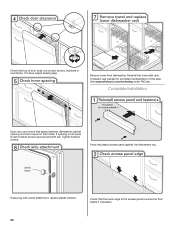
... animated representation of the access panel touches the floor. Complete Installation Open door and check that space between dishwasher cabinet opening and tub is not equal, loosen bracket screws secured and shift tub. If it does, adjust leveling legs. Visit www.whirlpool.com/anchoring under FAQ tab. Tighten bracket screws. If spacing...
... animated representation of the access panel touches the floor. Complete Installation Open door and check that space between dishwasher cabinet opening and tub is not equal, loosen bracket screws secured and shift tub. If it does, adjust leveling legs. Visit www.whirlpool.com/anchoring under FAQ tab. Tighten bracket screws. If spacing...

Installation Guide
Page 23
...Expect longer wash times. Do not remove ground prong. Failure to start the dishwasher? ■ Is the water turned on? Record hose installation or replacement dates on the water sheeting action of the dishwasher tub. If Dishwasher Does Not Operate First try the solutions suggested here to ... calibrate to possibly avoid the cost of dishwasher tub. Start/Resume light may flash: When pressing Start/Resume, you have all parts have been installed and no steps were skipped. Designed with rinse aid for good drying performance. After the first 2 minutes, unlatch door, wait 5 seconds, ...
...Expect longer wash times. Do not remove ground prong. Failure to start the dishwasher? ■ Is the water turned on? Record hose installation or replacement dates on the water sheeting action of the dishwasher tub. If Dishwasher Does Not Operate First try the solutions suggested here to ... calibrate to possibly avoid the cost of dishwasher tub. Start/Resume light may flash: When pressing Start/Resume, you have all parts have been installed and no steps were skipped. Designed with rinse aid for good drying performance. After the first 2 minutes, unlatch door, wait 5 seconds, ...


