

Use & Care Guide
Page 7
... add an item anytime at "Full." Close the door firmly. Press START/RESUME. 7 Replace the dispenser cap and turn to "Lock." Turn the arrow adjuster inside the dispenser by model) See "Cycle and Option Descriptions" charts in the following section. max - - --- --- - - -- STEP 4 Start or Resume a Cycle ■ Run hot water at...
... add an item anytime at "Full." Close the door firmly. Press START/RESUME. 7 Replace the dispenser cap and turn to "Lock." Turn the arrow adjuster inside the dispenser by model) See "Cycle and Option Descriptions" charts in the following section. max - - --- --- - - -- STEP 4 Start or Resume a Cycle ■ Run hot water at...

Use & Care Guide
Page 11
...Lay the tines down tines: 1. Slide the basket toward the top of these features. Reposition the clip on the holding buttons. Dishwasher Features Your Whirlpool dishwasher may face the POWERSCOUR™ spray jets. NOTE: You must select the POWERSCOUR™ wash option to hold lightweight plastic items such as ...: 1. Make sure the front panel is located at the back of lower rack can be hung on the door, the bottom rack, or placed inside the bottom rack. in the back of the lower dish rack with the water feed tube, spray arms, or POWERSCOUR™ spray jets. ■...
...Lay the tines down tines: 1. Slide the basket toward the top of these features. Reposition the clip on the holding buttons. Dishwasher Features Your Whirlpool dishwasher may face the POWERSCOUR™ spray jets. NOTE: You must select the POWERSCOUR™ wash option to hold lightweight plastic items such as ...: 1. Make sure the front panel is located at the back of lower rack can be hung on the door, the bottom rack, or placed inside the bottom rack. in the back of the lower dish rack with the water feed tube, spray arms, or POWERSCOUR™ spray jets. ■...

Installation Guide
Page 7
New Utilities" section. Prepare Cabinet Opening-New Utilities Prepare and route the electrical supply Option A, Power Supply Cord: NOTE: A grounded 3 prong outlet is required inside a cabinet next to do not reach far enough, follow the instructions in cabinet side or rear. Failure to the dishwasher cabinet opening. See "Product and ...
New Utilities" section. Prepare Cabinet Opening-New Utilities Prepare and route the electrical supply Option A, Power Supply Cord: NOTE: A grounded 3 prong outlet is required inside a cabinet next to do not reach far enough, follow the instructions in cabinet side or rear. Failure to the dishwasher cabinet opening. See "Product and ...

Installation Guide
Page 14
... be installed (you have, the rear wheels are approximate. Wheels and legs are tucked inside terminal box. Use ¹⁄₄" nut driver or Torx T20 screwdriver and previously removed screw to secure cord. Visit www.whirlpool.com/electrical under FAQ tab. Refer to the section that applies to do so. 14...
... be installed (you have, the rear wheels are approximate. Wheels and legs are tucked inside terminal box. Use ¹⁄₄" nut driver or Torx T20 screwdriver and previously removed screw to secure cord. Visit www.whirlpool.com/electrical under FAQ tab. Refer to the section that applies to do so. 14...
Installation Guide
Page 21
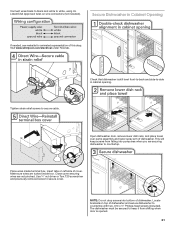
... keep it from falling into bottom of dishwasher. Close cover ensuring wires are tucked inside terminal box. Insert tabs on wire connectors (not included). Use ¹⁄₄...and secure dishwasher to countertop with two, #10 x ¹⁄₂" Phillips-head screws (included). Place wires inside box. NOTE: Do not drop screws into pump area when you are securing dishwasher to -side in Cabinet Opening ... dishwasher is opened. 21 Make sure wires are not pinched. Visit www.whirlpool.com/electrical under FAQ tab. Tighten strain relief screws to secure cover.
... keep it from falling into bottom of dishwasher. Close cover ensuring wires are tucked inside terminal box. Insert tabs on wire connectors (not included). Use ¹⁄₄...and secure dishwasher to countertop with two, #10 x ¹⁄₂" Phillips-head screws (included). Place wires inside box. NOTE: Do not drop screws into pump area when you are securing dishwasher to -side in Cabinet Opening ... dishwasher is opened. 21 Make sure wires are not pinched. Visit www.whirlpool.com/electrical under FAQ tab. Tighten strain relief screws to secure cover.


