

Installation Instructions
Page 2
TABLE OF CONTENTS DISHWASHER SAFETY 3 INSTALLATION REQUIREMENTS 4 Tools and Parts 4 18" Product and Cabinet Opening Dimensions 6 24" Product and Cabinet Opening Dimensions 7 Location Requirements 8 Drain Requirements 8 Water Supply Requirements 8 Electrical Requirements 8 INSTALLATION INSTRUCTIONS 9 Prepare Cabinet ...
TABLE OF CONTENTS DISHWASHER SAFETY 3 INSTALLATION REQUIREMENTS 4 Tools and Parts 4 18" Product and Cabinet Opening Dimensions 6 24" Product and Cabinet Opening Dimensions 7 Location Requirements 8 Drain Requirements 8 Water Supply Requirements 8 Electrical Requirements 8 INSTALLATION INSTRUCTIONS 9 Prepare Cabinet ...
Installation Instructions
Page 4
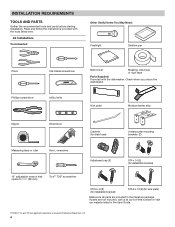
... 11/8" (29 mm) Torx®† T20® screwdriver ST3.9 x 9 (2) (for installation bracket) ST3.9 x 13 (2) (for kick plate) Make sure all parts are included in the User Guide. †®TORX, T15, and T20 are not included, call us at our toll-free number or visit our...Items You May Need: Flashlight Shallow pan Pliers Phillips screwdriver Flat-blade screwdriver Utility knife Bath towel Masking, electrical, or duct tape Parts Supplied: Provided with the tools listed here. Read and follow the instructions provided with the dishwasher. INSTALLATION REQUIREMENTS TOOLS AND...
... 11/8" (29 mm) Torx®† T20® screwdriver ST3.9 x 9 (2) (for installation bracket) ST3.9 x 13 (2) (for kick plate) Make sure all parts are included in the User Guide. †®TORX, T15, and T20 are not included, call us at our toll-free number or visit our...Items You May Need: Flashlight Shallow pan Pliers Phillips screwdriver Flat-blade screwdriver Utility knife Bath towel Masking, electrical, or duct tape Parts Supplied: Provided with the tools listed here. Read and follow the instructions provided with the dishwasher. INSTALLATION REQUIREMENTS TOOLS AND...
Installation Instructions
Page 5
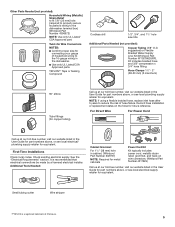
...replace inlet hose after 5 years to reduce the risk of household wiring to the dishwasher terminal box) (Whirlpool Part Number 4396672) NOTE: Use only UL Listed/ CSA Approved part. Other Parts Needed (not provided): Household Wiring (Metallic) Strain Relief to fit 7/8" (22 mm) hole (required to... wiring to the 16-gauge wiring in the dishwasher. ■■ Use only UL Listed/CSA Approved parts. suggested) or Flexible Braided Water Supply Line Kit (Whirlpool Part Number W10278635RP). Additional Tools Needed: Cabinet Grommet For 11/2" (38 mm) hole in the User Guide for...
...replace inlet hose after 5 years to reduce the risk of household wiring to the dishwasher terminal box) (Whirlpool Part Number 4396672) NOTE: Use only UL Listed/ CSA Approved part. Other Parts Needed (not provided): Household Wiring (Metallic) Strain Relief to fit 7/8" (22 mm) hole (required to... wiring to the 16-gauge wiring in the dishwasher. ■■ Use only UL Listed/CSA Approved parts. suggested) or Flexible Braided Water Supply Line Kit (Whirlpool Part Number W10278635RP). Additional Tools Needed: Cabinet Grommet For 11/2" (38 mm) hole in the User Guide for...
Installation Instructions
Page 8
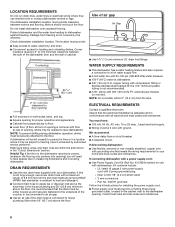
... hose with a maximum length of the counter, or be 2 wire with a power supply cord: ■■ Use Power Supply Cord Kit (Part No. 4317824) marked for door opening ■■ Full enclosure on one end. If direct wiring dishwasher: ■■ Use flexible, armored ...A 90° elbow with 3 prong grounded plug. •• Neer C-500 7/8" (2.2 cm) strain relief. •• 3 wire connectors. •• Part No. 302797 grommet. Kit contents include: •• UL listed 16 gauge 3 wire power supply cord with 3/8" (.95 cm) N.P.T. Do not install dishwasher over ...
... hose with a maximum length of the counter, or be 2 wire with a power supply cord: ■■ Use Power Supply Cord Kit (Part No. 4317824) marked for door opening ■■ Full enclosure on one end. If direct wiring dishwasher: ■■ Use flexible, armored ...A 90° elbow with 3 prong grounded plug. •• Neer C-500 7/8" (2.2 cm) strain relief. •• 3 wire connectors. •• Part No. 302797 grommet. Kit contents include: •• UL listed 16 gauge 3 wire power supply cord with 3/8" (.95 cm) N.P.T. Do not install dishwasher over ...
Installation Instructions
Page 9
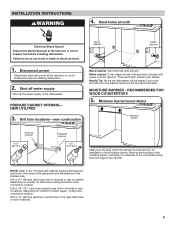
.... MOISTURE BARRIER - NOTE: Refer to underside of the countertop along the front edge of the shaded area. Wood Cabinet Metal Cabinet 1. See the "Tools and Parts" section part details. Remove the backing of the moisture barrier, and apply to the "Product and Cabinet Opening Dimensions" section for installation of cabinet. 9 Metal cabinet...
.... MOISTURE BARRIER - NOTE: Refer to underside of the countertop along the front edge of the shaded area. Wood Cabinet Metal Cabinet 1. See the "Tools and Parts" section part details. Remove the backing of the moisture barrier, and apply to the "Product and Cabinet Opening Dimensions" section for installation of cabinet. 9 Metal cabinet...

Installation Instructions
Page 12
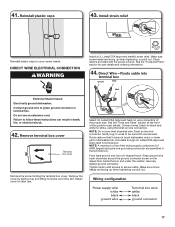
.... Route cord so that it through strain relief in terminal box. Wiring configuration Remove the screw holding the terminal box cover. Keep the cover for part details. Do not plug cord into an outlet until instructed to the new dishwasher. 14. Connect ground wire to -white, using the twist-on ...wire connectors of the slot. Do not use . 15. See the "Tools and Parts" section for later use an extension cord. Connect wires, black-to-black and white-to green ground connector in terminal box. NOTE: Do not pre...
.... Route cord so that it through strain relief in terminal box. Wiring configuration Remove the screw holding the terminal box cover. Keep the cover for part details. Do not plug cord into an outlet until instructed to the new dishwasher. 14. Connect ground wire to -white, using the twist-on ...wire connectors of the slot. Do not use . 15. See the "Tools and Parts" section for later use an extension cord. Connect wires, black-to-black and white-to green ground connector in terminal box. NOTE: Do not pre...
Installation Instructions
Page 17
...strain relief. Securely tighten ground connector. Make sure screw heads are facing up and lifting its hooks out of the guide for part details. See the "Tools and Parts" section at the front of the slot. Gently tug on the raised floor inside the box and under the washer. Wrap ground... relief is provided with the power cord kit. Do not use . Remove the cover by sliding it does not touch dishwasher motor or lower part of two field wiring supply conductors (12 AWG largest size) plus one grounding conductor are secured. Route cable so that it up when tightening conduit...
...strain relief. Securely tighten ground connector. Make sure screw heads are facing up and lifting its hooks out of the guide for part details. See the "Tools and Parts" section at the front of the slot. Gently tug on the raised floor inside the box and under the washer. Wrap ground... relief is provided with the power cord kit. Do not use . Remove the cover by sliding it does not touch dishwasher motor or lower part of two field wiring supply conductors (12 AWG largest size) plus one grounding conductor are secured. Route cable so that it up when tightening conduit...
Installation Instructions
Page 20
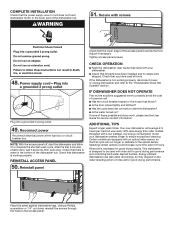
COMPLETE INSTALLATION Check that the power supply wire or cord does not touch dishwasher motor or the lower part of these possible solutions work, please see the User Guide for service contact information. Power supply cord-Plug into a grounded 3 prong outlet Plug ... seconds, then open door. REINSTALL ACCESS PANEL 50. Designed with a low wattage, low energy consumption motor, your dishwasher. ■■ Check that all parts have used with screws Check that dishwasher is necessary for good drying performance and controlling hard water deposit buildup. Secure with rinse aid for good...
COMPLETE INSTALLATION Check that the power supply wire or cord does not touch dishwasher motor or the lower part of these possible solutions work, please see the User Guide for service contact information. Power supply cord-Plug into a grounded 3 prong outlet Plug ... seconds, then open door. REINSTALL ACCESS PANEL 50. Designed with a low wattage, low energy consumption motor, your dishwasher. ■■ Check that all parts have used with screws Check that dishwasher is necessary for good drying performance and controlling hard water deposit buildup. Secure with rinse aid for good...
Owners Manual
Page 2
... into place. Doing so can result in the higher or lower position desired. The dishwasher is not locked into place. WARNING: Improper connection of three parts, a fine filter plate, coarse filter, and a lower filter. Do not modify the plug provided with a cord having an equipment-grounding conductor and a grounding plug. If...
... into place. Doing so can result in the higher or lower position desired. The dishwasher is not locked into place. WARNING: Improper connection of three parts, a fine filter plate, coarse filter, and a lower filter. Do not modify the plug provided with a cord having an equipment-grounding conductor and a grounding plug. If...
Owners Manual
Page 8
... of the problem ■■ Proof of original is reported to province. 03/17 W11172759A 8 ®/™ ©2017 Whirlpool. WHIRLPOOL® MAJOR APPLIANCE LIMITED WARRANTY ATTACH YOUR RECEIPT HERE. Some questions can be warranted for warranty service to chemicals. If outside the...or defects caused by our authorized Whirlpool Service Providers. Repairs to parts or systems to review the Troubleshooting section of the appliance. Service or parts for appliances with electrical or plumbing codes, or correction of non-genuine Whirlpool parts or accessories. PROOF OF PURCHASE...
... of the problem ■■ Proof of original is reported to province. 03/17 W11172759A 8 ®/™ ©2017 Whirlpool. WHIRLPOOL® MAJOR APPLIANCE LIMITED WARRANTY ATTACH YOUR RECEIPT HERE. Some questions can be warranted for warranty service to chemicals. If outside the...or defects caused by our authorized Whirlpool Service Providers. Repairs to parts or systems to review the Troubleshooting section of the appliance. Service or parts for appliances with electrical or plumbing codes, or correction of non-genuine Whirlpool parts or accessories. PROOF OF PURCHASE...


