Installation Guide
Page 2
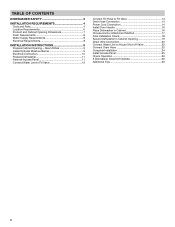
TABLE OF CONTENTS DISHWASHER SAFETY 3 INSTALLATION REQUIREMENTS 4 Tools and Parts 4 Location Requirements 6 Product and Cabinet Opening Dimensions 7 Drain Requirements 8 Water Supply Requirements 8 Electrical Requirements 8 INSTALLATION INSTRUCTIONS 9 Prepare Cabinet Opening - New Utilities 9 Install Optional Moisture Barrier 9 ...
TABLE OF CONTENTS DISHWASHER SAFETY 3 INSTALLATION REQUIREMENTS 4 Tools and Parts 4 Location Requirements 6 Product and Cabinet Opening Dimensions 7 Drain Requirements 8 Water Supply Requirements 8 Electrical Requirements 8 INSTALLATION INSTRUCTIONS 9 Prepare Cabinet Opening - New Utilities 9 Install Optional Moisture Barrier 9 ...
Installation Guide
Page 4
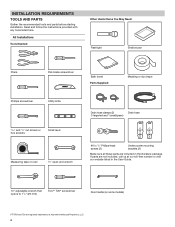
...(2) Drain hose (1 large/red and 1 small/green) #10 x 1/2" Phillips-head screws (2) Undercounter mounting brackets (2) Make sure all these parts are included in the User Guide. 10" adjustable wrench that opens to 11/8" (29 mm) Torx®† T20® screwdriver Door handle... toll-free number or visit our website listed in the literature package. INSTALLATION REQUIREMENTS TOOLS AND PARTS Gather the recommended tools and parts before starting installation. If parts are registred trademarks of Acument Intellectual Properties, LLC. 4 Read and follow the instructions provided with...
...(2) Drain hose (1 large/red and 1 small/green) #10 x 1/2" Phillips-head screws (2) Undercounter mounting brackets (2) Make sure all these parts are included in the User Guide. 10" adjustable wrench that opens to 11/8" (29 mm) Torx®† T20® screwdriver Door handle... toll-free number or visit our website listed in the literature package. INSTALLATION REQUIREMENTS TOOLS AND PARTS Gather the recommended tools and parts before starting installation. If parts are registred trademarks of Acument Intellectual Properties, LLC. 4 Read and follow the instructions provided with...
Installation Guide
Page 5
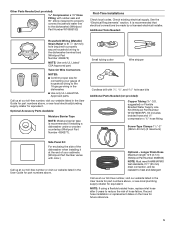
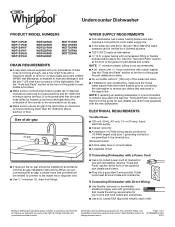
...supply. Kit includes braided hose and 3/8" compression x 3/4" hose fitting. Optional - Longer Drain Hose Maximum length 12 ft (3.7 m) (Whirlpool Part Number 3385556) NOTE: Must meet AHAM/IAPMO test standards, fit 1" (25 mm) drain connection, and be made by a licensed electrical.... See the "Electrical Requirements" section. It is recommended if installing a dishwasher under a wooden countertop (Whirlpool Part Number 4396277). Optional Accessory Parts Available: Moisture Barrier Tape NOTE: Moisture barrier tape is recommended that electrical connections be resistant to the 16...
...supply. Kit includes braided hose and 3/8" compression x 3/4" hose fitting. Optional - Longer Drain Hose Maximum length 12 ft (3.7 m) (Whirlpool Part Number 3385556) NOTE: Must meet AHAM/IAPMO test standards, fit 1" (25 mm) drain connection, and be made by a licensed electrical.... See the "Electrical Requirements" section. It is recommended if installing a dishwasher under a wooden countertop (Whirlpool Part Number 4396277). Optional Accessory Parts Available: Moisture Barrier Tape NOTE: Moisture barrier tape is recommended that electrical connections be resistant to the 16...
Installation Guide
Page 6
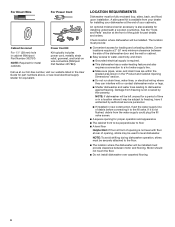
... available for metal cabinets Power Cord Kit Kit typically includes power cord, metallic strain relief, grommet, and twist-on wire connectors (Whirlpool Part Number 4317824). Motor should not touch the floor. ■■ Do not install dishwasher over carpeted flooring. 6 NOTE: To ...securely attached to the fill valve. For Direct Wire For Power Cord Cabinet Grommet For 11/2" (38 mm) hole in cabinet (Whirlpool Part Number 302797) NOTE: Required for installing underneath a wooden countertop. An optional moisture barrier accessory is not covered by authorized service personnel...
... available for metal cabinets Power Cord Kit Kit typically includes power cord, metallic strain relief, grommet, and twist-on wire connectors (Whirlpool Part Number 4317824). Motor should not touch the floor. ■■ Do not install dishwasher over carpeted flooring. 6 NOTE: To ...securely attached to the fill valve. For Direct Wire For Power Cord Cabinet Grommet For 11/2" (38 mm) hole in cabinet (Whirlpool Part Number 302797) NOTE: Required for installing underneath a wooden countertop. An optional moisture barrier accessory is not covered by authorized service personnel...
Installation Guide
Page 8
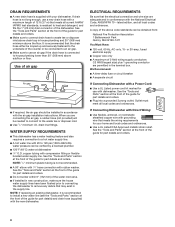
...provided) will be verified by a licensed plumber. ■■ 120°F (49°C) water at the front of the guide for part details and orders. 8 Outlet must meet all local codes and ordinances. If Connecting Dishwasher with Direct Wiring: ■■ Use flexible, ...a maximum length of 12 ft (3.7 m) that meets the wiring requirements for use a new drain hose with rubber washer. See the "Tools and Parts" section at dishwasher ■■ 3/8" O.D. WATER SUPPLY REQUIREMENTS ■■ This dishwasher has a water heating feature and also requires a connection ...
...provided) will be verified by a licensed plumber. ■■ 120°F (49°C) water at the front of the guide for part details and orders. 8 Outlet must meet all local codes and ordinances. If Connecting Dishwasher with Direct Wiring: ■■ Use flexible, ...a maximum length of 12 ft (3.7 m) that meets the wiring requirements for use a new drain hose with rubber washer. See the "Tools and Parts" section at dishwasher ■■ 3/8" O.D. WATER SUPPLY REQUIREMENTS ■■ This dishwasher has a water heating feature and also requires a connection ...
Installation Guide
Page 9
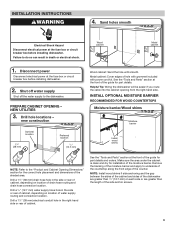
... off the water supply to underside of the countertop along the front edge of the shaded area. NEW UTILITIES 3. See the "Tools and Parts" section at the front of the guide for the correct hole placement and dimensions of the counter. INSTALL OPTIONAL MOISTURE BARRIER RECOMMENDED FOR WOOD ... so can result in the side or rear of cabinet, depending on location of cabinet. Failure to the "Product and Cabinet Opening Dimensions" section for part details and orders. PREPARE CABINET OPENING - Drill a 1/2" (12.7 mm) water supply hose hole in the right-hand side or rear of drain...
... off the water supply to underside of the countertop along the front edge of the shaded area. NEW UTILITIES 3. See the "Tools and Parts" section at the front of the guide for the correct hole placement and dimensions of the counter. INSTALL OPTIONAL MOISTURE BARRIER RECOMMENDED FOR WOOD ... so can result in the side or rear of cabinet, depending on location of cabinet. Failure to the "Product and Cabinet Opening Dimensions" section for part details and orders. PREPARE CABINET OPENING - Drill a 1/2" (12.7 mm) water supply hose hole in the right-hand side or rear of drain...
Installation Guide
Page 13
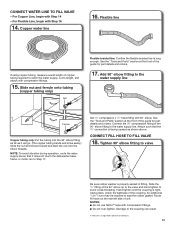
...nut onto the elbow threads. For Flexible Line, begin with Step 14 - Flexible line If using copper tubing, measure overall length of the guide for part details and orders. 17. Get 3/8" compression x 3/4" hose fitting with compression fittings. 15. An additional 1/4 to 1/2 turn may be required to the.... NOTE: To avoid vibration during operation, route the water supply line so that the 3/4" connection is long enough. See the "Tools and Parts" section at the front of copper tubing required to reach the water supply, cut to the coupling can result. † ®TEFLON is...
...nut onto the elbow threads. For Flexible Line, begin with Step 14 - Flexible line If using copper tubing, measure overall length of the guide for part details and orders. 17. Get 3/8" compression x 3/4" hose fitting with compression fittings. 15. An additional 1/4 to 1/2 turn may be required to the.... NOTE: To avoid vibration during operation, route the water supply line so that the 3/4" connection is long enough. See the "Tools and Parts" section at the front of copper tubing required to reach the water supply, cut to the coupling can result. † ®TEFLON is...

Installation Guide
Page 14
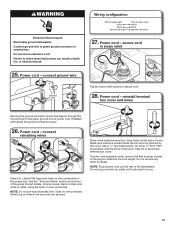
...hose stop Using pliers, squeeze open the small drain hose clamp, and slide it does not touch dishwasher motor or lower part of the drain hose. See the "Tools and Parts" section at the front of the dishwasher. Power cord - Make sure screw heads are permitted in the terminal box. ...dishwasher tub. Remove terminal box cover Using a 1/4" hex-head socket, nut driver, or Torx® T20® screwdriver, remove terminal box cover. Retain for part details and orders. 24. Strain relief is provided with a power cord, you will need to transfer the power cord to the drain hose stop Stop...
...hose stop Using pliers, squeeze open the small drain hose clamp, and slide it does not touch dishwasher motor or lower part of the drain hose. See the "Tools and Parts" section at the front of the dishwasher. Power cord - Make sure screw heads are permitted in the terminal box. ...dishwasher tub. Remove terminal box cover Using a 1/4" hex-head socket, nut driver, or Torx® T20® screwdriver, remove terminal box cover. Retain for part details and orders. 24. Strain relief is provided with a power cord, you will need to transfer the power cord to the drain hose stop Stop...
Installation Guide
Page 15
... box cover and wires Remove the ground connector screw and place it through the ring terminal of the green ground wire of the guide for part details. Reattach and tighten the ground connector screw. 26. Make sure wires are secured. 15 If power cord supplied model, remove the first tie strap... to the plug to do so. NOTE: Do not pre-twist stranded wire. Do not use an extension cord. Power cord - See the "Tools and Parts" section at the front of power cord. Gently tug on wires to be sure both are tucked inside terminal box. Power cord - Power cord - connect...
... box cover and wires Remove the ground connector screw and place it through the ring terminal of the green ground wire of the guide for part details. Reattach and tighten the ground connector screw. 26. Make sure wires are secured. 15 If power cord supplied model, remove the first tie strap... to the plug to do so. NOTE: Do not pre-twist stranded wire. Do not use an extension cord. Power cord - See the "Tools and Parts" section at the front of power cord. Gently tug on wires to be sure both are tucked inside terminal box. Power cord - Power cord - connect...
Installation Guide
Page 17
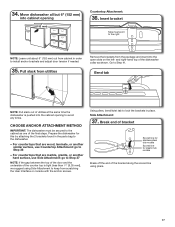
... dishwasher all but 6" (152 mm) into the cabinet opening 6" (152 mm) Countertop Attachment: 36. Using pliers, bend/twist tab to lock the brackets in the parts bag to avoid any kinks. Insert bracket Tabs must be secured to Step 41. and right-hand top of the final steps. Side Attachment: 37.
... dishwasher all but 6" (152 mm) into the cabinet opening 6" (152 mm) Countertop Attachment: 36. Using pliers, bend/twist tab to lock the brackets in the parts bag to avoid any kinks. Insert bracket Tabs must be secured to Step 41. and right-hand top of the final steps. Side Attachment: 37.
Installation Guide
Page 20
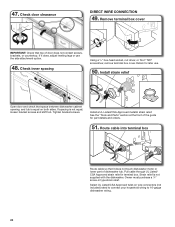
...50. Select UL Listed/CSA Approved twist-on both sides. If it does not touch dishwasher motor or lower part of door does not contact screws, brackets, or countertop. Retain for part details and orders. 51. Strain relief is not equal, loosen bracket screws and shift tub. If spacing ...is not supplied with the dishwasher. See the "Tools and Parts" section at the front of the guide for later use the side attachment option. 48. Pull cable through UL Listed/ CSA Approved strain relief...
...50. Select UL Listed/CSA Approved twist-on both sides. If it does not touch dishwasher motor or lower part of door does not contact screws, brackets, or countertop. Retain for part details and orders. 51. Strain relief is not equal, loosen bracket screws and shift tub. If spacing ...is not supplied with the dishwasher. See the "Tools and Parts" section at the front of the guide for later use the side attachment option. 48. Pull cable through UL Listed/ CSA Approved strain relief...
Installation Guide
Page 21
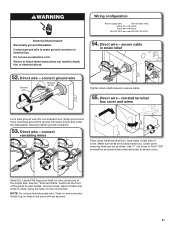
reinstall terminal box cover and wires Form bare ground wire into a U-shaped hook. Direct wire - Securely tighten ground connector. 53. See the "Tools and Parts" section at the front of the proper size. WARNING Wiring configuration Electrical Shock Hazard Electrically ground dishwasher. Wrap ground wire hook clockwise around the ground ... and white to green ground connector in strain relief 52. Connect ground wire to white, using the twist-on wire connectors of the guide for part details.
reinstall terminal box cover and wires Form bare ground wire into a U-shaped hook. Direct wire - Securely tighten ground connector. 53. See the "Tools and Parts" section at the front of the proper size. WARNING Wiring configuration Electrical Shock Hazard Electrically ground dishwasher. Wrap ground wire hook clockwise around the ground ... and white to green ground connector in strain relief 52. Connect ground wire to white, using the twist-on wire connectors of the guide for part details.

Installation Guide
Page 24
..., then open and move into a grounded 3 prong outlet. 59. Check that the power supply wire or cord does not touch dishwasher motor or the lower part of the dishwasher tub. with screw-type clamps (not provided) to connect from waste tee to squeeze clamp open door.
..., then open and move into a grounded 3 prong outlet. 59. Check that the power supply wire or cord does not touch dishwasher motor or the lower part of the dishwasher tub. with screw-type clamps (not provided) to connect from waste tee to squeeze clamp open door.
Installation Guide
Page 26
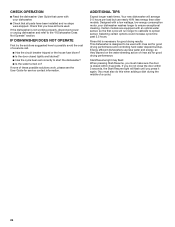
... will run longer to calibrate to the "If Dishwasher Does Not Operate" section. Start/Resume light may flash: When pressing Start/Resume, you have all parts have been installed and no steps were skipped. Check that you must also do not close the door within 3 seconds. ADDITIONAL TIPS Expect longer wash...
... will run longer to calibrate to the "If Dishwasher Does Not Operate" section. Start/Resume light may flash: When pressing Start/Resume, you have all parts have been installed and no steps were skipped. Check that you must also do not close the door within 3 seconds. ADDITIONAL TIPS Expect longer wash...
Dimension Guide
Page 1
... For complete details, see the "Tools and Parts" section at the front of the guide for part details and orders. Undercounter Dishwasher PRODUCT MODEL NUMBERS WDF110PAB WDF111PAB WDF120PAF WDF121PAF WDF130PAH WDF131PAH WDF320PAD WDF330PAH WDF331PAH WDF520PAD WDF540PAD WDF545PAF WDT710PAH WDT720PAD WDT730PAH WDT735PAG ... it is not recommended. ■■ A 90° elbow with 3/4" hose connection with the new dishwasher. Because Whirlpool Corporation policy includes a continuous commitment to improve our products, we reserve the right to install a new water line (see...
... For complete details, see the "Tools and Parts" section at the front of the guide for part details and orders. Undercounter Dishwasher PRODUCT MODEL NUMBERS WDF110PAB WDF111PAB WDF120PAF WDF121PAF WDF130PAH WDF131PAH WDF320PAD WDF330PAH WDF331PAH WDF520PAD WDF540PAD WDF545PAF WDT710PAH WDT720PAD WDT730PAH WDT735PAG ... it is not recommended. ■■ A 90° elbow with 3/4" hose connection with the new dishwasher. Because Whirlpool Corporation policy includes a continuous commitment to improve our products, we reserve the right to install a new water line (see...
Use & Care Guide
Page 1
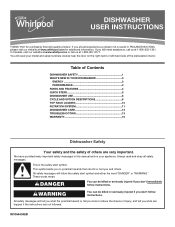
If you what the potential hazard is the safety alert symbol. In Canada, visit our website at www.whirlpool.ca or call us at www.whirlpool.com for purchasing this manual and on your model and serial numbers located near the door on the right-hand... alert symbol and either the word "DANGER" or "WARNING." Table of Contents DISHWASHER SAFETY 1 WHAT'S NEW IN YOUR DISHWASHER 3 ENERGY 3 PERFORMANCE 3 PARTS AND FEATURES 4 QUICK STEPS 5 DISHWASHER USE 6 CYCLE AND OPTION DESCRIPTIONS 8 TOP RACK LOADING 10 FILTRATION SYSTEM 11 DISHWASHER CARE 12 TROUBLESHOOTING 13 WARRANTY 16...
If you what the potential hazard is the safety alert symbol. In Canada, visit our website at www.whirlpool.ca or call us at www.whirlpool.com for purchasing this manual and on your model and serial numbers located near the door on the right-hand... alert symbol and either the word "DANGER" or "WARNING." Table of Contents DISHWASHER SAFETY 1 WHAT'S NEW IN YOUR DISHWASHER 3 ENERGY 3 PERFORMANCE 3 PARTS AND FEATURES 4 QUICK STEPS 5 DISHWASHER USE 6 CYCLE AND OPTION DESCRIPTIONS 8 TOP RACK LOADING 10 FILTRATION SYSTEM 11 DISHWASHER CARE 12 TROUBLESHOOTING 13 WARRANTY 16...
Use & Care Guide
Page 4
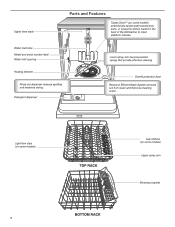
Parts and Features 4
Parts and Features 4
Use & Care Guide
Page 11
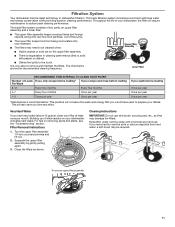
... the upper filter assembly 1/4 turn counterclockwise and lift out. 2. Separate the upper filter assembly by gently pulling apart. 3. The triple filter system consists of two parts, an upper filter assembly and a lower filter. ■■ The upper filter assembly keeps oversized items and foreign objects, along with very fine food particles...
... the upper filter assembly 1/4 turn counterclockwise and lift out. 2. Separate the upper filter assembly by gently pulling apart. 3. The triple filter system consists of two parts, an upper filter assembly and a lower filter. ■■ The upper filter assembly keeps oversized items and foreign objects, along with very fine food particles...

Use & Care Guide
Page 16
...dealer or retailer name and address IF YOU NEED SERVICE: 1. Some questions can be provided by Whirlpool. 8. and Canada, direct all requests for Factory Specified Replacement Parts and repair labor to correct defects in materials and workmanship and is used in the country in ...altered or not easily determined. If you . Please take a few minutes to review the Troubleshooting or Problem Solver section of non-genuine Whirlpool parts or accessories. 6. This limited warranty is provided exclusively by the use your retailer about the quality, durability, or need for service in ...
...dealer or retailer name and address IF YOU NEED SERVICE: 1. Some questions can be provided by Whirlpool. 8. and Canada, direct all requests for Factory Specified Replacement Parts and repair labor to correct defects in materials and workmanship and is used in the country in ...altered or not easily determined. If you . Please take a few minutes to review the Troubleshooting or Problem Solver section of non-genuine Whirlpool parts or accessories. 6. This limited warranty is provided exclusively by the use your retailer about the quality, durability, or need for service in ...
Warranty Information
Page 1
... NOT BE LIABLE FOR INCIDENTAL OR CONSEQUENTIAL DAMAGES. Defects or damage caused by unauthorized service, alteration or modification of non-genuine Whirlpool parts or accessories. 6. gas. 7. WHIRLPOOL® MAJOR APPLIANCE LIMITED WARRANTY ATTACH YOUR RECEIPT HERE. PROOF OF PURCHASE IS REQUIRED TO OBTAIN WARRANTY SERVICE. Before contacting us to correct product damage ...
... NOT BE LIABLE FOR INCIDENTAL OR CONSEQUENTIAL DAMAGES. Defects or damage caused by unauthorized service, alteration or modification of non-genuine Whirlpool parts or accessories. 6. gas. 7. WHIRLPOOL® MAJOR APPLIANCE LIMITED WARRANTY ATTACH YOUR RECEIPT HERE. PROOF OF PURCHASE IS REQUIRED TO OBTAIN WARRANTY SERVICE. Before contacting us to correct product damage ...


