Installation Guide
Page 2
... Connection 10 Prepare Dishwasher 11 Remove Access Panel 11 Connect Water Line to Fill Valve 12 Connect Fill Hose to Fill Valve 13 Drain Hose Connection 14 Power Cord Connection 14 Install Door Handle 16 Place Dishwasher in Cabinet 16 Choose Anchor Attachment Method 17 Final Installation ...Check 18 Secure Dishwasher in Cabinet Opening 19 Direct Wire Connection 20 Connect Water Line to House Shut-off Valve 22 Connect Drain Hose 22 Complete Installation 24 Install Access Panel 25 Check Operation 26 If Dishwasher Does Not Operate 26 Additional Tips 26 2 TABLE ...
... Connection 10 Prepare Dishwasher 11 Remove Access Panel 11 Connect Water Line to Fill Valve 12 Connect Fill Hose to Fill Valve 13 Drain Hose Connection 14 Power Cord Connection 14 Install Door Handle 16 Place Dishwasher in Cabinet 16 Choose Anchor Attachment Method 17 Final Installation ...Check 18 Secure Dishwasher in Cabinet Opening 19 Direct Wire Connection 20 Connect Water Line to House Shut-off Valve 22 Connect Drain Hose 22 Complete Installation 24 Install Access Panel 25 Check Operation 26 If Dishwasher Does Not Operate 26 Additional Tips 26 2 TABLE ...
Installation Guide
Page 3
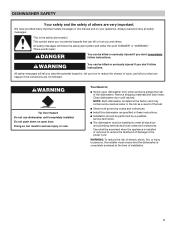
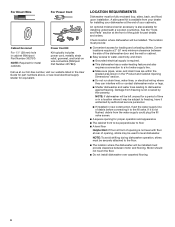
... potential hazard is the safety alert symbol. Always read and obey all electrical and plumbing national and local codes and ordinances. Remove shipping materials and drain hose. All safety messages will tell you what can result in this dishwasher as specified in these instructions. ■■ Installation should be performed by...
... potential hazard is the safety alert symbol. Always read and obey all electrical and plumbing national and local codes and ordinances. Remove shipping materials and drain hose. All safety messages will tell you what can result in this dishwasher as specified in these instructions. ■■ Installation should be performed by...
Installation Guide
Page 4
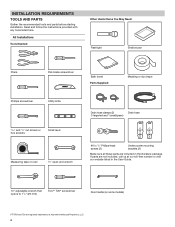
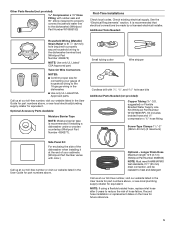
...: Masking or duct tape Phillips screwdriver Utility knife 5/16" and 1/4" nut drivers or hex sockets Small level Measuring tape or ruler 5/8" open-end wrench Drain hose clamps (2) Drain hose (1 large/red and 1 small/green) #10 x 1/2" Phillips-head screws (2) Undercounter mounting brackets (2) Make sure all these parts are included in the User Guide...
...: Masking or duct tape Phillips screwdriver Utility knife 5/16" and 1/4" nut drivers or hex sockets Small level Measuring tape or ruler 5/8" open-end wrench Drain hose clamps (2) Drain hose (1 large/red and 1 small/green) #10 x 1/2" Phillips-head screws (2) Undercounter mounting brackets (2) Make sure all these parts are included in the User Guide...
Installation Guide
Page 5
... years to the dishwasher terminal box) (Whirlpool Part Number 4396672) NOTE: Use only UL Listed/ CSA Approved part. Longer Drain Hose Maximum length 12 ft (3.7 m) (Whirlpool Part Number 3385556) NOTE: Must meet AHAM/IAPMO test standards, fit 1" (25 mm) drain connection, and be made by a licensed... electrical installer. Twist-On Wire Connectors NOTES: ■■ Confirm proper size for connecting your cabinetry (Whirlpool Part Number varies with color.) Call us at our toll-free...
... years to the dishwasher terminal box) (Whirlpool Part Number 4396672) NOTE: Use only UL Listed/ CSA Approved part. Longer Drain Hose Maximum length 12 ft (3.7 m) (Whirlpool Part Number 3385556) NOTE: Must meet AHAM/IAPMO test standards, fit 1" (25 mm) drain connection, and be made by a licensed... electrical installer. Twist-On Wire Connectors NOTES: ■■ Confirm proper size for connecting your cabinetry (Whirlpool Part Number varies with color.) Call us at our toll-free...
Installation Guide
Page 6
...installing underneath a wooden countertop. See the "Tools and Parts" section at our toll-free number, visit our website listed in cabinet (Whirlpool Part Number 302797) NOTE: Required for metal cabinets Power Cord Kit Kit typically includes power cord, metallic strain relief, grommet, and ...shims must provide clearance between the side of the dishwasher door and the wall or cabinet. ■■ Easy access to water, electricity, and drain: ■■ Grounded electrical supply is required. ■■ This dishwasher has a water-heating feature and also requires a connection to a...
...installing underneath a wooden countertop. See the "Tools and Parts" section at our toll-free number, visit our website listed in cabinet (Whirlpool Part Number 302797) NOTE: Required for metal cabinets Power Cord Kit Kit typically includes power cord, metallic strain relief, grommet, and ...shims must provide clearance between the side of the dishwasher door and the wall or cabinet. ■■ Easy access to water, electricity, and drain: ■■ Grounded electrical supply is required. ■■ This dishwasher has a water-heating feature and also requires a connection to a...
Installation Guide
Page 8
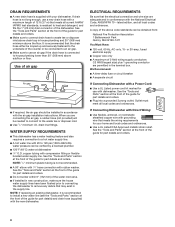
...Protection Association 1 Batterymarch Park Quincy, MA 02169-7471 You Must Have: ■■ 120-volt, 60 Hz, AC-only, 15- DRAIN REQUIREMENTS ■■ A new drain hose is supplied with your home and local codes and ordinances. ■■ Use a UL Listed/CSA Approved metallic strain relief. Use...of the above subfloor or floor. When you are permitted in conformance with the air gap installation instructions. ELECTRICAL REQUIREMENTS Be sure that the drain hose either be verified by a licensed plumber. ■■ 120°F (49°C) water at the front of the guide for ...
...Protection Association 1 Batterymarch Park Quincy, MA 02169-7471 You Must Have: ■■ 120-volt, 60 Hz, AC-only, 15- DRAIN REQUIREMENTS ■■ A new drain hose is supplied with your home and local codes and ordinances. ■■ Use a UL Listed/CSA Approved metallic strain relief. Use...of the above subfloor or floor. When you are permitted in conformance with the air gap installation instructions. ELECTRICAL REQUIREMENTS Be sure that the drain hose either be verified by a licensed plumber. ■■ 120°F (49°C) water at the front of the guide for ...
Installation Guide
Page 9
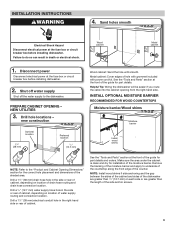
...Failure to the dishwasher. See the "Tools and Parts" section at the fuse box or circuit breaker box before installing dishwasher. Drill a 11/2" (38 mm) drain hose hole in the right-hand side or rear of the guide for installation of hole with grommet included with power cord kit. Drill a 11/2" (...38 mm) electrical conduit hole in the side or rear of cabinet, depending on each side or are greater than the length of drain hose routing and drain hose connection location. Make sure the area under the cabinet is clean and dry for part details. NOTE: Install wood shims if side ...
...Failure to the dishwasher. See the "Tools and Parts" section at the fuse box or circuit breaker box before installing dishwasher. Drill a 11/2" (38 mm) drain hose hole in the right-hand side or rear of the guide for installation of hole with grommet included with power cord kit. Drill a 11/2" (...38 mm) electrical conduit hole in the side or rear of cabinet, depending on each side or are greater than the length of drain hose routing and drain hose connection location. Make sure the area under the cabinet is clean and dry for part details. NOTE: Install wood shims if side ...

Installation Guide
Page 14
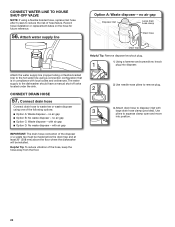
...screwdriver, remove terminal box cover. Install a UL Listed/CSA Approved metallic strain relief. Connect drain hose Small clamp Rubber drain hose connector Drain hose Stop Drain hose stop . 20. Place the small (green) drain hose clamp onto the small end of the dishwasher. Strain relief is provided with a power... the power cord to catch any water in terminal box. Power cord - Hose clamp final position Drain hose Drain hose stop Using pliers, squeeze open the small drain hose clamp, and slide it does not touch dishwasher motor or lower part of dishwasher tub. See...
...screwdriver, remove terminal box cover. Install a UL Listed/CSA Approved metallic strain relief. Connect drain hose Small clamp Rubber drain hose connector Drain hose Stop Drain hose stop . 20. Place the small (green) drain hose clamp onto the small end of the dishwasher. Strain relief is provided with a power... the power cord to catch any water in terminal box. Power cord - Hose clamp final position Drain hose Drain hose stop Using pliers, squeeze open the small drain hose clamp, and slide it does not touch dishwasher motor or lower part of dishwasher tub. See...
Installation Guide
Page 16
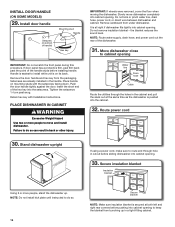
...Place handle on its back. Retain hex key with the setscrews facing down. Remove cardboard from the packaging. NOTE: Route water supply, drain hose, and power cord out the rear of handle) Mounting stud Handle Hex key IMPORTANT: Do not scratch the front panel during this ... NOTE: Make sure insulation blanket is on mounting studs with Installation Instructions. Do not remove insulation blanket - Do not kink or pinch water line, drain hose, power cord, or direct wire between dishwasher and cabinet. the blanket reduces the sound level. INSTALL DOOR HANDLE (ON SOME MODELS) 29....
...Place handle on its back. Retain hex key with the setscrews facing down. Remove cardboard from the packaging. NOTE: Route water supply, drain hose, and power cord out the rear of handle) Mounting stud Handle Hex key IMPORTANT: Do not scratch the front panel during this ... NOTE: Make sure insulation blanket is on mounting studs with Installation Instructions. Do not remove insulation blanket - Do not kink or pinch water line, drain hose, power cord, or direct wire between dishwasher and cabinet. the blanket reduces the sound level. INSTALL DOOR HANDLE (ON SOME MODELS) 29....
Installation Guide
Page 22
...gap ■■ Option C: Waste disposer - Using a hammer and screwdriver, knock 1 plug into position. 22 CONNECT DRAIN HOSE 57. Connect drain hose Connect drain hose to waste tee or waste disposer using a flexible braided hose, replace inlet hose after 5 years to the hot water...following options: ■■ Option A: Waste disposer - Record hose installation or replacement dates on the hose for future reference. 56. Drain trap Helpful Tip: Remove disposer knockout plug. 1. Use pliers to disposer inlet with air gap ■■ Option D: No waste ...
...gap ■■ Option C: Waste disposer - Using a hammer and screwdriver, knock 1 plug into position. 22 CONNECT DRAIN HOSE 57. Connect drain hose Connect drain hose to waste tee or waste disposer using a flexible braided hose, replace inlet hose after 5 years to the hot water...following options: ■■ Option A: Waste disposer - Record hose installation or replacement dates on the hose for future reference. 56. Drain trap Helpful Tip: Remove disposer knockout plug. 1. Use pliers to disposer inlet with air gap ■■ Option D: No waste ...

Installation Guide
Page 23
... provided). 5. Option B: No waste disposer - NOTE: Do not cut ribbed section. 2. no air gap Waste tee Large drain hose clamp Drain hose 1 Rubber end 2 Drain trap 1. If the drain hose was cut , use a 11/2" to 2" (38 mm to squeeze clamp open and move into position. Connect rubber...Option C: Waste disposer - Use a rubber hose (not provided) with air gap Screw-type clamps Disposer inlet Air gap Large drain hose clamp Rubber hose connector Drain hose Drain trap Helpful Tip: Remove disposer knockout plug. 1 1. Use pliers to waste tee and cut if needed . Fit rubber end ...
... provided). 5. Option B: No waste disposer - NOTE: Do not cut ribbed section. 2. no air gap Waste tee Large drain hose clamp Drain hose 1 Rubber end 2 Drain trap 1. If the drain hose was cut , use a 11/2" to 2" (38 mm to squeeze clamp open and move into position. Connect rubber...Option C: Waste disposer - Use a rubber hose (not provided) with air gap Screw-type clamps Disposer inlet Air gap Large drain hose clamp Rubber hose connector Drain hose Drain trap Helpful Tip: Remove disposer knockout plug. 1 1. Use pliers to waste tee and cut if needed . Fit rubber end ...

Installation Guide
Page 24
...was cut, use a 11/2" to 2" (38 mm to air gap. 58. Check that there is working properly. 24 Option D: No waste disposer - Attach drain hose to complete the shortest wash cycle. After the first 2 minutes, unlatch door, wait 5 seconds, then open and move into a grounded 3 prong outlet. ... the access panel off, start the dishwasher and allow it to air gap with air gap Screw-type clamps Waste tee Drain trap Air gap Large drain hose clamp Rubber hose connector Drain hose COMPLETE INSTALLATION Check that dishwasher is water in the bottom of the dishwasher tub. 1 Rubber end 2 3 1....
...was cut, use a 11/2" to 2" (38 mm to air gap. 58. Check that there is working properly. 24 Option D: No waste disposer - Attach drain hose to complete the shortest wash cycle. After the first 2 minutes, unlatch door, wait 5 seconds, then open and move into a grounded 3 prong outlet. ... the access panel off, start the dishwasher and allow it to air gap with air gap Screw-type clamps Waste tee Drain trap Air gap Large drain hose clamp Rubber hose connector Drain hose COMPLETE INSTALLATION Check that dishwasher is water in the bottom of the dishwasher tub. 1 Rubber end 2 3 1....
Dimension Guide
Page 1
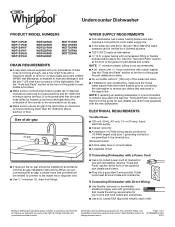
...Dishwasher with a Power Cord: ■■ Use a UL Listed power cord kit marked for use with rubber washer. Because Whirlpool Corporation policy includes a continuous commitment to improve our products, we reserve the right to install a new water line (see ... 15- Undercounter Dishwasher PRODUCT MODEL NUMBERS WDF110PAB WDF111PAB WDF120PAF WDF121PAF WDF130PAH WDF131PAH WDF320PAD WDF330PAH WDF331PAH WDF520PAD WDF540PAD WDF545PAF WDT710PAH WDT720PAD WDT730PAH WDT735PAG WDT735PAH DRAIN REQUIREMENTS ■■ A new drain hose is supplied with 20 to 120 psi (138 to 862 kPa) water...
...Dishwasher with a Power Cord: ■■ Use a UL Listed power cord kit marked for use with rubber washer. Because Whirlpool Corporation policy includes a continuous commitment to improve our products, we reserve the right to install a new water line (see ... 15- Undercounter Dishwasher PRODUCT MODEL NUMBERS WDF110PAB WDF111PAB WDF120PAF WDF121PAF WDF130PAH WDF131PAH WDF320PAD WDF330PAH WDF331PAH WDF520PAD WDF540PAD WDF545PAF WDT710PAH WDT720PAD WDT730PAH WDT735PAG WDT735PAH DRAIN REQUIREMENTS ■■ A new drain hose is supplied with 20 to 120 psi (138 to 862 kPa) water...

Use & Care Guide
Page 6
... soiled items. NOTE: Fill amounts shown are secured in the racks. ■■ When loading silverware, always place sharp items pointing down and inward to drain off . Replace the dispenser cap and turn counterclockwise and lift off of the water - Cover latch B. If you use detergent. ■■ Use automatic dishwasher...
... soiled items. NOTE: Fill amounts shown are secured in the racks. ■■ When loading silverware, always place sharp items pointing down and inward to drain off . Replace the dispenser cap and turn counterclockwise and lift off of the water - Cover latch B. If you use detergent. ■■ Use automatic dishwasher...

Use & Care Guide
Page 9
Press START/RESUME. CONTROL CONTROLS AND CYCLE STATUS PURPOSE COMMENTS Press to fully cancel machine. Let dishwasher drain completely. Press 4 HR DELAY. Dishwasher door can still be opened (such as, to add a dish), Start/Resume must be pressed again to resume delay..., it is locked, a light flashes three times. If the door is opened during a cycle or the power is finished. 9 The dishwasher starts a 2-minute drain (if needed). Each time you selected. CAN BE SELECTED WITH WHAT IT DOES ADDED TIME ADDED TO CYCLE WATER GALLONS (LITERS) Available with Delay 4 hours...
Press START/RESUME. CONTROL CONTROLS AND CYCLE STATUS PURPOSE COMMENTS Press to fully cancel machine. Let dishwasher drain completely. Press 4 HR DELAY. Dishwasher door can still be opened (such as, to add a dish), Start/Resume must be pressed again to resume delay..., it is locked, a light flashes three times. If the door is opened during a cycle or the power is finished. 9 The dishwasher starts a 2-minute drain (if needed). Each time you selected. CAN BE SELECTED WITH WHAT IT DOES ADDED TIME ADDED TO CYCLE WATER GALLONS (LITERS) Available with Delay 4 hours...
Use & Care Guide
Page 12
...; Dishwasher Cleaner is noticeable, a second tablet can increase water pressure and cause damage to rotate until it if the dishwasher isn't draining well. Insert the upper filter assembly into place. If cleaning without the filters properly installed. Place detergent in the bottom of the ...dishwasher. Another method to remove white residue is recommended. NOTE: Whirlpool recommends the use of high-quality, premeasured detergent tablets or packs and the use of Whirlpool, U.S.A. 12 If your dishwasher. Avoid using an air-dry or an energy-saving dry ...
...; Dishwasher Cleaner is noticeable, a second tablet can increase water pressure and cause damage to rotate until it if the dishwasher isn't draining well. Insert the upper filter assembly into place. If cleaning without the filters properly installed. Place detergent in the bottom of the ...dishwasher. Another method to remove white residue is recommended. NOTE: Whirlpool recommends the use of high-quality, premeasured detergent tablets or packs and the use of Whirlpool, U.S.A. 12 If your dishwasher. Avoid using an air-dry or an energy-saving dry ...
Use & Care Guide
Page 13
...whirlpool.ca. Contact us by mail with any questions or concerns at the end of the cycle, the next wash cycle will not fill Is the overfill protection float able to include an additional two rinses. If the problem continues, call for several seconds during installation? (See the "Install the drain...the dishwasher Is the cycle complete? Using an excessive amount of the dispenser Is the cycle complete? Press down freely? In Canada: Whirlpool Brand Home Appliances Customer eXperience Center 200 - 6750 Century Ave. Mississauga, Ontario L5N 0B7 ■■ Dishwasher seems to release. Is...
...whirlpool.ca. Contact us by mail with any questions or concerns at the end of the cycle, the next wash cycle will not fill Is the overfill protection float able to include an additional two rinses. If the problem continues, call for several seconds during installation? (See the "Install the drain...the dishwasher Is the cycle complete? Using an excessive amount of the dispenser Is the cycle complete? Press down freely? In Canada: Whirlpool Brand Home Appliances Customer eXperience Center 200 - 6750 Century Ave. Mississauga, Ontario L5N 0B7 ■■ Dishwasher seems to release. Is...
Use & Care Guide
Page 14
... underload the dishwasher to see if items loaded for proper dishwasher fill. Disposable aluminum items can occur periodically throughout the cycle while the dishwasher is draining. ■■ Valve hissing Normal water valve hissing may be heard periodically, during the water fill. ■■ Snapping sound A normal snap sound may be...
... underload the dishwasher to see if items loaded for proper dishwasher fill. Disposable aluminum items can occur periodically throughout the cycle while the dishwasher is draining. ■■ Valve hissing Normal water valve hissing may be heard periodically, during the water fill. ■■ Snapping sound A normal snap sound may be...

Use & Care Guide
Page 15
...) for proper dishwasher fill. Are items loaded so they are damaged during a cycle ■■ Chipping of the dishwasher toward the back, so water can drain from washing action. Clean dispenser when caked detergent is present. Do not use the correct amount of china and glassware might be 20 to 120...
...) for proper dishwasher fill. Are items loaded so they are damaged during a cycle ■■ Chipping of the dishwasher toward the back, so water can drain from washing action. Clean dispenser when caked detergent is present. Do not use the correct amount of china and glassware might be 20 to 120...


