

Installation Guide
Page 2
... followed. WARNING Tip Over Hazard Do not use dishwasher until latched. ■ Observe all safety messages. TABLE OF CONTENTS DISHWASHER SAFETY 2 INSTALLATION REQUIREMENTS 3 Tools and Parts 3 Location Requirements 4 Drain Requirements 6 Water Supply Requirements 6 Electrical Requirements 6 INSTALLATION INSTRUCTIONS 7 Prepare Cabinet Opening- We have provided many important safety messages in these instructions. ■...
... followed. WARNING Tip Over Hazard Do not use dishwasher until latched. ■ Observe all safety messages. TABLE OF CONTENTS DISHWASHER SAFETY 2 INSTALLATION REQUIREMENTS 3 Tools and Parts 3 Location Requirements 4 Drain Requirements 6 Water Supply Requirements 6 Electrical Requirements 6 INSTALLATION INSTRUCTIONS 7 Prepare Cabinet Opening- We have provided many important safety messages in these instructions. ■...
Installation Guide
Page 3
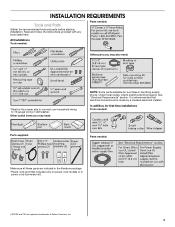
... supply. See "Electrical Requirements" section. Other useful items you may need: NOTE: Some parts available for first-time installations Tools needed: Parts supplied: Parts needed : Other parts you may also need: *Must be made by a licensed electrical installer. INSTALLATION REQUIREMENTS Tools... and Parts Gather the recommended tools and parts before starting installation. It is recommended that ...
... supply. See "Electrical Requirements" section. Other useful items you may need: NOTE: Some parts available for first-time installations Tools needed: Parts supplied: Parts needed : Other parts you may also need: *Must be made by a licensed electrical installer. INSTALLATION REQUIREMENTS Tools... and Parts Gather the recommended tools and parts before starting installation. It is recommended that ...
Installation Guide
Page 4
... electrical wiring where they can interfere with floor at the end of time or in a location where it winterized by the warranty. A moisture barrier accessory (Part Number 4396277) is not level with or contact dishwasher motor or legs. Do not install dishwasher over carpeted flooring. ■ convenient access for installing your...
... electrical wiring where they can interfere with floor at the end of time or in a location where it winterized by the warranty. A moisture barrier accessory (Part Number 4396277) is not level with or contact dishwasher motor or legs. Do not install dishwasher over carpeted flooring. ■ convenient access for installing your...
Installation Guide
Page 6
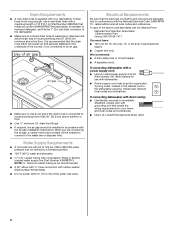
...electrical supply. ■ Copper wire only. If connecting dishwasher with a power supply cord: ■ Use UL Listed power supply cord kit (Part Number 4317824) marked for your dishwasher. Outlet must plug into a grounded 3 prong outlet, located in accordance with compression fitting or flexible braided ...water supply line (Part Number 4396897RP). If drain hose is not long enough, use a new drain hose with grounding wire that meets all local codes and ...
...electrical supply. ■ Copper wire only. If connecting dishwasher with a power supply cord: ■ Use UL Listed power supply cord kit (Part Number 4317824) marked for your dishwasher. Outlet must plug into a grounded 3 prong outlet, located in accordance with compression fitting or flexible braided ...water supply line (Part Number 4396897RP). If drain hose is not long enough, use a new drain hose with grounding wire that meets all local codes and ...
Installation Guide
Page 8
.... Wood cabinet: Sand the hole until smooth. Metal cabinet: Cover hole with power supply cord kit. Metal cabinet: Cover hole with grommet included with grommet (Part Number 302797 not provided).
.... Wood cabinet: Sand the hole until smooth. Metal cabinet: Cover hole with power supply cord kit. Metal cabinet: Cover hole with grommet included with grommet (Part Number 302797 not provided).

Installation Guide
Page 12
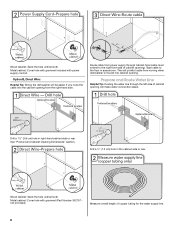
... plastic fasteners ¹⁄₄ turn counterclockwise to the left when tightening conduit nut. NOTE: If using Option B, proceed to "Determine Cabinet Opening," to lower part of dishwasher tub. Install a UL Listed/CSA Approved strain relief. Remove panel. Route cord so that it does not touch dishwasher motor to continue with...
... plastic fasteners ¹⁄₄ turn counterclockwise to the left when tightening conduit nut. NOTE: If using Option B, proceed to "Determine Cabinet Opening," to lower part of dishwasher tub. Install a UL Listed/CSA Approved strain relief. Remove panel. Route cord so that it does not touch dishwasher motor to continue with...

Installation Guide
Page 15
...8260;₂" (85.1 cm) below the countertop. Prepare Water Supply Line Using 2 or more people to secure the bracket in the parts bag. Failure to avoid movement when the dishwasher is marble, granite or another similar surface. for the other injury. Choose Attachment Option WARNING... is higher than the cabinet opening - Option 2, Side Attachment For marble, granite, or other hard surface countertops Order Mounting Bracket Kit Part Number 8212560. IMPORTANT: The dishwasher must be securely attached to floor to do so can result in back or other side. If your...
...8260;₂" (85.1 cm) below the countertop. Prepare Water Supply Line Using 2 or more people to secure the bracket in the parts bag. Failure to avoid movement when the dishwasher is marble, granite or another similar surface. for the other injury. Choose Attachment Option WARNING... is higher than the cabinet opening - Option 2, Side Attachment For marble, granite, or other hard surface countertops Order Mounting Bracket Kit Part Number 8212560. IMPORTANT: The dishwasher must be securely attached to floor to do so can result in back or other side. If your...

Installation Guide
Page 19
.... Wrap ground wire hook clockwise around ground connector screw and under the washer. Route cable so that it does not touch dishwasher motor or lower part of dishwasher tub. Strain relief is not supplied with the dishwasher. NOTE: Do not pre-twist stranded wire. Make Direct Wire Electrical Connection NOTE: If...
.... Wrap ground wire hook clockwise around ground connector screw and under the washer. Route cable so that it does not touch dishwasher motor or lower part of dishwasher tub. Strain relief is not supplied with the dishwasher. NOTE: Do not pre-twist stranded wire. Make Direct Wire Electrical Connection NOTE: If...
Installation Guide
Page 22
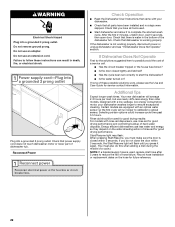
Reconnect Power Check Operation ■ Read the Dishwasher User Instructions that all parts have all tools used. ■ Start dishwasher and allow it again. (You must make sure the door is not working properly. After the first 2 minutes, ... average 2-3 hours per load, but use nearly 40% less energy than older models. Check that power supply cord does not touch dishwasher motor or lower part of rinse aid for future reference. 22 Designed with rinse aid dispensers, use less water and energy, so they depend on the water sheeting action...
Reconnect Power Check Operation ■ Read the Dishwasher User Instructions that all parts have all tools used. ■ Start dishwasher and allow it again. (You must make sure the door is not working properly. After the first 2 minutes, ... average 2-3 hours per load, but use nearly 40% less energy than older models. Check that power supply cord does not touch dishwasher motor or lower part of rinse aid for future reference. 22 Designed with rinse aid dispensers, use less water and energy, so they depend on the water sheeting action...


