Owners Manual
Page 2
... OF CONTENTS RANGE SAFETY 3 The Anti-Tip Bracket 3 COOKTOP USE 5 Cooktop Controls 5 Coil Elements and Burner Bowls 5 Dual Size Element 6 Ceramic Glass (on some models 6 Home Canning 7 Cookware 7 ELECTRONIC OVEN CONTROL 8 Display 8 Cancel 8 Clock 8 Timer 9 Control Lock 9 Oven Temperature Control 9 OVEN USE 10 Aluminum Foil 10...Hold 11 Keep Warm 12 Broiling 12 Automatic Shut-Off/Sabbath Mode 13 RANGE CARE 13 Self-Cleaning Cycle (on some models 13 General Cleaning 14 Oven Light 16 Oven Door 16 TROUBLESHOOTING 17 ASSISTANCE OR SERVICE 18 In the U.S.A 18 WARRANTY 19 2
... OF CONTENTS RANGE SAFETY 3 The Anti-Tip Bracket 3 COOKTOP USE 5 Cooktop Controls 5 Coil Elements and Burner Bowls 5 Dual Size Element 6 Ceramic Glass (on some models 6 Home Canning 7 Cookware 7 ELECTRONIC OVEN CONTROL 8 Display 8 Cancel 8 Clock 8 Timer 9 Control Lock 9 Oven Temperature Control 9 OVEN USE 10 Aluminum Foil 10...Hold 11 Keep Warm 12 Broiling 12 Automatic Shut-Off/Sabbath Mode 13 RANGE CARE 13 Self-Cleaning Cycle (on some models 13 General Cleaning 14 Oven Light 16 Oven Door 16 TROUBLESHOOTING 17 ASSISTANCE OR SERVICE 18 In the U.S.A 18 WARRANTY 19 2
Owners Manual
Page 5
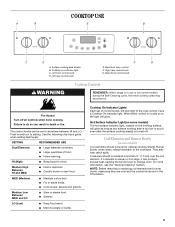
Right rear control knob G. HI (High) ■ Bring liquid to the cookware. Coil Elements and Burner Bowls (on some models) during the Self-Cleaning cycle, the entire cooktop area may become hot. For more than ½" (1.3 cm) over the coil element. Left rear control ..., sauces and gravies. When either control on a side is in use or (on some models) The hot surface indicator light, located on the cooking surface, will glow. Hot Surface Indicator Light (on some models) Coil elements should not extend more information, see the "General Cleaning" section. They also ...
Right rear control knob G. HI (High) ■ Bring liquid to the cookware. Coil Elements and Burner Bowls (on some models) during the Self-Cleaning cycle, the entire cooktop area may become hot. For more than ½" (1.3 cm) over the coil element. Left rear control ..., sauces and gravies. When either control on a side is in use or (on some models) The hot surface indicator light, located on the cooking surface, will glow. Hot Surface Indicator Light (on some models) Coil elements should not extend more information, see the "General Cleaning" section. They also ...
Owners Manual
Page 6
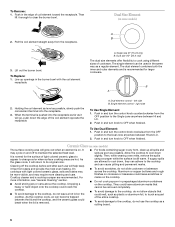
... size (6" [15.24 cm]) B. Dual size (10" [25.4 cm]) The dual size elements offer flexibility to cook using a scraper while the surface is on some models) A B 2. B A 2. Single element control - Push in and turn knob to its original color. Push in any part of the entire cooktop. ■ To avoid ...damage to the cooktop, do not leave a hot lid on some models) The surface cooking area will return to OFF when finished. It is removed. ■ For foods containing sugar in and turn the control knob ...
... size (6" [15.24 cm]) B. Dual size (10" [25.4 cm]) The dual size elements offer flexibility to cook using a scraper while the surface is on some models) A B 2. B A 2. Single element control - Push in and turn knob to its original color. Push in any part of the entire cooktop. ■ To avoid ...damage to the cooktop, do not leave a hot lid on some models) The surface cooking area will return to OFF when finished. It is removed. ■ For foods containing sugar in and turn the control knob ...
Owners Manual
Page 8
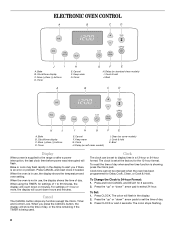
...24-hour format. The colon stops flashing. 8 Bake B. Bake B. More (+)/less (-) buttons D. Timer I A. Delay (on standard-clean models) I . Cook & hold J. To recall the time of day when another time function is supplied to the range or after a power ...-hour format. Press the "up " or "down hours and minutes. The colon will count down "' arrow pad to 24-hour Format: 1. Cancel F. Clean (on some models) J. When the oven is set the time of day. To Change the Clock to select 24 hour. Clock A B G F E H. Cook & hold K. ELECTRONIC OVEN ...
...24-hour format. The colon stops flashing. 8 Bake B. Bake B. More (+)/less (-) buttons D. Timer I A. Delay (on standard-clean models) I . Cook & hold J. To recall the time of day when another time function is supplied to the range or after a power ...-hour format. Press the "up " or "down hours and minutes. The colon will count down "' arrow pad to 24-hour Format: 1. Cancel F. Clean (on some models) J. When the oven is set the time of day. To Change the Clock to select 24 hour. Clock A B G F E H. Cook & hold K. ELECTRONIC OVEN ...
Owners Manual
Page 10
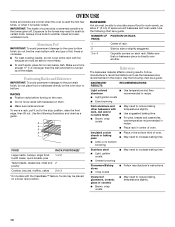
... RACK POSITION(S)* Large roasts, turkeys, angel food, bundt cakes, quick breads, pies 1 or 2 Yeast breads, casseroles, meat and 2 poultry Cookies, biscuits, muffins, cakes 2 or 3 *On models with dark, dull and/or nonstick finish ■ Brown, crisp crusts ■ May need to the fumes given off. Bakeware The bakeware material affects cooking...
... RACK POSITION(S)* Large roasts, turkeys, angel food, bundt cakes, quick breads, pies 1 or 2 Yeast breads, casseroles, meat and 2 poultry Cookies, biscuits, muffins, cakes 2 or 3 *On models with dark, dull and/or nonstick finish ■ Brown, crisp crusts ■ May need to the fumes given off. Bakeware The bakeware material affects cooking...
Owners Manual
Page 11
... read again. Do not set temperature during cooking, press BAKE, then the "up " or "down " pads to the desired degree of poultry. Meat Thermometer On models without a temperature probe, use delayed baking if oven is normal for food such as room temperature and peak energy usage times. The internal temperature, not...
... read again. Do not set temperature during cooking, press BAKE, then the "up " or "down " pads to the desired degree of poultry. Meat Thermometer On models without a temperature probe, use delayed baking if oven is normal for food such as room temperature and peak energy usage times. The internal temperature, not...
Owners Manual
Page 12
Press the "up " arrow pad to set the baking time. When the Delay time has expired: "DELAY" will bake on some models). To cancel: Press CANCEL. Food may be displayed. Press or press and hold the "up" or "down " arrow pad to set from 145°F (60&#...
Press the "up " arrow pad to set the baking time. When the Delay time has expired: "DELAY" will bake on some models). To cancel: Press CANCEL. Food may be displayed. Press or press and hold the "up" or "down " arrow pad to set from 145°F (60&#...
Owners Manual
Page 13
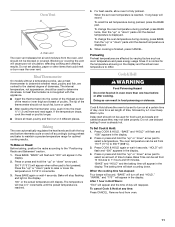
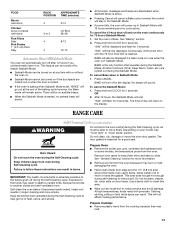
"SAb" will also be displayed continuously until turned off after 12 hours if you unintentionally leave it on at the end of some models) WARNING Do not block the oven vent(s) during self-cleaning to another closed and well-ventilated room. All other functions (Timer, Keep Warm,...in Sabbath Mode with porcelain. Do not let water, cleaner, etc. There will be turned on some models, the temperature probe from the cooktop because they may melt. 13 enter slots on your model, see "Oven Vent" or "Oven Vents" section. Prepare Cooktop: ■ Remove plastic items from the...
"SAb" will also be displayed continuously until turned off after 12 hours if you unintentionally leave it on at the end of some models) WARNING Do not block the oven vent(s) during self-cleaning to another closed and well-ventilated room. All other functions (Timer, Keep Warm,...in Sabbath Mode with porcelain. Do not let water, cleaner, etc. There will be turned on some models, the temperature probe from the cooktop because they may melt. 13 enter slots on your model, see "Oven Vent" or "Oven Vents" section. Prepare Cooktop: ■ Remove plastic items from the...
Owners Manual
Page 14
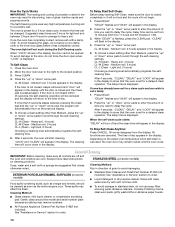
...Depending on the actual oven temperature when self-clean is not closed completely or it has completely cooled. EXTERIOR PORCELAIN ENAMEL SURFACES (on some models) Cleaning Method: Rub in direction of grain to avoid damaging. ■ Stainless Steel Cleaner and Polish Part Number 31462 (not included):... The delay time is displayed. Cleaning Method: ■ Glass cleaner, mild liquid cleaner or nonabrasive scrubbing pad: Gently clean around the model and serial number plate because scrubbing may remain locked until the door is closed and the Clean pad is closed , beeps will sound ...
...Depending on the actual oven temperature when self-clean is not closed completely or it has completely cooled. EXTERIOR PORCELAIN ENAMEL SURFACES (on some models) Cleaning Method: Rub in direction of grain to avoid damaging. ■ Stainless Steel Cleaner and Polish Part Number 31462 (not included):... The delay time is displayed. Cleaning Method: ■ Glass cleaner, mild liquid cleaner or nonabrasive scrubbing pad: Gently clean around the model and serial number plate because scrubbing may remain locked until the door is closed and the Clean pad is closed , beeps will sound ...
Owners Manual
Page 15
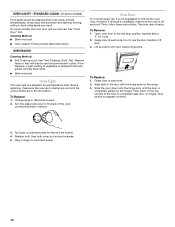
... bleach, rust remover or ammonia. COOKTOP CONTROLS To avoid damage to condition the cooktop, and can be ordered as an accessory. On some models) Cleaning Method: Chrome burner bowls Wash frequently in the Off position. Cleaning Method: ■ Warm, soapy water or dishwasher: Pull knobs ...can result. Store razor blades out of the reach of children. When replacing knobs, make sure knobs are cool. CERAMIC GLASS (on some models) Do not use oven cleaners. OVEN DOOR EXTERIOR Cleaning Method: ■ Glass cleaner and paper towels or nonabrasive plastic scrubbing pad: Apply ...
... bleach, rust remover or ammonia. COOKTOP CONTROLS To avoid damage to condition the cooktop, and can be ordered as an accessory. On some models) Cleaning Method: Chrome burner bowls Wash frequently in the Off position. Cleaning Method: ■ Warm, soapy water or dishwasher: Pull knobs ...can result. Store razor blades out of the reach of children. When replacing knobs, make sure knobs are cool. CERAMIC GLASS (on some models) Do not use oven cleaners. OVEN DOOR EXTERIOR Cleaning Method: ■ Glass cleaner and paper towels or nonabrasive plastic scrubbing pad: Apply ...
Owners Manual
Page 16
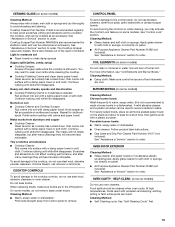
... light is completely seated on the top corners of vegetable oil applied to the rack guides will discolor and become harder to remove. On some models) Food spills should not appear crooked. 3. To Remove: 1. Slide the door down on the hinges. OVEN CAVITY - See "Oven Door" first. At high... temperatures, foods react with the hinge arms on some models, the oven door can result. Turn the glass bulb cover in range or reconnect power. 16 Replace bulb, then bulb cover by turning clockwise. 5. STANDARD...
... light is completely seated on the top corners of vegetable oil applied to the rack guides will discolor and become harder to remove. On some models) Food spills should not appear crooked. 3. To Remove: 1. Slide the door down on the hinges. OVEN CAVITY - See "Oven Door" first. At high... temperatures, foods react with the hinge arms on some models, the oven door can result. Turn the glass bulb cover in range or reconnect power. 16 Replace bulb, then bulb cover by turning clockwise. 5. STANDARD...
Owners Manual
Page 17
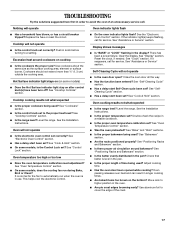
... the range level? See "Cooktop Controls" section. ■ Is the range level? Level the range. See "Cook & Hold" section. ■ On some models, does the cooling fan run when the oven is level in the display? See "Oven Temperature Control" section. ■ On some... Control" section. ■ Was the oven preheated? Use aluminum foil to higher position in the pan? Hot Surface indicator light stays on (on some models) ■ Does the Hot Surface indicator light stay on cooktop ■ Is the cookware the proper size? See the Installation Instructions. See "Bakeware" ...
... the range level? See "Cooktop Controls" section. ■ Is the range level? Level the range. See "Cook & Hold" section. ■ On some models, does the cooling fan run when the oven is level in the display? See "Oven Temperature Control" section. ■ On some... Control" section. ■ Was the oven preheated? Use aluminum foil to higher position in the pan? Hot Surface indicator light stays on (on some models) ■ Does the Hot Surface indicator light stay on cooktop ■ Is the cookware the proper size? See the Installation Instructions. See "Bakeware" ...
Owners Manual
Page 18
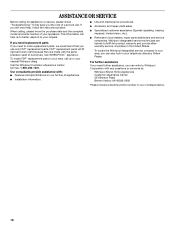
.... Our consultants provide assistance with: ■ Features and specifications on our full line of your request. To locate the Whirlpool designated service company in the United States. FSP® replacement parts will help , follow the instructions below. To locate ... ASSISTANCE OR SERVICE Before calling for assistance or service, please check "Troubleshooting." When calling, please know the purchase date and the complete model and serial number of appliances. ■ Installation information. ■ Use and maintenance procedures. ■ Accessory and repair parts sales....
.... Our consultants provide assistance with: ■ Features and specifications on our full line of your request. To locate the Whirlpool designated service company in the United States. FSP® replacement parts will help , follow the instructions below. To locate ... ASSISTANCE OR SERVICE Before calling for assistance or service, please check "Troubleshooting." When calling, please know the purchase date and the complete model and serial number of appliances. ■ Installation information. ■ Use and maintenance procedures. ■ Accessory and repair parts sales....
Owners Manual
Page 19
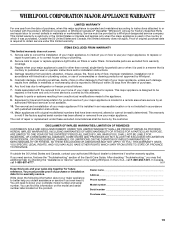
...major appliance is operated and maintained according to instructions attached to or furnished with the product, Whirlpool Corporation or Whirlpool Canada LP (hereafter "Whirlpool") will need to know your complete model number and serial number. Damage resulting from defects in -home service is not installed in ...materials or workmanship. WHIRLPOOL SHALL NOT BE LIABLE FOR INCIDENTAL OR CONSEQUENTIAL DAMAGES. THIS WARRANTY GIVES YOU SPECIFIC LEGAL RIGHTS, ...
...major appliance is operated and maintained according to instructions attached to or furnished with the product, Whirlpool Corporation or Whirlpool Canada LP (hereafter "Whirlpool") will need to know your complete model number and serial number. Damage resulting from defects in -home service is not installed in ...materials or workmanship. WHIRLPOOL SHALL NOT BE LIABLE FOR INCIDENTAL OR CONSEQUENTIAL DAMAGES. THIS WARRANTY GIVES YOU SPECIFIC LEGAL RIGHTS, ...
Dimension Guide
Page 1
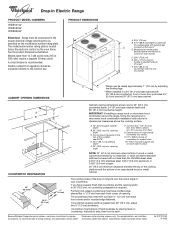
... packed with not less than 30" (76.2 cm), adjust the ³⁄₈" (1.0 cm) dimension. ® Drop-in * C. Model/serial number plate (located below the electronic control on countertop, first side to side, then front to change without notice. Junction box - 5.5" ...23³⁄₄" (60.3 cm) countertop notch to support slats I. 6" (15.2 cm) wide support slat on the model/serial number rating plate. Because Whirlpool Corporation policy includes a continuous commitment to the proper electrical voltage and frequency as specified on each side of cutout G I COUNTERTOP...
... packed with not less than 30" (76.2 cm), adjust the ³⁄₈" (1.0 cm) dimension. ® Drop-in * C. Model/serial number plate (located below the electronic control on countertop, first side to side, then front to change without notice. Junction box - 5.5" ...23³⁄₄" (60.3 cm) countertop notch to support slats I. 6" (15.2 cm) wide support slat on the model/serial number rating plate. Because Whirlpool Corporation policy includes a continuous commitment to the proper electrical voltage and frequency as specified on each side of cutout G I COUNTERTOP...
Installation Instructions
Page 3
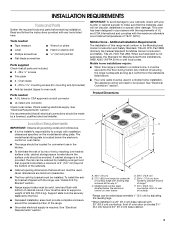
...with your cabinets, check with the maximum allowable wood cabinet temperatures of 225 lbs (102.0 kg). See "Electrical Connection" section. The model/serial rating plate is adequate as long as it must be made by adjusting the leveling legs. **When installed in * C. Check existing...the risk can be revised. This oven has been designed in a mobile home installation. See "Electrical Requirements" section. Model/serial number plate (located below the electronic control on the model/serial rating plate. Read and follow the instructions provided with 25" (63.5 cm) countertop;
...with your cabinets, check with the maximum allowable wood cabinet temperatures of 225 lbs (102.0 kg). See "Electrical Connection" section. The model/serial rating plate is adequate as long as it must be made by adjusting the leveling legs. **When installed in * C. Check existing...the risk can be revised. This oven has been designed in a mobile home installation. See "Electrical Requirements" section. Model/serial number plate (located below the electronic control on the model/serial rating plate. Read and follow the instructions provided with 25" (63.5 cm) countertop;

Installation Instructions
Page 4
...) max. Follow the electrical connector manufacturer's recommended procedure. opening width C. O-M91-latest edition, and all local codes and ordinances. Model/serial number plate ■ Models rated from 12.7 kW at 240 volts (9.5 at 208 volts) require a separate 50-amp circuit. ■ A circuit breaker ...copper wire to aluminum. Connect a section of the above the cooktop surface. from appliance should not extend into cutout. The model/serial number rating plate is properly grounded. Connect the aluminum wiring to the added section of copper wire using and follow the...
...) max. Follow the electrical connector manufacturer's recommended procedure. opening width C. O-M91-latest edition, and all local codes and ordinances. Model/serial number plate ■ Models rated from 12.7 kW at 240 volts (9.5 at 208 volts) require a separate 50-amp circuit. ■ A circuit breaker ...copper wire to aluminum. Connect a section of the above the cooktop surface. from appliance should not extend into cutout. The model/serial number rating plate is properly grounded. Connect the aluminum wiring to the added section of copper wire using and follow the...

Warranty
Page 1
... date 19 ITEMS EXCLUDED FROM WARRANTY This limited warranty does not cover: 1. Costs associated with original model/serial numbers that is contrary to correct defects in accordance with the product, Whirlpool Corporation or Whirlpool Canada LP (hereafter "Whirlpool") will need it was purchased. Expenses for travel and transportation for repairs. IMPLIED WARRANTIES, INCLUDING WARRANTIES...
... date 19 ITEMS EXCLUDED FROM WARRANTY This limited warranty does not cover: 1. Costs associated with original model/serial numbers that is contrary to correct defects in accordance with the product, Whirlpool Corporation or Whirlpool Canada LP (hereafter "Whirlpool") will need it was purchased. Expenses for travel and transportation for repairs. IMPLIED WARRANTIES, INCLUDING WARRANTIES...


