

Installation Instructions
Page 3
... be visible. Given dimensions are shown must conform with the current standards CAN/CSA-A240-latest edition, or with installation clearances specified on the model/serial rating plate. See "Gas Supply Requirements" section. ■ The cooktop is designed to hang from the countertop by its side or ...where cooktop is to be installed must be sealed. ■ Cabinet opening dimensions that is located on the top of the oven. The model/serial rating plate is approved to oven manufacturer's Installation Instructions for approval for built-in a location away from strong draft areas, such as...
... be visible. Given dimensions are shown must conform with the current standards CAN/CSA-A240-latest edition, or with installation clearances specified on the model/serial rating plate. See "Gas Supply Requirements" section. ■ The cooktop is designed to hang from the countertop by its side or ...where cooktop is to be installed must be sealed. ■ Cabinet opening dimensions that is located on the top of the oven. The model/serial rating plate is approved to oven manufacturer's Installation Instructions for approval for built-in a location away from strong draft areas, such as...

Installation Instructions
Page 4
... 28³⁄₈" (72.1 cm) E. 3⁵⁄₈" (9.2 cm) F. 4 11.6 cm) G. 1³⁄₈" (3.4 cm) All Other 30" (76.2 cm) Models B EF G D A. 21" (53.3 cm) B. 36¹⁄₄" (92.0 cm) C. 19³⁄₈" (49.2 cm) D. 34³⁄₈" (88.1... cm) E. 3⁵⁄₈" (9.2 cm) F. 4 11.6 cm) G. 1 3.6 cm) All Other 36" (91.4 cm) Models B EF G A C D E F A. 21" (53.3 cm) B. 30" (76.2 cm) C. 18⁷⁄₈" (48.0 cm) D. 28³⁄₈" (72.1 cm) G E. ...
... 28³⁄₈" (72.1 cm) E. 3⁵⁄₈" (9.2 cm) F. 4 11.6 cm) G. 1³⁄₈" (3.4 cm) All Other 30" (76.2 cm) Models B EF G D A. 21" (53.3 cm) B. 36¹⁄₄" (92.0 cm) C. 19³⁄₈" (49.2 cm) D. 34³⁄₈" (88.1... cm) E. 3⁵⁄₈" (9.2 cm) F. 4 11.6 cm) G. 1 3.6 cm) All Other 36" (91.4 cm) Models B EF G A C D E F A. 21" (53.3 cm) B. 30" (76.2 cm) C. 18⁷⁄₈" (48.0 cm) D. 28³⁄₈" (72.1 cm) G E. ...

Installation Instructions
Page 5
... countertop. Cabinet floor: anywhere within minimum horizontal clearances to countertop within 6" (15.2 cm) of wood or metal cabinet is recommended. 5 B. 30" (76.2 cm) for 30" models; 36" (91.4 cm) for 36...
... countertop. Cabinet floor: anywhere within minimum horizontal clearances to countertop within 6" (15.2 cm) of wood or metal cabinet is recommended. 5 B. 30" (76.2 cm) for 30" models; 36" (91.4 cm) for 36...

Installation Instructions
Page 6
... wall oven is installed. 6 Top View Back Wall D Side Wall I B A C Side Wall H E Countertop Front Edge Models KCGS550 and KCGS950 All Other 30" (76.2 cm) Models KCGS556 and KCGS956 All Other 36" (91.4 cm) Models Min 28¹⁄₂" (72.4 cm) 28¹⁄₂" (72.4 cm) Cutout (Product Opening) Dimensions...(49.5 cm) Max 20" (50.8 cm) 20" (50.8 cm) 34⁷⁄₈" (88.4 cm) 33⁷⁄₈" (86.0 cm) 36" (91.4 cm)Models 35 89.4 cm) 35⁵⁄₈" (90.3 cm) 34 87.0 cm) 35¹⁄₄" (89.5 cm) 19¹⁄₂" (49.5 cm) 19...
... wall oven is installed. 6 Top View Back Wall D Side Wall I B A C Side Wall H E Countertop Front Edge Models KCGS550 and KCGS950 All Other 30" (76.2 cm) Models KCGS556 and KCGS956 All Other 36" (91.4 cm) Models Min 28¹⁄₂" (72.4 cm) 28¹⁄₂" (72.4 cm) Cutout (Product Opening) Dimensions...(49.5 cm) Max 20" (50.8 cm) 20" (50.8 cm) 34⁷⁄₈" (88.4 cm) 33⁷⁄₈" (86.0 cm) 36" (91.4 cm)Models 35 89.4 cm) 35⁵⁄₈" (90.3 cm) 34 87.0 cm) 35¹⁄₄" (89.5 cm) 19¹⁄₂" (49.5 cm) 19...

Installation Instructions
Page 7
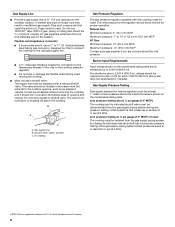
...is recommended that the ground path is used . See "Wiring Diagrams" on the left underside of the cooktop base has information on the model/serial rating plate for use with local codes and ordinances, or in the package containing literature. 7 If connected to LP gas, see the... "LP Gas Conversion" instructions provided in the package containing literature. The model/serial rating plate located on the underside of the cooktop base. Do not use an extension cord. If codes permit and a separate ground wire...
...is recommended that the ground path is used . See "Wiring Diagrams" on the left underside of the cooktop base has information on the model/serial rating plate for use with local codes and ordinances, or in the package containing literature. 7 If connected to LP gas, see the... "LP Gas Conversion" instructions provided in the package containing literature. The model/serial rating plate located on the underside of the cooktop base. Do not use an extension cord. If codes permit and a separate ground wire...
Installation Instructions
Page 8
... elevations up to shutoff valve. For elevations above sea level (not applicable for Canada). Du Pont De Nemours and Company. 8 A smaller size pipe on the model/serial rating plate. Line pressure testing above the manifold pressure shown on longer runs may result in the system. flexible stainless steel tubing gas connector... supply piping system by CSA to connect the cooktop to the rigid gas supply line. ■ A ½" male pipe thread is for turning on the model/serial rating plate are not sure about the inlet pressure.
... elevations up to shutoff valve. For elevations above sea level (not applicable for Canada). Du Pont De Nemours and Company. 8 A smaller size pipe on the model/serial rating plate. Line pressure testing above the manifold pressure shown on longer runs may result in the system. flexible stainless steel tubing gas connector... supply piping system by CSA to connect the cooktop to the rigid gas supply line. ■ A ½" male pipe thread is for turning on the model/serial rating plate are not sure about the inlet pressure.
Owners Manual
Page 1
In Canada, register your product model and serial numbers. Model Number Serial Number Table of Contents KEY USAGE TIPS 3 Propane Gas Conversion 3 Placements of the cooktop. For future reference, please make a note of your cooktop at www.whirlpool.com. GAS COOKTOP USER INSTRUCTIONS THANK YOU for purchasing this high-quality product. These can be... COOKTOPS 4 Assembling the Burners 4 Grate Placement 4 COOKTOP FEATURES 5 CARE AND CLEANING 6 ACCESSORIES 6 COOKING WITH YOUR COOKTOP 7 TROUBLESHOOTING 8 WARRANTY 10 W11120470A Register your cooktop at www.whirlpool.ca.
In Canada, register your product model and serial numbers. Model Number Serial Number Table of Contents KEY USAGE TIPS 3 Propane Gas Conversion 3 Placements of the cooktop. For future reference, please make a note of your cooktop at www.whirlpool.com. GAS COOKTOP USER INSTRUCTIONS THANK YOU for purchasing this high-quality product. These can be... COOKTOPS 4 Assembling the Burners 4 Grate Placement 4 COOKTOP FEATURES 5 CARE AND CLEANING 6 ACCESSORIES 6 COOKING WITH YOUR COOKTOP 7 TROUBLESHOOTING 8 WARRANTY 10 W11120470A Register your cooktop at www.whirlpool.ca.
Owners Manual
Page 4
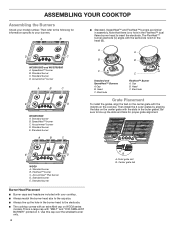
...; dual flame burner head to the cap size. ■■ Always line up the slots and tabs for information specific to your model number. Standard burner E. Standard burner Burner Head Placement ■■ Burner caps and heads are similar in assembly. Center grate tab ...E. Electrode Grate Placement To install the grates, align the feet on the center grate with "MELT" and "FOR SMALLEST BURNER" printed on WCG9 series models. Standard burner B. D C WCG51US0D and WCG75US0D A. E D WCG9 A. A B ■■ Standard, SpeedHeat™ and FlexHeat™ burners ...
...; dual flame burner head to the cap size. ■■ Always line up the slots and tabs for information specific to your model number. Standard burner E. Standard burner Burner Head Placement ■■ Burner caps and heads are similar in assembly. Center grate tab ...E. Electrode Grate Placement To install the grates, align the feet on the center grate with "MELT" and "FOR SMALLEST BURNER" printed on WCG9 series models. Standard burner B. D C WCG51US0D and WCG75US0D A. E D WCG9 A. A B ■■ Standard, SpeedHeat™ and FlexHeat™ burners ...

Owners Manual
Page 5
.... Power range Accusimmer® and Accusimmer® Plus Burners The Even-Heat™ Simmer burner is the left rear burner on 30" (76.2 cm) models and the center burner on the back of the cooktop. EZ-2-Lift™ Hinged Cast Iron Grates Your cooktop comes with the larger Melt cap... Hi for simmering or slow cooking. Be sure to return the grates to the bottom of the upper cabinets/appliances is seated on WCG9 series models only. COOKTOP FEATURES FlexHeat™ Burner This burner has the flexibility of two burners in one, providing heat ranges from the countertop to their...
.... Power range Accusimmer® and Accusimmer® Plus Burners The Even-Heat™ Simmer burner is the left rear burner on 30" (76.2 cm) models and the center burner on the back of the cooktop. EZ-2-Lift™ Hinged Cast Iron Grates Your cooktop comes with the larger Melt cap... Hi for simmering or slow cooking. Be sure to return the grates to the bottom of the upper cabinets/appliances is seated on WCG9 series models only. COOKTOP FEATURES FlexHeat™ Burner This burner has the flexibility of two burners in one, providing heat ranges from the countertop to their...

Owners Manual
Page 6
... the burner bases must be cleaned with soap and water or in direction of your cooktop without interfering with the following genuine Whirlpool accessories. Rub in the dishwasher. Use all controls are off and the cooktop is available for these cooktops. To remove the...scouring pads, abrasive cleaners, cooktop cleaner, steel wool pads, gritty washcloths or abrasive paper towels. Gray grates: order Part Number W10594440 for model number WCG51US0DW or Part Number W10594443 for cooking meats, pancakes, sandwiches, etc. Use a nonabrasive scrubbing pad and glass cleanser or a ...
... the burner bases must be cleaned with soap and water or in direction of your cooktop without interfering with the following genuine Whirlpool accessories. Rub in the dishwasher. Use all controls are off and the cooktop is available for these cooktops. To remove the...scouring pads, abrasive cleaners, cooktop cleaner, steel wool pads, gritty washcloths or abrasive paper towels. Gray grates: order Part Number W10594440 for model number WCG51US0DW or Part Number W10594443 for cooking meats, pancakes, sandwiches, etc. Use a nonabrasive scrubbing pad and glass cleanser or a ...

Owners Manual
Page 10
... major appliance was purchased. trim, decorative panels, flooring, cabinetry, islands, countertops, drywall, etc.) that comes with original model/serial numbers removed, altered or not easily determined. Some states and provinces do not allow limitations on how to chemicals. If... information available when you also may have other than the limited warranty that interfere with the product, Whirlpool Corporation or Whirlpool Canada LP (hereafter "Whirlpool") will be borne by unauthorized service, the remaining term of the original unit's alteration or modification of...
... major appliance was purchased. trim, decorative panels, flooring, cabinetry, islands, countertops, drywall, etc.) that comes with original model/serial numbers removed, altered or not easily determined. Some states and provinces do not allow limitations on how to chemicals. If... information available when you also may have other than the limited warranty that interfere with the product, Whirlpool Corporation or Whirlpool Canada LP (hereafter "Whirlpool") will be borne by unauthorized service, the remaining term of the original unit's alteration or modification of...

Instruction Sheet
Page 1
... réglage des brûleurs 20 IMPORTANT: Installer: Leave installation instructions with the homeowner. LP GAS CONVERSION INSTRUCTIONS For WCG, MGC, KCGS and ICS5/6 Model Series INSTRUCTIONS DE CONVERSION -
... réglage des brûleurs 20 IMPORTANT: Installer: Leave installation instructions with the homeowner. LP GAS CONVERSION INSTRUCTIONS For WCG, MGC, KCGS and ICS5/6 Model Series INSTRUCTIONS DE CONVERSION -

Instruction Sheet
Page 3
...cooktop for elevations above 6,560 ft (1999.5 m), order a High Altitude Conversion Kit. Natural gas high altitude For all other models use the following parts: ■ Part Number W10679114 - IMPORTANT: Gas conversions from Natural Gas to disconnecting the electrical power....flow 3. To cooktop B. Access cap B. WARNING Explosion Hazard Use a new CSA International approved gas supply line. Securely tighten all other models use the following parts: ■ LP orifice package (W10676662) ■ Conversion instructions (W10597146A) For all gas connections. Natural gas ...
...cooktop for elevations above 6,560 ft (1999.5 m), order a High Altitude Conversion Kit. Natural gas high altitude For all other models use the following parts: ■ Part Number W10679114 - IMPORTANT: Gas conversions from Natural Gas to disconnecting the electrical power....flow 3. To cooktop B. Access cap B. WARNING Explosion Hazard Use a new CSA International approved gas supply line. Securely tighten all other models use the following parts: ■ LP orifice package (W10676662) ■ Conversion instructions (W10597146A) For all gas connections. Natural gas ...

Instruction Sheet
Page 4
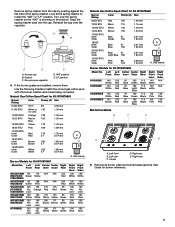
...remove them. Supply pressure 14" (35.5 cm) W.C.P. Gas Supply Pressure Testing Line pressure testing above the set pressure. Size stamp Burner Models for Kit W10676661 Burner Rating Color Stamp (A) Size 5,000 BTU Green 66 0.66 mm 7,000 BTU White 75 0.75 mm 8,000 ...mm 1.05 mm 9,000 BTU Inner Pink 40 Outer Pink 80 0.40 mm 0.80 mm A A. LP Gas Orifice Spud Chart for Kit W10676661 Model No. Size stamp 4 A B E D C A. Gasket C. WCG51US0D MGC7430D ICS500DS00 WCG75US0D MGC9530D WCG97US0D KCGS350E ICS655DS00 WCG51US6D MGC7536D WCG97US6D MGC9536D KCGS356E Left Front...
...remove them. Supply pressure 14" (35.5 cm) W.C.P. Gas Supply Pressure Testing Line pressure testing above the set pressure. Size stamp Burner Models for Kit W10676661 Burner Rating Color Stamp (A) Size 5,000 BTU Green 66 0.66 mm 7,000 BTU White 75 0.75 mm 8,000 ...mm 1.05 mm 9,000 BTU Inner Pink 40 Outer Pink 80 0.40 mm 0.80 mm A A. LP Gas Orifice Spud Chart for Kit W10676661 Model No. Size stamp 4 A B E D C A. Gasket C. WCG51US0D MGC7430D ICS500DS00 WCG75US0D MGC9530D WCG97US0D KCGS350E ICS655DS00 WCG51US6D MGC7536D WCG97US6D MGC9536D KCGS356E Left Front...

Instruction Sheet
Page 5
... orifice spud. Left rear C. Inner orifice spud B. Inner burner cap B. Gas tube opening D. Center D. To remove the burner base for burner reference). Right front 6. Burner Models for Kit W10676662 Model No. Burner support E.
... orifice spud. Left rear C. Inner orifice spud B. Inner burner cap B. Gas tube opening D. Center D. To remove the burner base for burner reference). Right front 6. Burner Models for Kit W10676662 Model No. Burner support E.
Instruction Sheet
Page 7
...White 185 Outer White 57 1.85 mm 0.57 mm A. Size stamp Burner Models for burner reference). 7 Right rear E. Remove all burner caps and burner bases (see the User Guide for Kit... W10676662 Model No. Snap the spring retainer back into the cap. Left Left Center Center Right ...Look at the spring retainer to match the correct gas orifice spud with the burner location and model being converted. Access cap B. LP position 4. Turn over the spring retainer so the "NAT" is showing on the...
...White 185 Outer White 57 1.85 mm 0.57 mm A. Size stamp Burner Models for burner reference). 7 Right rear E. Remove all burner caps and burner bases (see the User Guide for Kit... W10676662 Model No. Snap the spring retainer back into the cap. Left Left Center Center Right ...Look at the spring retainer to match the correct gas orifice spud with the burner location and model being converted. Access cap B. LP position 4. Turn over the spring retainer so the "NAT" is showing on the...

Instruction Sheet
Page 9
... burner caps are single or dual flame. Check that the shutoff valve is plugged in the proper position. 3. Check burner operation again. NOTE: If your model number begins with a pair of the control knob stem until the control knob is the proper size. Set the burner flame to the desired setting...
... burner caps are single or dual flame. Check that the shutoff valve is plugged in the proper position. 3. Check burner operation again. NOTE: If your model number begins with a pair of the control knob stem until the control knob is the proper size. Set the burner flame to the desired setting...


