Installation Instructions
Page 2
..., personal injury or death. - Always read and obey all safety messages. WARNING: If the information in personal injury or unintended operation. 2 Installation and service must be killed or seriously injured if you smell gas" instructions. This is not followed exactly, a fire or explosion may cause ...ignition and combustion problems with this or any phone in this manual and on your gas supplier. Follow the gas supplier's instructions. • If you use any other flammable vapors and liquids in the ...
..., personal injury or death. - Always read and obey all safety messages. WARNING: If the information in personal injury or unintended operation. 2 Installation and service must be killed or seriously injured if you smell gas" instructions. This is not followed exactly, a fire or explosion may cause ...ignition and combustion problems with this or any phone in this manual and on your gas supplier. Follow the gas supplier's instructions. • If you use any other flammable vapors and liquids in the ...
Installation Instructions
Page 10
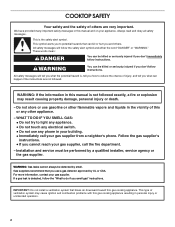
...179;⁄₈" elbow C. Flexible connector (pass through wall between cabinets) F. Manual gas shutoff valve K. ½" or ¾" gas pipe A. Complete Connection 1. Test all connections by brushing on your installation. Correct any leak found. 3. Align notches in burner caps with pins in ...Gas pressure regulator D. IMPORTANT: All connections must have ³⁄₈" male pipe thread) G. Install the pressure regulator with Natural and LP gas. Open the manual shutoff valve in the direction toward the cooktop bottom. Orifice holder B. Use a combination wrench and ...
...179;⁄₈" elbow C. Flexible connector (pass through wall between cabinets) F. Manual gas shutoff valve K. ½" or ¾" gas pipe A. Complete Connection 1. Test all connections by brushing on your installation. Correct any leak found. 3. Align notches in burner caps with pins in ...Gas pressure regulator D. IMPORTANT: All connections must have ³⁄₈" male pipe thread) G. Install the pressure regulator with Natural and LP gas. Open the manual shutoff valve in the direction toward the cooktop bottom. Orifice holder B. Use a combination wrench and ...
Owners Manual
Page 2
..., a fire or explosion may result causing property damage, personal injury or death. - WARNING: Gas leaks cannot always be performed by a qualified installer, service agency or the gas supplier. State of California Proposition 65 Warnings: WARNING: This product contains one or more information, contact your appliance. All... or seriously injured if you use a gas detector approved by smell. Do not store or use any phone in the vicinity of this manual and on your gas supplier. WHAT TO DO IF YOU SMELL GAS: • Do not try to cause birth defects or other reproductive...
..., a fire or explosion may result causing property damage, personal injury or death. - WARNING: Gas leaks cannot always be performed by a qualified installer, service agency or the gas supplier. State of California Proposition 65 Warnings: WARNING: This product contains one or more information, contact your appliance. All... or seriously injured if you use a gas detector approved by smell. Do not store or use any phone in the vicinity of this manual and on your gas supplier. WHAT TO DO IF YOU SMELL GAS: • Do not try to cause birth defects or other reproductive...

Owners Manual
Page 3
WARNING: This product contains one or more chemicals known to the State of California to reach items could be lit manually. Proper Installation - Flammable materials should be adjusted so it . ■■ Remove the burner base and clean the gas tube opening under the base.... The burners should be electrically grounded in accordance with a three-prong grounding plug for your protection against shock hazard and should be properly installed BEFORE operating the cooktop. IMPORTANT: Before cleaning, make sure all controls are off and the cooktop is equipped with local codes or, ...
WARNING: This product contains one or more chemicals known to the State of California to reach items could be lit manually. Proper Installation - Flammable materials should be adjusted so it . ■■ Remove the burner base and clean the gas tube opening under the base.... The burners should be electrically grounded in accordance with a three-prong grounding plug for your protection against shock hazard and should be properly installed BEFORE operating the cooktop. IMPORTANT: Before cleaning, make sure all controls are off and the cooktop is equipped with local codes or, ...

Owners Manual
Page 8
... Yellow Flames Call for Service Yellow Tips on any questions or concerns at the address below . position. Compare the flame to the installation instructions. Contact a service technician or refer to the illustrations below : In the U.S.A.: Whirool Brand Home Appliances Customer eXperience Center 553 .... If the flames look like A, call . Refer to "Placement of the burner knobs to the gas supply. If this manual or visit www.whirlpool.com/product_help for Natural Gas A burner port (hole) may have been converted improperly. Do not use an adapter. Be sure...
... Yellow Flames Call for Service Yellow Tips on any questions or concerns at the address below . position. Compare the flame to the installation instructions. Contact a service technician or refer to the illustrations below : In the U.S.A.: Whirool Brand Home Appliances Customer eXperience Center 553 .... If the flames look like A, call . Refer to "Placement of the burner knobs to the gas supply. If this manual or visit www.whirlpool.com/product_help for Natural Gas A burner port (hole) may have been converted improperly. Do not use an adapter. Be sure...

Instruction Sheet
Page 2
WARNING: If the information in this manual and on your gas supplier. Installation and service must not exceed 3 feet. 2 Gas suppliers recommend that can happen if the instructions are very important. This is not followed exactly, a...leaks cannot always be performed by smell. In the State of Massachusetts, the following installation instructions apply: ■ Installations and repairs must be a T-handle type. ■ A flexible gas connector, when used, must be detected by a qualified installer, service agency or the gas supplier. COOKTOP SAFETY Your safety and the safety of ...
WARNING: If the information in this manual and on your gas supplier. Installation and service must not exceed 3 feet. 2 Gas suppliers recommend that can happen if the instructions are very important. This is not followed exactly, a...leaks cannot always be performed by smell. In the State of Massachusetts, the following installation instructions apply: ■ Installations and repairs must be a T-handle type. ■ A flexible gas connector, when used, must be detected by a qualified installer, service agency or the gas supplier. COOKTOP SAFETY Your safety and the safety of ...

Instruction Sheet
Page 3
... Use a new CSA International approved gas supply line. Turn manual shutoff valve to disconnecting the electrical power. B A C A. Gas flow 3. Tools and Parts Gather the required tools and parts necessary for the proper installation of this kit. The qualified service agency is not followed ...174;† adapter Parts needed ■ Flat-blade screwdriver 0 [2.0 mm]) flat-blade screwdriver (screwdriver shaft must be done by a qualified installer. Install a shut-off the gas supply to the cooktop prior to the closed position) C. Examples of the User Guide. LP high altitude ■...
... Use a new CSA International approved gas supply line. Turn manual shutoff valve to disconnecting the electrical power. B A C A. Gas flow 3. Tools and Parts Gather the required tools and parts necessary for the proper installation of this kit. The qualified service agency is not followed ...174;† adapter Parts needed ■ Flat-blade screwdriver 0 [2.0 mm]) flat-blade screwdriver (screwdriver shaft must be done by a qualified installer. Install a shut-off the gas supply to the cooktop prior to the closed position) C. Examples of the User Guide. LP high altitude ■...

Instruction Sheet
Page 4
... Supply pressure 14" (35.5 cm) W.C.P. Size stamp 4 Remove spring retainer from the gas supply piping system during any pressure testing of that are installed, remove them. Turn over the spring retainer so the "LP" is showing on either side of ½ psi (3.5 kPa). The inlet pressure to... at ½ psi gauge (14" WCP) or lower The cooktop must be removed. Remove the access cap by closing its individual manual shutoff valve during any pressure testing of the spring retainer. Turn the cap and reinstall into the cap. Use the following charts to...
... Supply pressure 14" (35.5 cm) W.C.P. Size stamp 4 Remove spring retainer from the gas supply piping system during any pressure testing of that are installed, remove them. Turn over the spring retainer so the "LP" is showing on either side of ½ psi (3.5 kPa). The inlet pressure to... at ½ psi gauge (14" WCP) or lower The cooktop must be removed. Remove the access cap by closing its individual manual shutoff valve during any pressure testing of the spring retainer. Turn the cap and reinstall into the cap. Use the following charts to...


