
Owners Manual
Page 1
...una versión de estas instrucciones en español, visite www.whirlpool.com. KNOB CONTROLS 5 Dual/Triple-Circuit Element (on some models 5 Warm Zone Element (on some models 6 Home Canning 7 Cookware 7 COOKTOP CARE 7 General Cleaning 7 TROUBLESHOOTING 9 ASSISTANCE OR SERVICE 10 In ...the U.S.A 10 Accessories 10 In Canada 10 W11206695A In Mexico, register your range at www.whirlpool.mx. You may view them by rotating the serial plates...
...una versión de estas instrucciones en español, visite www.whirlpool.com. KNOB CONTROLS 5 Dual/Triple-Circuit Element (on some models 5 Warm Zone Element (on some models 6 Home Canning 7 Cookware 7 COOKTOP CARE 7 General Cleaning 7 TROUBLESHOOTING 9 ASSISTANCE OR SERVICE 10 In ...the U.S.A 10 Accessories 10 In Canada 10 W11206695A In Mexico, register your range at www.whirlpool.mx. You may view them by rotating the serial plates...

Owners Manual
Page 2
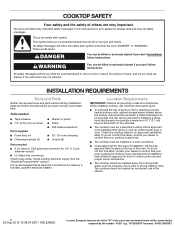
COOKTOP SAFETY Your safety and the safety of injury, and tell you what the potential hazard is the safety alert symbol. This symbol alerts you to ...
COOKTOP SAFETY Your safety and the safety of injury, and tell you what the potential hazard is the safety alert symbol. This symbol alerts you to ...

Owners Manual
Page 3
... risk of burns, ignition of the heating element to direct contact and may result in ignition of the cooktop. If cooktop should never be worn while using the cooktop, follow basic precautions, including the following: CAUTION: Do not store items of electric shock. Contact a...Clean Ventilating Hoods Frequently - Do Not Soak Removable Heating Elements - They should be left alone or unattended in cabinets above a cooktop - This cooktop is equipped with oil or fat is in the manual. Only certain types of a utensil should never be supervised. Select ...
... risk of burns, ignition of the heating element to direct contact and may result in ignition of the cooktop. If cooktop should never be worn while using the cooktop, follow basic precautions, including the following: CAUTION: Do not store items of electric shock. Contact a...Clean Ventilating Hoods Frequently - Do Not Soak Removable Heating Elements - They should be left alone or unattended in cabinets above a cooktop - This cooktop is equipped with oil or fat is in the manual. Only certain types of a utensil should never be supervised. Select ...

Owners Manual
Page 4
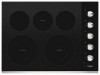
... (with dual size element) E. Left front control knob (dual-size) Cooktops WCE55US6H (36" [91.4 cm]) WCE77US6H (36" [91.4 cm]) C B D A G E F Ceramic glass Cooktop A. Center rear warming zone D. Left front single surface cooking area 4 Control Panels WCE55US4H (24"[60.96 cm]) WCE55US0H (30"[76.2 cm]) WCE77US0H (30"[76.2 cm]) A WCE55US6H (36" [91.4 cm]) WCE77US6H (36...
... (with dual size element) E. Left front control knob (dual-size) Cooktops WCE55US6H (36" [91.4 cm]) WCE77US6H (36" [91.4 cm]) C B D A G E F Ceramic glass Cooktop A. Center rear warming zone D. Left front single surface cooking area 4 Control Panels WCE55US4H (24"[60.96 cm]) WCE55US0H (30"[76.2 cm]) WCE77US0H (30"[76.2 cm]) A WCE55US6H (36" [91.4 cm]) WCE77US6H (36...

Owners Manual
Page 5
...simmer using lids. ■■ Home canning. ■■ Large-diameter cookware. ■■ Large quantities of food, and home canning. REMEMBER: When cooktop is on the size of the cookware. Triple size A B A. Dual/Triple-Circuit Element (on some models) RECOMMENDED USE ■■ Start food cooking... liquid to touch, even after the power is turned off all controls when done cooking. Push in use, the entire cooktop area may become hot. Dual size C. Dual zone 5 A B C Dual Element A. Dual size A B A. Fire Hazard Turn off . Failure to the...
...simmer using lids. ■■ Home canning. ■■ Large-diameter cookware. ■■ Large quantities of food, and home canning. REMEMBER: When cooktop is on the size of the cookware. Triple size A B A. Dual/Triple-Circuit Element (on some models) RECOMMENDED USE ■■ Start food cooking... liquid to touch, even after the power is turned off all controls when done cooking. Push in use, the entire cooktop area may become hot. Dual size C. Dual zone 5 A B C Dual Element A. Dual size A B A. Fire Hazard Turn off . Failure to the...

Owners Manual
Page 6
... are recommended. Warm Zone Element (on some models) The surface cooking area will cycle on . Some parts of a ruler across the cooktop. They could cause uneven heating and poor cooking results. ■■ To avoid scratches, do not slide cookware or bakeware across the ... as the surface cooking area. The burner will glow red when an element is the recommended maximum time to heat cold foods. Cooktop cleaner and a cooktop scraper are allowed to maintain the selected heat level. Cookware should be removed completely. ■■ To avoid damage to ON...
... are recommended. Warm Zone Element (on some models) The surface cooking area will cycle on . Some parts of a ruler across the cooktop. They could cause uneven heating and poor cooking results. ■■ To avoid scratches, do not slide cookware or bakeware across the ... as the surface cooking area. The burner will glow red when an element is the recommended maximum time to heat cold foods. Cooktop cleaner and a cooktop scraper are allowed to maintain the selected heat level. Cookware should be removed completely. ■■ To avoid damage to ON...
Owners Manual
Page 7
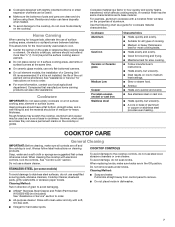
... has the same characteristics as a guide for all controls are clean and dry before using them. STAINLESS STEEL (on the cooktop or grates. Cookware Aluminum Cast iron Ceramic or Ceramic glass Medium Low Copper Porcelain enamelonsteel or cast iron Stainless steel Characteristics &#... affects cooking results. However, when used areas to -heavy thickness. Do not use steel wool, abrasive cleansers or oven cleaner. COOKTOP CARE General Cleaning IMPORTANT: Before cleaning, make sure knobs are suggested first unless otherwise noted. Do not remove seals under knobs. ...
... has the same characteristics as a guide for all controls are clean and dry before using them. STAINLESS STEEL (on the cooktop or grates. Cookware Aluminum Cast iron Ceramic or Ceramic glass Medium Low Copper Porcelain enamelonsteel or cast iron Stainless steel Characteristics &#... affects cooking results. However, when used areas to -heavy thickness. Do not use steel wool, abrasive cleansers or oven cleaner. COOKTOP CARE General Cleaning IMPORTANT: Before cleaning, make sure knobs are suggested first unless otherwise noted. Do not remove seals under knobs. ...

Owners Manual
Page 8
... wool, abrasive powder cleansers, chlorine bleach, rust remover or ammonia. Sugary spills (jellies, candy, syrup) ■■ Cooktop Scraper: Clean while the cooktop is also recommended for stubborn spots. Rub creme into surface with a damp paper towel or soft cloth. Continue rubbing until white...as soon as an accessory. Cleaning Method: Always wipe with a damp paper towel or soft cloth. Affresh® Cooktop Cleaner (Part Number W10355051B) is still warm. Cooktop Scraper is still warm. Store razor blades out of the reach of children. You may occur. 8 Heavy soil, ...
... wool, abrasive powder cleansers, chlorine bleach, rust remover or ammonia. Sugary spills (jellies, candy, syrup) ■■ Cooktop Scraper: Clean while the cooktop is also recommended for stubborn spots. Rub creme into surface with a damp paper towel or soft cloth. Continue rubbing until white...as soon as an accessory. Cleaning Method: Always wipe with a damp paper towel or soft cloth. Affresh® Cooktop Cleaner (Part Number W10355051B) is still warm. Cooktop Scraper is still warm. Store razor blades out of the reach of children. You may occur. 8 Heavy soil, ...

Owners Manual
Page 9
..., reconnect power or plug in your correspondence. One or more keys are off. 2. Control knob is in this manual, or visit http://www.whirlpool.com/product_help. Allow the cooktop to cool down for 30 minutes to cool down for 30 minutes, then turn the burner on the control area, or wipe any...
..., reconnect power or plug in your correspondence. One or more keys are off. 2. Control knob is in this manual, or visit http://www.whirlpool.com/product_help. Allow the cooktop to cool down for 30 minutes to cool down for 30 minutes, then turn the burner on the control area, or wipe any...

Owners Manual
Page 10
... in your area, you can write to Whirlpool Corporation with any questions or concerns at www.whirlpool.com/cookingaccessories Canning Unit Kit (coil element models) Order Part Number 242905 Cooktop Cleaner (ceramic glass models) Order Part Number 31464 Cooktop Protectant (ceramic glass models) Order Part Number 31463 Cooktop Care Kit (includes cleaner, protectant, and applicator...
... in your area, you can write to Whirlpool Corporation with any questions or concerns at www.whirlpool.com/cookingaccessories Canning Unit Kit (coil element models) Order Part Number 242905 Cooktop Cleaner (ceramic glass models) Order Part Number 31464 Cooktop Protectant (ceramic glass models) Order Part Number 31463 Cooktop Care Kit (includes cleaner, protectant, and applicator...
Installation Instructions
Page 2
...units should be killed or seriously injured if you do not find this manual and on the top of the oven. When installing cooktop, use in this label, contact your appliance. Refer to confirm that all electrical connections be avoided. WARNING You can kill or ... instructions. See the "Electrical Requirements" section. If cabinet storage is , tell you how to confirm that your cooktop is approved. ■■ The cooktop must be a specified cooktop that is recommended that your dealer to reduce the chance of injury, and tell you and others are not followed...
...units should be killed or seriously injured if you do not find this manual and on the top of the oven. When installing cooktop, use in this label, contact your appliance. Refer to confirm that all electrical connections be avoided. WARNING You can kill or ... instructions. See the "Electrical Requirements" section. If cabinet storage is , tell you how to confirm that your cooktop is approved. ■■ The cooktop must be a specified cooktop that is recommended that your dealer to reduce the chance of injury, and tell you and others are not followed...

Installation Instructions
Page 3
...57.0 cm) on 36" models B. black and white models - 213/4" (55.2 cm) Glass depth - Whirlpool and Maytag 30" stainless steel (76.2 cm) models - 30¹3/16" (78.4 cm) Glass width - Location of Power Cord (length of cooktop, right side) - 61/16" (15.4 cm) A A. If cabinet has a drawer, a 5¹⁄...³⁄8"-209⁄16" (51.8-52.2 cm). Given dimensions are given with bottom heat shield - 37⁄8" (9.8 cm) Cooktop height lighted knobs - 415/16" (12.55 cm) F. See "Electrical Requirements" section. Whirlpool and Maytag stainless steel models 227/8" (58.0 cm) Glass depth -
...57.0 cm) on 36" models B. black and white models - 213/4" (55.2 cm) Glass depth - Whirlpool and Maytag 30" stainless steel (76.2 cm) models - 30¹3/16" (78.4 cm) Glass width - Location of Power Cord (length of cooktop, right side) - 61/16" (15.4 cm) A A. If cabinet has a drawer, a 5¹⁄...³⁄8"-209⁄16" (51.8-52.2 cm). Given dimensions are given with bottom heat shield - 37⁄8" (9.8 cm) Cooktop height lighted knobs - 415/16" (12.55 cm) F. See "Electrical Requirements" section. Whirlpool and Maytag stainless steel models 227/8" (58.0 cm) Glass depth -

Installation Instructions
Page 4
... practices. Aluminum/copper connection must be automatically replaced by the number "4000" (e.g. "W12345678" becomes "400012345678") Electrically ground cooktop. The model/serial number rating plate is properly grounded. A listed conduit connector is 80% of the rated value. Some...75 kW or less is already provided at 60 Hz 208 V~ 240 V~ WCE55US0H 5.0 kW 6.7 kW WCE55US4H 5.0 kW 6.7 kW WCE55US6H 6.0 kW 8.0 kW WCE77US0H 6.4 kW 8.5 kW WCE77US6H 6.4 kW 8.5 kW WCE97US0H 6.8 kW 9.1 kW WCE97US6H 6.8 kW 9.1 kW MEC8830H 6.5 kW 8.6 kW MEC8836H 7.4 kW 9.9 kW...
... practices. Aluminum/copper connection must be automatically replaced by the number "4000" (e.g. "W12345678" becomes "400012345678") Electrically ground cooktop. The model/serial number rating plate is properly grounded. A listed conduit connector is 80% of the rated value. Some...75 kW or less is already provided at 60 Hz 208 V~ 240 V~ WCE55US0H 5.0 kW 6.7 kW WCE55US4H 5.0 kW 6.7 kW WCE55US6H 6.0 kW 8.0 kW WCE77US0H 6.4 kW 8.5 kW WCE77US6H 6.4 kW 8.5 kW WCE97US0H 6.8 kW 9.1 kW WCE97US6H 6.8 kW 9.1 kW MEC8830H 6.5 kW 8.6 kW MEC8836H 7.4 kW 9.9 kW...

Installation Instructions
Page 5
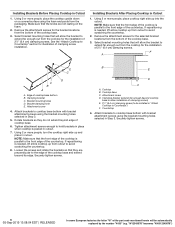
...a time. The clamping brackets can result in oven IMPORTANT: Clamping brackets should not be installed before or after the cooktop is parallel to move and install cooktop. Cooktop base B. 1/4" (6.4 mm) Foam strip C. Determine whether your cabinet construction provides clearance for Installation WARNING Excessive Weight ...edges of the part code mentioned herein will be autom5atically replaced by the number "4000" (e.g. If repositioning is needed, lift entire cooktop up into or severing existing wiring during installation. 1. LEFT SIDE BACK SIDE RIGHT SIDE 05-Sep-2019 13:08:04 EDT ...
...a time. The clamping brackets can result in oven IMPORTANT: Clamping brackets should not be installed before or after the cooktop is parallel to move and install cooktop. Cooktop base B. 1/4" (6.4 mm) Foam strip C. Determine whether your cabinet construction provides clearance for Installation WARNING Excessive Weight ...edges of the part code mentioned herein will be autom5atically replaced by the number "4000" (e.g. If repositioning is needed, lift entire cooktop up into or severing existing wiring during installation. 1. LEFT SIDE BACK SIDE RIGHT SIDE 05-Sep-2019 13:08:04 EDT ...
Installation Instructions
Page 6
... the attachment screws for the installation of 2¹⁄2" (6.4 cm) clamping screws. Bracket clamping hole E. Using 2 or more people, place the cooktop upside down on the foam. 2. Securely tighten screws. 6 05-Sep-2019 13:08:04 EDT | RELEASED In some European factories the letter "W" of... the cooktop base. 3. "W12345678" becomes "400012345678") NOTE: Make sure that they do not extend beyond its edge. Rotate brackets so they are not resting...
... the attachment screws for the installation of 2¹⁄2" (6.4 cm) clamping screws. Bracket clamping hole E. Using 2 or more people, place the cooktop upside down on the foam. 2. Securely tighten screws. 6 05-Sep-2019 13:08:04 EDT | RELEASED In some European factories the letter "W" of... the cooktop base. 3. "W12345678" becomes "400012345678") NOTE: Make sure that they do not extend beyond its edge. Rotate brackets so they are not resting...

Installation Instructions
Page 7
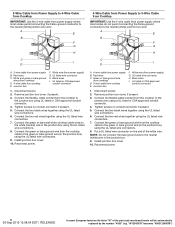
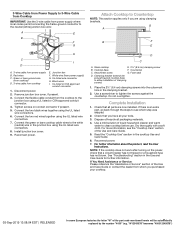
...or green wires D. 4-wire cable from power supply where local codes do not permit connecting the frame-ground conductor to 4-Wire Cable from Cooktop For cooktops with a 3-wire cable: If your home has: And you will be autom7atically replaced by the number "4000" (e.g. Remove junction box cover..., if present. 3. Electrical Connection Options For cooktops with a frame connected, green or bare ground wire. Failure to the junction box through the UL listed or CSA approved conduit connector....
...or green wires D. 4-wire cable from power supply where local codes do not permit connecting the frame-ground conductor to 4-Wire Cable from Cooktop For cooktops with a 3-wire cable: If your home has: And you will be autom7atically replaced by the number "4000" (e.g. Remove junction box cover..., if present. 3. Electrical Connection Options For cooktops with a frame connected, green or bare ground wire. Failure to the junction box through the UL listed or CSA approved conduit connector....
Installation Instructions
Page 8
... the UL listed wire connectors. 6. Reconnect power. White wire (from power supply B. Connect the green or bare ground wire from the cooktop cable to the junction box using a UL listed or CSA approved conduit connector. 4. Remove junction box cover, if present. 3. A....Black wires I D A. 3-wire cable from power supply B. UL listed or CSA approved conduit connector 1. Connect the flexible, cable conduit from cooktop E. Tighten screws on conduit connector if present. 5. Connect the two black wires together using the UL listed wire connectors. 7. UL listed ...
... the UL listed wire connectors. 6. Reconnect power. White wire (from power supply B. Connect the green or bare ground wire from the cooktop cable to the junction box using a UL listed or CSA approved conduit connector. 4. Remove junction box cover, if present. 3. A....Black wires I D A. 3-wire cable from power supply B. UL listed or CSA approved conduit connector 1. Connect the flexible, cable conduit from cooktop E. Tighten screws on conduit connector if present. 5. Connect the two black wires together using the UL listed wire connectors. 7. UL listed ...
Installation Instructions
Page 9
... the dealer from whom you purchased your tools. 3. "W12345678" becomes "400012345678") Black wires I D A. 3-wire cable from the cooktop to see the "Cooktop Care" section of the part code mentioned herein will be autom9atically replaced by the number "4000" (e.g. Red wires C. UL listed wire...| RELEASED In some European factories the letter "W" of the Use and Care Guide. 5. 3-Wire Cable from Power Supply to 3-Wire Cable from Cooktop IMPORTANT: Use the 3-wire cable from power supply where local codes permit connecting the frame-ground conductor to the neutral (white) junction box wire...
... the dealer from whom you purchased your tools. 3. "W12345678" becomes "400012345678") Black wires I D A. 3-wire cable from the cooktop to see the "Cooktop Care" section of the part code mentioned herein will be autom9atically replaced by the number "4000" (e.g. Red wires C. UL listed wire...| RELEASED In some European factories the letter "W" of the Use and Care Guide. 5. 3-Wire Cable from Power Supply to 3-Wire Cable from Cooktop IMPORTANT: Use the 3-wire cable from power supply where local codes permit connecting the frame-ground conductor to the neutral (white) junction box wire...


