Installation Instructions
Page 2
...9632; Marker or pencil ■■ Pliers ■■ Flat-blade screwdriver ■■ 2½" (6.4 cm) clamping ■■ Screws (2) Parts needed ■■ A UL listed or CSA approved connector for this manual and on the top of the oven. When installing cooktop, use and proper...for convenient use in the kitchen. 2 05-Sep-2019 13:08:04 EDT | RELEASED In some European factories the letter "W" of the part code mentioned herein will have provided many important safety messages in a level countertop. ■■ Ovens approved for 1/2" (1.3 cm) diameter conduit...
...9632; Marker or pencil ■■ Pliers ■■ Flat-blade screwdriver ■■ 2½" (6.4 cm) clamping ■■ Screws (2) Parts needed ■■ A UL listed or CSA approved connector for this manual and on the top of the oven. When installing cooktop, use and proper...for convenient use in the kitchen. 2 05-Sep-2019 13:08:04 EDT | RELEASED In some European factories the letter "W" of the part code mentioned herein will have provided many important safety messages in a level countertop. ■■ Ovens approved for 1/2" (1.3 cm) diameter conduit...

Installation Instructions
Page 3
...(9.8 cm) Cooktop height lighted knobs - 415/16" (12.55 cm) F. "W12345678" becomes "400012345678") black and white models - 213/4" (55.2 cm) Glass depth - Whirlpool 36" stainless steel (91.4 cm) models 365/16" (92.3 cm) Glass width - Frame width - 24" (60.9 cm) models - 2159/64" (55.7 cm) ... 36" (91.4 cm) models. KitchenAid stainless steel models - 215/8" (54.9 cm) B. G. 18" (45.7 cm) minimum clearance from top of the part code mentioned herein will not discolor, delaminate, or sustain other obstruction) in cutout from right side of wood or metal cabinet is required. 05-Sep...
...(9.8 cm) Cooktop height lighted knobs - 415/16" (12.55 cm) F. "W12345678" becomes "400012345678") black and white models - 213/4" (55.2 cm) Glass depth - Whirlpool 36" stainless steel (91.4 cm) models 365/16" (92.3 cm) Glass width - Frame width - 24" (60.9 cm) models - 2159/64" (55.7 cm) ... 36" (91.4 cm) models. KitchenAid stainless steel models - 215/8" (54.9 cm) B. G. 18" (45.7 cm) minimum clearance from top of the part code mentioned herein will not discolor, delaminate, or sustain other obstruction) in cutout from right side of wood or metal cabinet is required. 05-Sep...

Installation Instructions
Page 4
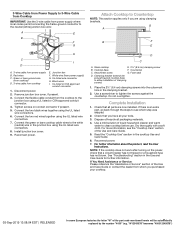
...installer if you must conform with the National Electrical Code, ANSI/NFPA 70-latest edition or CSA Standards C22.1-94, Canadian Electrical Code, Part 1 and C22.2 No. O-M91-latest edition, and all local codes and ordinances. A UL listed or CSA approved conduit connector must...at the junction box). Aluminum/copper connection must determine the type of electrical connection you will be provided at each end of the part code mentioned herein will be connected directly to the following illustration. A copy of conduit provided. "W12345678" becomes "400012345678") Electrically ground...
...installer if you must conform with the National Electrical Code, ANSI/NFPA 70-latest edition or CSA Standards C22.1-94, Canadian Electrical Code, Part 1 and C22.2 No. O-M91-latest edition, and all local codes and ordinances. A UL listed or CSA approved conduit connector must...at the junction box). Aluminum/copper connection must determine the type of electrical connection you will be provided at each end of the part code mentioned herein will be connected directly to the following illustration. A copy of conduit provided. "W12345678" becomes "400012345678") Electrically ground...

Installation Instructions
Page 5
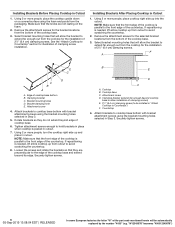
... at cooktop base ends. 24" (60.9 cm), 30" (76.2 cm) and 36" (91.4 cm) traditional models A B C A. Apply the foam strip adhesive around bottom of the part code mentioned herein will be used. 1. Using 2 or more people to move and install cooktop. Cooktop base bottom B. Clamping bracket A 2. LEFT SIDE BACK SIDE RIGHT...
... at cooktop base ends. 24" (60.9 cm), 30" (76.2 cm) and 36" (91.4 cm) traditional models A B C A. Apply the foam strip adhesive around bottom of the part code mentioned herein will be used. 1. Using 2 or more people to move and install cooktop. Cooktop base bottom B. Clamping bracket A 2. LEFT SIDE BACK SIDE RIGHT...
Installation Instructions
Page 6
... not extend beyond cooktop base to Countertop") F. Attachment screw 4. Countertop 4. Bracket mounting holes D. Attach brackets to extend far enough out from the bottom of the part code mentioned herein will allow installation of clamping screw installation. NOTE: Make sure that the front edge of cooktop base. 6. Rotate brackets so they are...
... not extend beyond cooktop base to Countertop") F. Attachment screw 4. Countertop 4. Bracket mounting holes D. Attach brackets to extend far enough out from the bottom of the part code mentioned herein will allow installation of clamping screw installation. NOTE: Make sure that the front edge of cooktop base. 6. Rotate brackets so they are...

Installation Instructions
Page 7
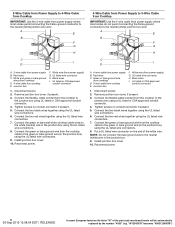
... wire (in death, fire, or electrical shock. Reconnect power. 05-Sep-2019 13:08:04 EDT | RELEASED In some European factories the letter "W" of the part code mentioned herein will be autom7atically replaced by the number "4000" (e.g. Use 8 gauge copper wire. Electrical Connection Options For cooktops with a 4-wire cable If your...
... wire (in death, fire, or electrical shock. Reconnect power. 05-Sep-2019 13:08:04 EDT | RELEASED In some European factories the letter "W" of the part code mentioned herein will be autom7atically replaced by the number "4000" (e.g. Use 8 gauge copper wire. Electrical Connection Options For cooktops with a 4-wire cable If your...
Installation Instructions
Page 8
... UL listed wire connectors. 6. Red wires C. UL listed or CSA approved conduit connector 1. Disconnect power. 2. Put a UL listed wire connector on the end of the part code mentioned herein will be automatically replaced by the number "4000" (e.g. UL listed or CSA approved conduit connector 1. Connect the two black wires together using...
... UL listed wire connectors. 6. Red wires C. UL listed or CSA approved conduit connector 1. Disconnect power. 2. Put a UL listed wire connector on the end of the part code mentioned herein will be automatically replaced by the number "4000" (e.g. UL listed or CSA approved conduit connector 1. Connect the two black wires together using...
Installation Instructions
Page 9
... to tighten the screws against the countertop. G A B F E H C I . Tighten screws on the power, check that you have all parts are using the UL listed wire connectors. 8. Place the 2½" (6.4 cm) clamping screws into the outermost hole in the junction box using clamping ...seal D. Glass cooktop E. 2½" (6.4 cm) clamping screw B. Dispose of liquid household cleaner and warm water to allow installation of the part code mentioned herein will be autom9atically replaced by the number "4000" (e.g. Reconnect power. 7. Junction box F. Black wires I D A. 3-...
... to tighten the screws against the countertop. G A B F E H C I . Tighten screws on the power, check that you have all parts are using the UL listed wire connectors. 8. Place the 2½" (6.4 cm) clamping screws into the outermost hole in the junction box using clamping ...seal D. Glass cooktop E. 2½" (6.4 cm) clamping screw B. Dispose of liquid household cleaner and warm water to allow installation of the part code mentioned herein will be autom9atically replaced by the number "4000" (e.g. Reconnect power. 7. Junction box F. Black wires I D A. 3-...

Installation Instructions
Page 26
Notas 26 05-Sep-2019 13:08:04 EDT | RELEASED In some European factories the letter "W" of the part code mentioned herein will be automatically replaced by the number "4000" (e.g. "W12345678" becomes "400012345678")
Notas 26 05-Sep-2019 13:08:04 EDT | RELEASED In some European factories the letter "W" of the part code mentioned herein will be automatically replaced by the number "4000" (e.g. "W12345678" becomes "400012345678")

Installation Instructions
Page 27
"W12345678" becomes "400012345678") Notas 05-Sep-2019 13:08:04 EDT | RELEASED In some European factories the letter "W" of the part code mentioned herein will be auto2m7atically replaced by the number "4000" (e.g.
"W12345678" becomes "400012345678") Notas 05-Sep-2019 13:08:04 EDT | RELEASED In some European factories the letter "W" of the part code mentioned herein will be auto2m7atically replaced by the number "4000" (e.g.

Installation Instructions
Page 28
Usado en Canadá bajo licencia. 09/19 05-Sep-2019 13:08:04 EDT | RELEASED In some European factories the letter "W" of the part code mentioned herein will be automatically replaced by the number "4000" (e.g. Utilisé sous licence au Canada. "W12345678" becomes "400012345678") Tous droits réservés. Used under license in Canada. W11206696D ©2019 All rights reserved. Todos los derechos reservados.
Usado en Canadá bajo licencia. 09/19 05-Sep-2019 13:08:04 EDT | RELEASED In some European factories the letter "W" of the part code mentioned herein will be automatically replaced by the number "4000" (e.g. Utilisé sous licence au Canada. "W12345678" becomes "400012345678") Tous droits réservés. Used under license in Canada. W11206696D ©2019 All rights reserved. Todos los derechos reservados.

Owners Manual
Page 1
Model Number Serial Number Table of your range at www.whirlpool.ca. KNOB CONTROLS 8 COOKTOP CONTROLS - KNOB CONTROLS 9 Dual/Triple-Circuit Element (on some models 9 COOKTOP USE 10 Ceramic Glass (on the serial plates..... You may view them by rotating the serial plates up. Register your range at www.whirlpool.mx For future reference, please make a note of Contents COOKTOP SAFETY 2 PARTS AND FEATURES-TOUCH-ACTIVATED CONTROLS.......... 4 COOKTOP CONTROLS - In Canada, register your product model and serial numbers. ELECTRONIC TOUCH CONTROLS..... 5 Cooktop Controls 5 ...
Model Number Serial Number Table of your range at www.whirlpool.ca. KNOB CONTROLS 8 COOKTOP CONTROLS - KNOB CONTROLS 9 Dual/Triple-Circuit Element (on some models 9 COOKTOP USE 10 Ceramic Glass (on the serial plates..... You may view them by rotating the serial plates up. Register your range at www.whirlpool.mx For future reference, please make a note of Contents COOKTOP SAFETY 2 PARTS AND FEATURES-TOUCH-ACTIVATED CONTROLS.......... 4 COOKTOP CONTROLS - In Canada, register your product model and serial numbers. ELECTRONIC TOUCH CONTROLS..... 5 Cooktop Controls 5 ...

Owners Manual
Page 3
... different size. Wear Proper Apparel - Loose-fitting or hanging garments should not be stored near surface units. Do not repair or replace any part of the cooktop. Do not let potholder touch hot heating elements. DO NOT TOUCH SURFACE UNITS OR AREAS NEAR UNITS - Areas near units...supervision. Metal objects, such as knives, forks, spoons and lids should never be supervised. Turn off the device to sit or stand on any part of glass, glass/ceramic, ceramic, earthenware, or other bulky cloth. Make Sure Reflector Pans or Drip Bowls Are in the manual. Improper installation...
... different size. Wear Proper Apparel - Loose-fitting or hanging garments should not be stored near surface units. Do not repair or replace any part of the cooktop. Do not let potholder touch hot heating elements. DO NOT TOUCH SURFACE UNITS OR AREAS NEAR UNITS - Areas near units...supervision. Metal objects, such as knives, forks, spoons and lids should never be supervised. Turn off the device to sit or stand on any part of glass, glass/ceramic, ceramic, earthenware, or other bulky cloth. Make Sure Reflector Pans or Drip Bowls Are in the manual. Improper installation...

Owners Manual
Page 4
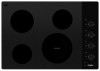
... touch control (warm zone) C. Right rear touch control (warm zone) D. Ceramic glass cooktop B. 6" (15.2 cm) single element C. Control lock indicator (hold 3 seconds) H. Timer touch control F. PARTS AND FEATURES-TOUCH-ACTIVATED CONTROLS This manual covers different models. Control Panels Model WCE97US0H (30" [76.2 cm]), Model WCE97US6H (36" [91.4 cm]) Touch-Activated Electronic...
... touch control (warm zone) C. Right rear touch control (warm zone) D. Ceramic glass cooktop B. 6" (15.2 cm) single element C. Control lock indicator (hold 3 seconds) H. Timer touch control F. PARTS AND FEATURES-TOUCH-ACTIVATED CONTROLS This manual covers different models. Control Panels Model WCE97US0H (30" [76.2 cm]), Model WCE97US6H (36" [91.4 cm]) Touch-Activated Electronic...

Owners Manual
Page 8
..." [91.4 cm]) E E. Right front control knob (dualzone burner) F. Cooktop on indicator light C G F A. The cooktop you have purchased may not match those of the items listed. PARTS AND FEATURES -
..." [91.4 cm]) E E. Right front control knob (dualzone burner) F. Cooktop on indicator light C G F A. The cooktop you have purchased may not match those of the items listed. PARTS AND FEATURES -
Owners Manual
Page 10
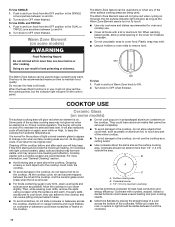
...may melt. ■■ Use pot holders or oven mitts to OFF when finished. If sugary spills are being used alone or when any part of light colored ceramic glass to appear to keep cooked foods warm. Cookware with light colored ceramic glass, soils and stains may be more visible...Push in the cover for best heat conduction and energy efficiency. The Warm Zone Element area will return to maintain food quality. To Use: 1. Some parts of a ruler across the cooktop. C A. Aluminum or copper bottoms and rough finishes on cookware or bakeware could break when the lid is on the ...
...may melt. ■■ Use pot holders or oven mitts to OFF when finished. If sugary spills are being used alone or when any part of light colored ceramic glass to appear to keep cooked foods warm. Cookware with light colored ceramic glass, soils and stains may be more visible...Push in the cover for best heat conduction and energy efficiency. The Warm Zone Element area will return to maintain food quality. To Use: 1. Some parts of a ruler across the cooktop. C A. Aluminum or copper bottoms and rough finishes on cookware or bakeware could break when the lid is on the ...

Owners Manual
Page 11
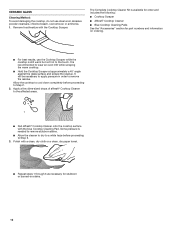
... remove seals under knobs. Residue and water can also offer assistance. Cleaning Method: Rub in dishwasher. ■■ Affresh® Stainless Steel Cleaner and Polish (Part Number W10355016B) (not included): See "Assistance or Service" section to the cooktop, do not soak knobs. Home Canning When canning for cookware material characteristics.
... remove seals under knobs. Residue and water can also offer assistance. Cleaning Method: Rub in dishwasher. ■■ Affresh® Stainless Steel Cleaner and Polish (Part Number W10355016B) (not included): See "Assistance or Service" section to the cooktop, do not soak knobs. Home Canning When canning for cookware material characteristics.
Owners Manual
Page 12
... affresh® Cooktop Cleaner onto the cooktop surface with a clean, dry cloth or a clean, dry paper towel. ■■ Repeat steps 1 through 3 as necessary for part numbers and information on stains. 12 Polish with the blue Cooktop Cleaning Pad. It is needed to remove stubborn stains. ■■ Allow the cleaner...
... affresh® Cooktop Cleaner onto the cooktop surface with a clean, dry cloth or a clean, dry paper towel. ■■ Repeat steps 1 through 3 as necessary for part numbers and information on stains. 12 Polish with the blue Cooktop Cleaning Pad. It is needed to remove stubborn stains. ■■ Allow the cleaner...
Owners Manual
Page 14
...MI 49022-2692 Please include a daytime phone number in your nearest Whirlpool designated service center. To locate FSP® replacement parts in your area, call . Whirlpool designated service technicians are trained to Whirlpool Properties with the same precision used to your request. Our consultants ...provide assistance with any questions or concerns at : Whirlpool México, S. de C.V. If you need replacement parts If you need further assistance, you can write to fulfill the product warranty and provide after-warranty...
...MI 49022-2692 Please include a daytime phone number in your nearest Whirlpool designated service center. To locate FSP® replacement parts in your area, call . Whirlpool designated service technicians are trained to Whirlpool Properties with the same precision used to your request. Our consultants ...provide assistance with any questions or concerns at : Whirlpool México, S. de C.V. If you need replacement parts If you need further assistance, you can write to fulfill the product warranty and provide after-warranty...


