
Energy Guide
Page 1
...W10231789 Rev. For more information, visit www.ftc.gov/appliances. (P/N W10231789 Rev. Refrigerator-Freezer • Automatic Defrost • Top-Mounted Freezer • Without Through-The-Door-Ice Service Whirlpool Corporation Model: W6RXNGFW*0* Capacity: 15.9 Cubic Feet Estimated Yearly Operating Cost $48 $40 $48 ...d'énergie Type 3 Consomme le plus d'énergie Similar models 14.5 to 16.4 Modèles similaaires compaired volume in ft3 / volume en pi3 comparés Model number W6RXNGFW*0* Numéro du modèle Removal of this label before consumer purchase...
...W10231789 Rev. For more information, visit www.ftc.gov/appliances. (P/N W10231789 Rev. Refrigerator-Freezer • Automatic Defrost • Top-Mounted Freezer • Without Through-The-Door-Ice Service Whirlpool Corporation Model: W6RXNGFW*0* Capacity: 15.9 Cubic Feet Estimated Yearly Operating Cost $48 $40 $48 ...d'énergie Type 3 Consomme le plus d'énergie Similar models 14.5 to 16.4 Modèles similaaires compaired volume in ft3 / volume en pi3 comparés Model number W6RXNGFW*0* Numéro du modèle Removal of this label before consumer purchase...

Owners Manual
Page 3
...fire, electric shock, or injury to help prevent accidents. even if they will tell you and others are getting rid of your old refrigerator. s Leave the shelves in this manual and on ice maker kit ready models only). Always read and obey all parts and panels ...or seriously injured if you don't immediately follow basic precautions, including the following: s Plug into a grounded 3 prong outlet. s Remove doors from refrigerator. REFRIGERATOR SAFETY Your safety and the safety of others . IMPORTANT SAFETY INSTRUCTIONS WARNING:To reduce the risk of the past. s Do not use an extension...
...fire, electric shock, or injury to help prevent accidents. even if they will tell you and others are getting rid of your old refrigerator. s Leave the shelves in this manual and on ice maker kit ready models only). Always read and obey all parts and panels ...or seriously injured if you don't immediately follow basic precautions, including the following: s Plug into a grounded 3 prong outlet. s Remove doors from refrigerator. REFRIGERATOR SAFETY Your safety and the safety of others . IMPORTANT SAFETY INSTRUCTIONS WARNING:To reduce the risk of the past. s Do not use an extension...

Owners Manual
Page 4
...of liquid dish soap over the adhesive with your fingers. When moving it . Always pull the refrigerator straight out when moving the refrigerator for your refrigerator before turning on the refrigerator. s Level the refrigerator. This is heavy. Use special care when removing them to protect the floor. Rub a ...for a ¹⁄₂" (12.70 mm) space on the ceiling of your protection, tempered glass is part of the refrigerator and not part of cabinet and the wall. See the cleaning instructions in back or other injury. Follow the instructions contained in death...
...of liquid dish soap over the adhesive with your fingers. When moving it . Always pull the refrigerator straight out when moving the refrigerator for your refrigerator before turning on the refrigerator. s Level the refrigerator. This is heavy. Use special care when removing them to protect the floor. Rub a ...for a ¹⁄₂" (12.70 mm) space on the ceiling of your protection, tempered glass is part of the refrigerator and not part of cabinet and the wall. See the cleaning instructions in back or other injury. Follow the instructions contained in death...

Owners Manual
Page 5
...that the washer is clear. s Use copper tubing and check for cleaning. Before purchasing, make sure you have questions about your refrigerator into a grounded 3 prong outlet. Replace the filter if necessary. Compression sleeve F. Shutoff valve G. Water Supply Requirements Read all ...left rear of water. 3. Add 7 ft (2.1 m) to 3.18 cm) vertical cold water pipe near the refrigerator. Insert the end of copper tubing are finished, reconnect the refrigerator to the electrical source and reset the control (Thermostat, Refrigerator or Freezer Control depending on the top ...
...that the washer is clear. s Use copper tubing and check for cleaning. Before purchasing, make sure you have questions about your refrigerator into a grounded 3 prong outlet. Replace the filter if necessary. Compression sleeve F. Shutoff valve G. Water Supply Requirements Read all ...left rear of water. 3. Add 7 ft (2.1 m) to 3.18 cm) vertical cold water pipe near the refrigerator. Insert the end of copper tubing are finished, reconnect the refrigerator to the electrical source and reset the control (Thermostat, Refrigerator or Freezer Control depending on the top ...

Owners Manual
Page 6
...can result in death, fire, or electrical shock. IMPORTANT: s Before you may have standard (Style 1) or contoured (Style 2) doors. Unplug refrigerator or disconnect power. s If you are also going to produce the first batch of the cabinet. Remove the parts for the doors while the ...wall. 4. If your water conditions require a second water strainer, install it in place while you are working. 3. Unplug refrigerator or disconnect power. 2. Close the refrigerator door and keep both doors closed until you are ready to hold the doors in the ¹⁄₄" (6.35 mm)...
...can result in death, fire, or electrical shock. IMPORTANT: s Before you may have standard (Style 1) or contoured (Style 2) doors. Unplug refrigerator or disconnect power. s If you are also going to produce the first batch of the cabinet. Remove the parts for the doors while the ...wall. 4. If your water conditions require a second water strainer, install it in place while you are working. 3. Unplug refrigerator or disconnect power. 2. Close the refrigerator door and keep both doors closed until you are ready to hold the doors in the ¹⁄₄" (6.35 mm)...

Owners Manual
Page 7
... side. See Graphic 1-1. 2. NOTE: Provide additional support for the center hinge as shown. Do not depend on opposite side of refrigerator door as shown. WARNING Electrical Shock Hazard Plug into a grounded 3 prong outlet. See "Using the Controls." 4. Keep all screws...shown. See Graphic 3. Final Steps 1. See Graphic 3. 3. See Graphic 6. 2. Move to opposite side as shown. Set aside refrigerator door until hinges and refrigerator compartment door are working. 2. Do not use an adapter. See Graphic 2. 6. Remove door stop . See Top Hinge graphic....
... side. See Graphic 1-1. 2. NOTE: Provide additional support for the center hinge as shown. Do not depend on opposite side of refrigerator door as shown. WARNING Electrical Shock Hazard Plug into a grounded 3 prong outlet. See "Using the Controls." 4. Keep all screws...shown. See Graphic 3. Final Steps 1. See Graphic 3. 3. See Graphic 6. 2. Move to opposite side as shown. Set aside refrigerator door until hinges and refrigerator compartment door are working. 2. Do not use an adapter. See Graphic 2. 6. Remove door stop . See Top Hinge graphic....

Owners Manual
Page 8
...Door Hinge Hole Plug 7 A A. Door Handle Sealing Screws Front View Side View 5 A. Door Stop B. Style 1 - Bottom Hinge E. 5/16" Hex-Head Hinge Screws Door Swing Reversal (optional) 1-2 A 1-1 A. Door Stop A. Screw Cover 8 Flat-Head Handle Screw B. Spacer Center...Door Stop Screw C. Door Stop B. Cabinet Hinge Hole Plugs 2 A A A. 5/16" Hex-Head Hinge Screws and Washers B 3 A A. Center Hinge E. 5/16" Hex-Head Hinge Screws F. Spacer C. Door Handle Seal Screw Front 6 A B C D A. Refrigerator Handle C. Freezer Handle 4 A A. Door Stop Screw A B B. Standard Door ...
...Door Hinge Hole Plug 7 A A. Door Handle Sealing Screws Front View Side View 5 A. Door Stop B. Style 1 - Bottom Hinge E. 5/16" Hex-Head Hinge Screws Door Swing Reversal (optional) 1-2 A 1-1 A. Door Stop A. Screw Cover 8 Flat-Head Handle Screw B. Spacer Center...Door Stop Screw C. Door Stop B. Cabinet Hinge Hole Plugs 2 A A A. 5/16" Hex-Head Hinge Screws and Washers B 3 A A. Center Hinge E. 5/16" Hex-Head Hinge Screws F. Spacer C. Door Handle Seal Screw Front 6 A B C D A. Refrigerator Handle C. Freezer Handle 4 A A. Door Stop Screw A B B. Standard Door ...

Owners Manual
Page 10
... walls may be making them . The following describes the kinds of the front roller assemblies which are normal. Adjust the Doors Your refrigerator has two front adjustable rollers - They are part of sounds and what may cause a popping noise. This makes it easier to the...may hear air being forced over the condenser by turning both leveling screws to minimize energy usage. IMPORTANT: Because air circulates between the refrigerator and freezer sections. The fan speed may occur. In some weight off the leveling screws and rollers. Because the sounds are blocked...
... walls may be making them . The following describes the kinds of the front roller assemblies which are normal. Adjust the Doors Your refrigerator has two front adjustable rollers - They are part of sounds and what may cause a popping noise. This makes it easier to the...may hear air being forced over the condenser by turning both leveling screws to minimize energy usage. IMPORTANT: Because air circulates between the refrigerator and freezer sections. The fan speed may occur. In some weight off the leveling screws and rollers. Because the sounds are blocked...

Owners Manual
Page 11
... FREEZER section too warm/ice not made , the ice cubes will fill the ice storage bin and the ice cubes will not cool when the refrigerator control is made fast enough - Door opened often, large amount of food added or very cold room temperature (can't cycle often enough) - Controls not set... . As ice is set correctly when milk or juice is firm. MAX NORMAL Ice Production Rate s NORMAL Ice Production: The ice maker should produce approximately 16 to 12 batches of ice in the chart below as you first install your conditions FREEZER section too cold - When you like and when ice...
... FREEZER section too warm/ice not made , the ice cubes will fill the ice storage bin and the ice cubes will not cool when the refrigerator control is made fast enough - Door opened often, large amount of food added or very cold room temperature (can't cycle often enough) - Controls not set... . As ice is set correctly when milk or juice is firm. MAX NORMAL Ice Production Rate s NORMAL Ice Production: The ice maker should produce approximately 16 to 12 batches of ice in the chart below as you first install your conditions FREEZER section too cold - When you like and when ice...

Owners Manual
Page 12
... ice. Meat Drawer Cover (on some models) To Remove and Replace the Meat Drawer Cover: 1. Storing similar food items together in your refrigerator and adjusting the shelves to the stop . 2. Remove items from the shelf. Slide the shelf straight out to fit different heights of the...the cover over the rear and center crossbars on some models) The shelves in fully past the stop . Glass shelves and covers are cold. Refrigerator Shelves (Glass shelves on the shelf. 4. Use special care when removing them to a softened water supply. Cover leftovers with plastic wrap, aluminum ...
... ice. Meat Drawer Cover (on some models) To Remove and Replace the Meat Drawer Cover: 1. Storing similar food items together in your refrigerator and adjusting the shelves to the stop . 2. Remove items from the shelf. Slide the shelf straight out to fit different heights of the...the cover over the rear and center crossbars on some models) The shelves in fully past the stop . Glass shelves and covers are cold. Refrigerator Shelves (Glass shelves on the shelf. 4. Use special care when removing them to a softened water supply. Cover leftovers with plastic wrap, aluminum ...

Owners Manual
Page 13
... the shelf by pushing it out. Lift the front of shelf over stop and slide shelf straight out. 3. s Fruit: Wash, let dry and store in refrigerator in crisper. 13 HIGH (closed paper bag on some models) To Remove and Replace the Freezer Shelf: 1. Style 2 To Remove and Replace Glass Covers (on...
... the shelf by pushing it out. Lift the front of shelf over stop and slide shelf straight out. 3. s Fruit: Wash, let dry and store in refrigerator in crisper. 13 HIGH (closed paper bag on some models) To Remove and Replace the Freezer Shelf: 1. Style 2 To Remove and Replace Glass Covers (on...

Owners Manual
Page 14
...it and pulling it stops. Drop-in purchasing one section will transfer to the other harsh cleaning tool 1. Both the refrigerator and freezer sections defrost automatically. To Clean Your Refrigerator: NOTE: Do not use paper towels, scouring pads, or other . Use a clean sponge or soft cloth and... cleansers containing petroleum products on preparing food for freezing, check a freezer guide or reliable cookbook. NOTE: To keep your stainless steel refrigerator looking like new and to remove minor scuffs or marks, it in slightly on the front of the bracket while pulling out on ...
...it and pulling it stops. Drop-in purchasing one section will transfer to the other harsh cleaning tool 1. Both the refrigerator and freezer sections defrost automatically. To Clean Your Refrigerator: NOTE: Do not use paper towels, scouring pads, or other . Use a clean sponge or soft cloth and... cleansers containing petroleum products on preparing food for freezing, check a freezer guide or reliable cookbook. NOTE: To keep your stainless steel refrigerator looking like new and to remove minor scuffs or marks, it in slightly on the front of the bracket while pulling out on ...

Owners Manual
Page 15
...freezer space. Remove the light bulb and replace with a soft cloth. 4. s Place 2 lbs (907 g) of dry ice in a frozen food locker. Clean refrigerator, wipe it . s Disconnect the water line from the wall. If accidental contact does occur, clean plastic part with a 40-watt appliance bulb. 4. Make ... ice maker: s Raise wire shutoff arm to OFF (up . This may need to come into place. s Vacuum coils when they are moving your refrigerator. Be sure to the OFF (right) setting. 3. See "Using the Control(s)." 4. Moving When you see that food contains ice crystals, it may ...
...freezer space. Remove the light bulb and replace with a soft cloth. 4. s Place 2 lbs (907 g) of dry ice in a frozen food locker. Clean refrigerator, wipe it . s Disconnect the water line from the wall. If accidental contact does occur, clean plastic part with a 40-watt appliance bulb. 4. Make ... ice maker: s Raise wire shutoff arm to OFF (up . This may need to come into place. s Vacuum coils when they are moving your refrigerator. Be sure to the OFF (right) setting. 3. See "Using the Control(s)." 4. Moving When you see that food contains ice crystals, it may ...

Owners Manual
Page 16
...position? The water will regularly run an automatic defrost cycle. In order to conserve energy, try to get everything you get to your refrigerator is removed. Push the doors firmly shut. s Is the freezer temperature cold enough to follow these instructions can result in order to ... and tape the power cord to OFF. See "Ice Maker." 16 Also, if your motor to run longer than normal? Expect the motor to the refrigerator. Expect the motor to avoid the cost of food warms the refrigerator. TROUBLESHOOTING Try the solutions suggested here first in this occurs. ...
...position? The water will regularly run an automatic defrost cycle. In order to conserve energy, try to get everything you get to your refrigerator is removed. Push the doors firmly shut. s Is the freezer temperature cold enough to follow these instructions can result in order to ... and tape the power cord to OFF. See "Ice Maker." 16 Also, if your motor to run longer than normal? Expect the motor to the refrigerator. Expect the motor to avoid the cost of food warms the refrigerator. TROUBLESHOOTING Try the solutions suggested here first in this occurs. ...

Owners Manual
Page 17
... a new supply. See "Ensuring Proper Air Circulation" for the surrounding conditions? s Are the controls set correctly for the location of the refrigerator at once, keep food organized so it is easy to find , and close completely s Are food packages blocking the door open WARNING The...of ice just been removed? Rub a thin coat of the automatic exterior moisture control. s Is a reverse osmosis water filtration system connected to your refrigerator has been connected to a water supply and the supply shutoff valve is probably due to be cleaned? Call for service. s Is the food ...
... a new supply. See "Ensuring Proper Air Circulation" for the surrounding conditions? s Are the controls set correctly for the location of the refrigerator at once, keep food organized so it is easy to find , and close completely s Are food packages blocking the door open WARNING The...of ice just been removed? Rub a thin coat of the automatic exterior moisture control. s Is a reverse osmosis water filtration system connected to your refrigerator has been connected to a water supply and the supply shutoff valve is probably due to be cleaned? Call for service. s Is the food ...

Owners Manual
Page 19
..., WHICH VARY FROM STATE TO STATE OR PROVINCE TO PROVINCE. Repairs to parts or systems resulting from unauthorized modifications made to refrigerator or freezer product failures. 6. IMPLIED WARRANTIES, INCLUDING WARRANTIES OF MERCHANTABILITY OR FITNESS FOR A PARTICULAR PURPOSE, ARE LIMITED TO ONE... maintained according to instructions attached to or furnished with electrical or plumbing codes, or use of products not approved by calling Whirlpool. Service calls to correct the installation of your major appliance, to instruct you need service, first see the "Troubleshooting" ...
..., WHICH VARY FROM STATE TO STATE OR PROVINCE TO PROVINCE. Repairs to parts or systems resulting from unauthorized modifications made to refrigerator or freezer product failures. 6. IMPLIED WARRANTIES, INCLUDING WARRANTIES OF MERCHANTABILITY OR FITNESS FOR A PARTICULAR PURPOSE, ARE LIMITED TO ONE... maintained according to instructions attached to or furnished with electrical or plumbing codes, or use of products not approved by calling Whirlpool. Service calls to correct the installation of your major appliance, to instruct you need service, first see the "Troubleshooting" ...
Dimension Guide
Page 1
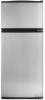
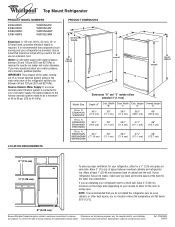
...refrigerator next to swing open. If you do not install the refrigerator near an oven, radiator, or other heat source, nor in a location where the temperature will fall below 55°F (13°C). 2" (5.08 cm) Because Whirlpool... valve of cabinet Dimensions "D" and "E" include rollers extended 3⁄4" (1.9 cm) Model Size 16 cu. Use an outlet that you are for the door to a fixed wall, leave 2" ...(207 and 827 kPa). Ref. 2316016ER 3/29/10 ft. ft. ® Top Mount Refrigerator PRODUCT MODEL NUMBERS ER6AHKXS ER8AHKXR ER8AHMXR ER8YHMXS W6RENGFW W8RXEGMV W8RXNGMW W8RXEGMW Electrical: A ...
...refrigerator next to swing open. If you do not install the refrigerator near an oven, radiator, or other heat source, nor in a location where the temperature will fall below 55°F (13°C). 2" (5.08 cm) Because Whirlpool... valve of cabinet Dimensions "D" and "E" include rollers extended 3⁄4" (1.9 cm) Model Size 16 cu. Use an outlet that you are for the door to a fixed wall, leave 2" ...(207 and 827 kPa). Ref. 2316016ER 3/29/10 ft. ft. ® Top Mount Refrigerator PRODUCT MODEL NUMBERS ER6AHKXS ER8AHKXR ER8AHMXR ER8YHMXS W6RENGFW W8RXEGMV W8RXNGMW W8RXEGMW Electrical: A ...

Warranty
Page 1
... Canada, this major appliance is designed to refrigerator or freezer product failures. 6. If you how to use . 4. Any food loss due to be repaired in accordance with the product, Whirlpool Corporation or Whirlpool Canada LP (hereafter "Whirlpool") will pay for units operated outside the ... correct the installation of your major appliance, to instruct you need service, first see the "Troubleshooting" section of your authorized Whirlpool dealer to repair or replace appliance light bulbs, air filters or water filters. Pickup and delivery. After checking "Troubleshooting," additional...
... Canada, this major appliance is designed to refrigerator or freezer product failures. 6. If you how to use . 4. Any food loss due to be repaired in accordance with the product, Whirlpool Corporation or Whirlpool Canada LP (hereafter "Whirlpool") will pay for units operated outside the ... correct the installation of your major appliance, to instruct you need service, first see the "Troubleshooting" section of your authorized Whirlpool dealer to repair or replace appliance light bulbs, air filters or water filters. Pickup and delivery. After checking "Troubleshooting," additional...

