
Installation Instructions
Page 1
... DE CUISSON 9 INSTALLATION REQUIREMENTS 2 Tools and Parts 2 Location Requirements 2 Electrical Requirements 3 INSTALLATION INSTRUCTIONS 4 Prepare Cooktop for local electrical inspector's use. All safety messages will follow instructions. This is , tell you don't immediately ... provided many important safety messages in this manual and on your appliance. IMPORTANT: Save for Installation 4 Install Cooktop 4 Make Electrical Connection 6 Attach Cooktop to Countertop 8 Complete Installation 8 EXIGENCES D'INSTALLATION 9 Outils et pièces 9 Exigences d'emplacement 9 Sp...
... DE CUISSON 9 INSTALLATION REQUIREMENTS 2 Tools and Parts 2 Location Requirements 2 Electrical Requirements 3 INSTALLATION INSTRUCTIONS 4 Prepare Cooktop for local electrical inspector's use. All safety messages will follow instructions. This is , tell you don't immediately ... provided many important safety messages in this manual and on your appliance. IMPORTANT: Save for Installation 4 Install Cooktop 4 Make Electrical Connection 6 Attach Cooktop to Countertop 8 Complete Installation 8 EXIGENCES D'INSTALLATION 9 Outils et pièces 9 Exigences d'emplacement 9 Sp...

Installation Instructions
Page 2
...21¾" (55.2 cm) B. 30" (76.2 cm) models - 30 78.4 cm) 36" (91.4 cm) models - 36 92.3 cm) C. 3¾" (9.5 cm) 2 When installing cooktop, use in a level countertop. ■ Ovens approved for this label, contact your dealer to confirm that your builder or cabinet supplier to be provided, the...given. ■ To eliminate the risk of the oven. Read and follow the instructions provided with your cooktop is approved. ■ The cooktop must be a specified cooktop that is approved to be installed either alone or over the heated surface units, cabinet storage space located above...
...21¾" (55.2 cm) B. 30" (76.2 cm) models - 30 78.4 cm) 36" (91.4 cm) models - 36 92.3 cm) C. 3¾" (9.5 cm) 2 When installing cooktop, use in a level countertop. ■ Ovens approved for this label, contact your dealer to confirm that your builder or cabinet supplier to be provided, the...given. ■ To eliminate the risk of the oven. Read and follow the instructions provided with your cooktop is approved. ■ The cooktop must be a specified cooktop that is approved to be installed either alone or over the heated surface units, cabinet storage space located above...

Installation Instructions
Page 3
...MA 02269 CSA International 8501 East Pleasant Valley Road Cleveland, OH 44131-5575 Before You Make the Electrical Connection: To properly install your cooktop, you must determine the type of electrical connection you are in accordance with sidewalls wider than No. 28 MSG sheet steel, 0.015"... E. 2" (5.1 cm) F. 20 52.0 +/- 0.16 cm) G. 18" (45.7 cm) minimum clearance from the top of the countertop to clear the cooktop base. Combustible area above countertop (shown by dashed box above) C. 30" (76.2 cm) minimum clearance between back wall and countertop NOTES: After making the countertop...
...MA 02269 CSA International 8501 East Pleasant Valley Road Cleveland, OH 44131-5575 Before You Make the Electrical Connection: To properly install your cooktop, you must determine the type of electrical connection you are in accordance with sidewalls wider than No. 28 MSG sheet steel, 0.015"... E. 2" (5.1 cm) F. 20 52.0 +/- 0.16 cm) G. 18" (45.7 cm) minimum clearance from the top of the countertop to clear the cooktop base. Combustible area above countertop (shown by dashed box above) C. 30" (76.2 cm) minimum clearance between back wall and countertop NOTES: After making the countertop...

Installation Instructions
Page 4
...strip helps avoid damage to allow as much slack as possible between the junction box and the cooktop so that the cooktop can be used. 1. Complete the following steps for the cooktop. The flexible, armored cable extending from the fuse box or circuit breaker box should be connected ...and/or tools designed and UL listed for Installation WARNING Excessive Weight Hazard Use two or more people, place cooktop right side up from the packaging. Style 2: Cooktop over undercounter built-in oven IMPORTANT: Clamping brackets should not be moved if servicing becomes necessary in back or...
...strip helps avoid damage to allow as much slack as possible between the junction box and the cooktop so that the cooktop can be used. 1. Complete the following steps for the cooktop. The flexible, armored cable extending from the fuse box or circuit breaker box should be connected ...and/or tools designed and UL listed for Installation WARNING Excessive Weight Hazard Use two or more people, place cooktop right side up from the packaging. Style 2: Cooktop over undercounter built-in oven IMPORTANT: Clamping brackets should not be moved if servicing becomes necessary in back or...

Installation Instructions
Page 5
... screws. Remove the attachment screws for the installation of clamping screws) E. 2½" (6.4 cm) clamping screw (to be installed in "Attach Cooktop to extend far enough out from the cooktop for the installation of 2½" (6.4 cm) clamping screws. Select bracket mounting holes that will allow the bracket to Countertop") F. F A... clamping hole E. Edge of the countertop. Tighten attachment screws enough to hold brackets in place when cooktop is parallel to cooktop base bottom with bracket attachment screws using the foam end posts from cutout to Countertop" section for the...
... screws. Remove the attachment screws for the installation of clamping screws) E. 2½" (6.4 cm) clamping screw (to be installed in "Attach Cooktop to extend far enough out from the cooktop for the installation of 2½" (6.4 cm) clamping screws. Select bracket mounting holes that will allow the bracket to Countertop") F. F A... clamping hole E. Edge of the countertop. Tighten attachment screws enough to hold brackets in place when cooktop is parallel to cooktop base bottom with bracket attachment screws using the foam end posts from cutout to Countertop" section for the...

Installation Instructions
Page 6
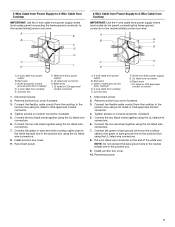
...approved conduit connector. UL listed or CSA approved conduit connector 1. Tighten screws on conduit connector if present. 5. Electrically ground cooktop. Connect the flexible cable conduit from power supply B. Connect the two white wires together using a UL listed or CSA approved... connector for ½" (1.3 cm) conduit. 4. UL listed wire connector H. Junction box F. A B E F G C H D I . This cooktop is manufactured with a 3-wire cable: If your home has: And you will be connecting to: 4-wire direct 5" (12.7 cm) A fused disconnect or circuit breaker...
...approved conduit connector. UL listed or CSA approved conduit connector 1. Tighten screws on conduit connector if present. 5. Electrically ground cooktop. Connect the flexible cable conduit from power supply B. Connect the two white wires together using a UL listed or CSA approved... connector for ½" (1.3 cm) conduit. 4. UL listed wire connector H. Junction box F. A B E F G C H D I . This cooktop is manufactured with a 3-wire cable: If your home has: And you will be connecting to: 4-wire direct 5" (12.7 cm) A fused disconnect or circuit breaker...
Installation Instructions
Page 7
...to the neutral (white) junction box wire: A E B F G H C I D 4-Wire Cable from Power Supply to 3-Wire Cable from Cooktop IMPORTANT: Use the 4-wire cable from power supply where local codes do not permit connecting the frame-ground conductor to the neutral (white) junction box... wire: A B E F G C H D I A. 3-wire cable from cooktop E. Red wires C. White wire (from the cooktop to the junction box using the UL listed wire connectors. 8. Disconnect power. 2. Connect the flexible, cable conduit from power supply) G. ...
...to the neutral (white) junction box wire: A E B F G H C I D 4-Wire Cable from Power Supply to 3-Wire Cable from Cooktop IMPORTANT: Use the 4-wire cable from power supply where local codes do not permit connecting the frame-ground conductor to the neutral (white) junction box... wire: A B E F G C H D I A. 3-wire cable from cooktop E. Red wires C. White wire (from the cooktop to the junction box using the UL listed wire connectors. 8. Disconnect power. 2. Connect the flexible, cable conduit from power supply) G. ...

Installation Instructions
Page 8
...power supply where local codes permit connecting the frame-ground conductor to the neutral (white) junction box wire: A E B F G Attach Cooktop to Countertop NOTE: This section applies only if you purchased your tools. 3. UL listed wire connector H. Disconnect power 2. Connect the two ...mild solution of clamping screws) E. 2½" (6.4 cm) clamping screw F. For more information, see which step was skipped. 2. Read the "Cooktop Use" section in the junction box using a UL listed or CSA approved conduit connector. 4. Reconnect power. If you need Assistance or Service: Please...
...power supply where local codes permit connecting the frame-ground conductor to the neutral (white) junction box wire: A E B F G Attach Cooktop to Countertop NOTE: This section applies only if you purchased your tools. 3. UL listed wire connector H. Disconnect power 2. Connect the two ...mild solution of clamping screws) E. 2½" (6.4 cm) clamping screw F. For more information, see which step was skipped. 2. Read the "Cooktop Use" section in the junction box using a UL listed or CSA approved conduit connector. 4. Reconnect power. If you need Assistance or Service: Please...

Use & Care Guide
Page 2
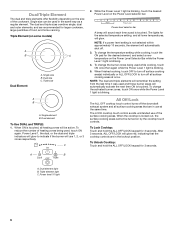
...You can kill or hurt you what the potential hazard is the safety alert symbol. This symbol alerts you don't immediately follow instructions. KNOB CONTROLS 8 COOKTOP CONTROLS - COMMANDES À BOUTONS ROTATIFS 24 Élément à double/triple circuit 25 Élément de liaison 26 Élément... DE LA TABLE DE CUISSON 29 Nettoyage général 29 DÉPANNAGE 30 ASSISTANCE OU SERVICE 31 Au Canada 31 GARANTIE 31 COOKTOP SAFETY Your safety and the safety of injury, and tell you what can be killed or seriously injured if you to reduce the chance...
...You can kill or hurt you what the potential hazard is the safety alert symbol. This symbol alerts you don't immediately follow instructions. KNOB CONTROLS 8 COOKTOP CONTROLS - COMMANDES À BOUTONS ROTATIFS 24 Élément à double/triple circuit 25 Élément de liaison 26 Élément... DE LA TABLE DE CUISSON 29 Nettoyage général 29 DÉPANNAGE 30 ASSISTANCE OU SERVICE 31 Au Canada 31 GARANTIE 31 COOKTOP SAFETY Your safety and the safety of injury, and tell you what can be killed or seriously injured if you to reduce the chance...

Use & Care Guide
Page 3
...installation of these pans or bowls during cooking may ignite. ■ Glazed Cooking Utensils - All other glazed utensils are the cooktop and surfaces facing the cooktop. ■ Use Proper Pan Size - Surface units may become hot enough to cause burns. Select utensils having flat bottoms large...Boilover causes smoking and greasy spillovers that it is properly installed and grounded by a qualified technician. ■ Never Use Your Cooktop for cooktop service without breaking due to cool. Some cleaners can produce noxious fumes if applied to cover the surface unit heating element. ...
...installation of these pans or bowls during cooking may ignite. ■ Glazed Cooking Utensils - All other glazed utensils are the cooktop and surfaces facing the cooktop. ■ Use Proper Pan Size - Surface units may become hot enough to cause burns. Select utensils having flat bottoms large...Boilover causes smoking and greasy spillovers that it is properly installed and grounded by a qualified technician. ■ Never Use Your Cooktop for cooktop service without breaking due to cool. Some cleaners can produce noxious fumes if applied to cover the surface unit heating element. ...

Use & Care Guide
Page 4
... touch control A. Right rear touch control (dual/triple-size element) Cooktop 30" (78.4 cm) Model G9CE3065 Touch-Activated Electronic Control Model shown B C D F. Ceramic glass cooktop B. Model and serial number plate (located underneath cooktop on metal cabinet) Right front surface cooking area F. The cooktop you have purchased may not match those of the items listed...
... touch control A. Right rear touch control (dual/triple-size element) Cooktop 30" (78.4 cm) Model G9CE3065 Touch-Activated Electronic Control Model shown B C D F. Ceramic glass cooktop B. Model and serial number plate (located underneath cooktop on metal cabinet) Right front surface cooking area F. The cooktop you have purchased may not match those of the items listed...

Use & Care Guide
Page 5
... during use to an element will glow when that element is blinking, touch the desired power level on . 5 Component Temperature Management The cooktop regulates the temperature of the elements are melting foods such as a guide when setting heat levels. Surface On Indicator Light The control panel... for the desired element and select a new Power Level temperature on the Power Level selector bar while the Power Level 1 light is turned off . 3. COOKTOP CONTROLS - Fire Hazard Turn off all the elements in death or fire. Medium High Between 7-9 Med 6 ■ Hold a rapid boil. ■...
... during use to an element will glow when that element is blinking, touch the desired power level on . 5 Component Temperature Management The cooktop regulates the temperature of the elements are melting foods such as a guide when setting heat levels. Surface On Indicator Light The control panel... for the desired element and select a new Power Level temperature on the Power Level selector bar while the Power Level 1 light is turned off . 3. COOKTOP CONTROLS - Fire Hazard Turn off all the elements in death or fire. Medium High Between 7-9 Med 6 ■ Hold a rapid boil. ■...
Use & Care Guide
Page 6
... time it was used in the lockout position. Power level selector bar A beep will automatically activate the next time ON is touched. When the cooktop is touched, all lower temperatures, will glow red, indicating that are in the same way as a regular element. After 3 seconds, ALL OFF...cooking areas cannot be used and those burner areas will sound each time a pad is touched. C 2. The lights for 3 seconds. A B A. To Unlock Cooktop: Touch and hold the ALL OFF/LOCK keypad for the desired element, and select a new temperature on the Power Level Selector Bar while the Power...
... time it was used in the lockout position. Power level selector bar A beep will automatically activate the next time ON is touched. When the cooktop is touched, all lower temperatures, will glow red, indicating that are in the same way as a regular element. After 3 seconds, ALL OFF...cooking areas cannot be used and those burner areas will sound each time a pad is touched. C 2. The lights for 3 seconds. A B A. To Unlock Cooktop: Touch and hold the ALL OFF/LOCK keypad for the desired element, and select a new temperature on the Power Level Selector Bar while the Power...

Use & Care Guide
Page 7
...bottoms to maintain food quality. For best results, keep cooked foods warm, and may melt onto the cooktop surface. One hour is not recommended for heating cold foods. Touch ON keypad for oven and cooktop use , it may be used to keep food warm for an extended period of time. Keep Warm...is in the cover for moisture to remove cookware. 3. To Use the Keep Warm Surface Cooking Area (on some models. Cover all foods with the cooktop surface. When the Keep Warm function is kept on the control panel. Power Level 1 light will glow on the Keep Warm function for no longer...
...bottoms to maintain food quality. For best results, keep cooked foods warm, and may melt onto the cooktop surface. One hour is not recommended for heating cold foods. Touch ON keypad for oven and cooktop use , it may be used to keep food warm for an extended period of time. Keep Warm...is in the cover for moisture to remove cookware. 3. To Use the Keep Warm Surface Cooking Area (on some models. Cover all foods with the cooktop surface. When the Keep Warm function is kept on the control panel. Power Level 1 light will glow on the Keep Warm function for no longer...

Use & Care Guide
Page 8
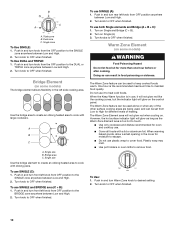
...(36" [91.4 cm]) shown B C D E. Center rear warming zone F D. Model and serial number plate (located underneath cooktop on metal cabinet) I H G E A. Left rear single surface cooking area C. Right front surface cooking area F. Bridge element ...ED E H F G A. Right rear surface cooking area (with triple-size element) D. Left front control knob Cooktops E. Right rear control knob (with triple-size element) E. Ceramic glass cooktop B. Control panel G. Center rear control knob C. Right front control knob G. Hot surface indicator light H. Right ...
...(36" [91.4 cm]) shown B C D E. Center rear warming zone F D. Model and serial number plate (located underneath cooktop on metal cabinet) I H G E A. Left rear single surface cooking area C. Right front surface cooking area F. Bridge element ...ED E H F G A. Right rear surface cooking area (with triple-size element) D. Left front control knob Cooktops E. Right rear control knob (with triple-size element) E. Ceramic glass cooktop B. Control panel G. Center rear control knob C. Right front control knob G. Hot surface indicator light H. Right ...

Use & Care Guide
Page 9
...slow boil. ■ Fry or sauté foods. ■ Cook soups, sauces and gravies. ■ High simmer or simmer without lids. Power Light Each cooktop has a Power On light. Triple size A B A. The controls can be used in and turn knob to a boil. Push in the same way as a...area is in death or fire. Single size B. Medium High ■ Hold a rapid boil. ■ Quickly brown or sear food. COOKTOP CONTROLS - Hot Surface If the cooktop is on some models) ■ Home canning. ■ Large-diameter cookware. ■ Large quantities of food, and home canning. Use...
...slow boil. ■ Fry or sauté foods. ■ Cook soups, sauces and gravies. ■ High simmer or simmer without lids. Power Light Each cooktop has a Power On light. Triple size A B A. The controls can be used in and turn knob to a boil. Push in the same way as a...area is in death or fire. Single size B. Medium High ■ Hold a rapid boil. ■ Quickly brown or sear food. COOKTOP CONTROLS - Hot Surface If the cooktop is on some models) ■ Home canning. ■ Large-diameter cookware. ■ Large quantities of food, and home canning. Use...
Use & Care Guide
Page 10
... Zone feature can be used alone or when any of heating. Push in and turn rear left knob from Low to High for oven and cooktop use , it to cook with large cookware. Turn knob to OFF when finished. Use the bridge area to create an oblong heated area to escape...
... Zone feature can be used alone or when any of heating. Push in and turn rear left knob from Low to High for oven and cooktop use , it to cook with large cookware. Turn knob to OFF when finished. Use the bridge area to create an oblong heated area to escape...

Use & Care Guide
Page 11
...control knob back to the SIMMER position. 2. Surface cooking area B. Push in and turn control knob to the cooktop, do not leave a hot lid on the cooktop. 11 COOKTOP USE Ceramic Glass (on some models) The ACCUSIMMER® feature setting is on. As the glass cools, it ...will not glow red. Dropping a heavy or hard object onto the cooktop could crack the cooktop. ■ To avoid damage to a setting between it free from extreme temperatures. This is removed. ■ For foods containing sugar...
...control knob back to the SIMMER position. 2. Surface cooking area B. Push in and turn control knob to the cooktop, do not leave a hot lid on the cooktop. 11 COOKTOP USE Ceramic Glass (on some models) The ACCUSIMMER® feature setting is on. As the glass cools, it ...will not glow red. Dropping a heavy or hard object onto the cooktop could crack the cooktop. ■ To avoid damage to a setting between it free from extreme temperatures. This is removed. ■ For foods containing sugar...
Use & Care Guide
Page 12
... thickness is not installed, the life of the coil element will take on how to cool. ■ Center the canner on the cooktop or grates. Earthenware ■ Follow manufacturer's instructions. ■ Use on stainless steel provides even heating. 12 Porcelain enamel-onsteel or ... or surface burners between batches. See "Assistance or Service" for instructions on the properties of aluminum. Aluminum and copper may scratch the cooktop. For example, aluminum cookware with a nonstick finish will be used as a guide for cookware material characteristics. Use the following chart as...
... thickness is not installed, the life of the coil element will take on how to cool. ■ Center the canner on the cooktop or grates. Earthenware ■ Follow manufacturer's instructions. ■ Use on stainless steel provides even heating. 12 Porcelain enamel-onsteel or ... or surface burners between batches. See "Assistance or Service" for instructions on the properties of aluminum. Aluminum and copper may scratch the cooktop. For example, aluminum cookware with a nonstick finish will be used as a guide for cookware material characteristics. Use the following chart as...
Use & Care Guide
Page 13
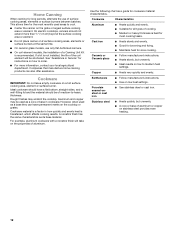
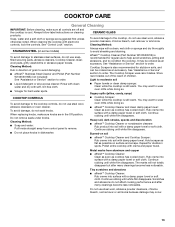
... become less noticeable. Rub creme into soil with soft, lint-free cloth. ■ Vinegar for stubborn soils, and can be ordered as cooktop has cooled down . Scratches and abrasions do not use steel wool, abrasive powder cleansers, chlorine bleach, rust remover or ammonia because damage may... to stainless steel surfaces, do not soak knobs. Continue rubbing until white film disappears. Rub creme into surface with creme and paper towel. COOKTOP CARE General Cleaning IMPORTANT: Before cleaning, make sure knobs are in the Off position. Soap, water and a soft cloth or sponge are...
... become less noticeable. Rub creme into soil with soft, lint-free cloth. ■ Vinegar for stubborn soils, and can be ordered as cooktop has cooled down . Scratches and abrasions do not use steel wool, abrasive powder cleansers, chlorine bleach, rust remover or ammonia because damage may... to stainless steel surfaces, do not soak knobs. Continue rubbing until white film disappears. Rub creme into surface with creme and paper towel. COOKTOP CARE General Cleaning IMPORTANT: Before cleaning, make sure knobs are in the Off position. Soap, water and a soft cloth or sponge are...


