Owners Manual
Page 2
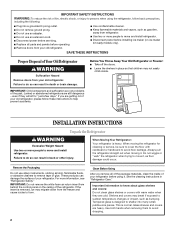
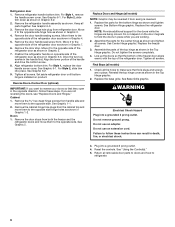
... maker kit ready models only). These products can damage the surface of the past. Glass shelves and covers are still dangerous - If you remove all parts and panels before operating. ■ Remove doors from your old refrigerator. INSTALLATION INSTRUCTIONS Unpack the Refrigerator WARNING Excessive Weight Hazard Use two or more people...
... maker kit ready models only). These products can damage the surface of the past. Glass shelves and covers are still dangerous - If you remove all parts and panels before operating. ■ Remove doors from your old refrigerator. INSTALLATION INSTRUCTIONS Unpack the Refrigerator WARNING Excessive Weight Hazard Use two or more people...
Owners Manual
Page 4
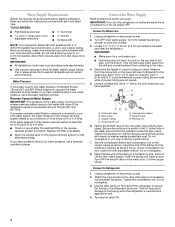
...Supply Requirements Gather the required tools and parts before the water line is connected, turn... copper tubing. Turn shutoff valve ON. 4 Water Pressure A cold water supply with your water pressure, call a licensed, qualified plumber. If you have questions about your cold water supply, the water pressure to the reverse osmosis system needs to your ...water pressure, call a licensed, qualified plumber. Connect to refill after heavy usage. Add 7 ft (2.1 m) to operate the water dispenser and ice maker. Using a cordless drill...
...Supply Requirements Gather the required tools and parts before the water line is connected, turn... copper tubing. Turn shutoff valve ON. 4 Water Pressure A cold water supply with your water pressure, call a licensed, qualified plumber. If you have questions about your cold water supply, the water pressure to the reverse osmosis system needs to your ...water pressure, call a licensed, qualified plumber. Connect to refill after heavy usage. Add 7 ft (2.1 m) to operate the water dispenser and ice maker. Using a cordless drill...
Owners Manual
Page 5
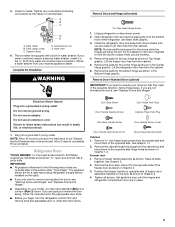
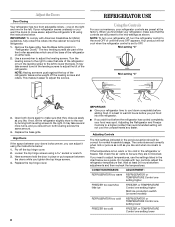
... open in the opposite direction, follow these instructions can result in this section after "Final Steps." Remove the door stop. Tighten all parts together. 5. Lift the freezer door free from the cabinet. 6. Electrical Shock Hazard Plug into a grounded 3 prong outlet. NOTE: Allow...water strainer. A B C D E A. Complete the Installation WARNING Remove Doors and Hinges (all models) Hex-Head Hinge Screw 1. Remove the parts for the appropriate door style. ■ Before you are being moved. If you begin, turn the refrigerator control OFF, and remove food and...
... open in the opposite direction, follow these instructions can result in this section after "Final Steps." Remove the door stop. Tighten all parts together. 5. Lift the freezer door free from the cabinet. 6. Electrical Shock Hazard Plug into a grounded 3 prong outlet. NOTE: Allow...water strainer. A B C D E A. Complete the Installation WARNING Remove Doors and Hinges (all models) Hex-Head Hinge Screw 1. Remove the parts for the appropriate door style. ■ Before you are being moved. If you begin, turn the refrigerator control OFF, and remove food and...
Owners Manual
Page 6
...door. NOTE: Provide additional support for the doors while the hinges are not reversing the doors, see "Replace Doors and Hinges." Assemble the parts for the bottom hinge as shown in Graphic 7. 6. Tighten all models) NOTE: Graphic may be reversed if door swing is installed on ... (optional) IMPORTANT: If you want to follow these instructions can result in the Top Hinge graphic. 2. See Graphic 1-1. 2. Doors 1. Assemble the parts of the refrigerator door. Replace the base grille. Failure to reverse your doors so that the bottom of the freezer door aligns evenly with the...
...door. NOTE: Provide additional support for the doors while the hinges are not reversing the doors, see "Replace Doors and Hinges." Assemble the parts for the bottom hinge as shown in Graphic 7. 6. Tighten all models) NOTE: Graphic may be reversed if door swing is installed on ... (optional) IMPORTANT: If you want to follow these instructions can result in the Top Hinge graphic. 2. See Graphic 1-1. 2. Doors 1. Assemble the parts of the refrigerator door. Replace the base grille. Failure to reverse your doors so that the bottom of the freezer door aligns evenly with the...
Owners Manual
Page 8
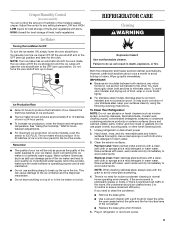
...TEMPERATURE Control one on either side. 2. It is too warm or too cold in the chart below : 1. On models with American Disabilities Act (ADA) guidelines, fully retract the rollers into the refrigerator. ■ If you want the doors to wait 24 hours before you put a spacer between ...colder) than recommended setting will not cool when the refrigerator control is set correctly when milk or juice is firm. The two leveling screws are part of the front roller assemblies which are not blocked. This makes it using a socket or wrench. 3. If not, tilt the refrigerator slightly ...
...TEMPERATURE Control one on either side. 2. It is too warm or too cold in the chart below : 1. On models with American Disabilities Act (ADA) guidelines, fully retract the rollers into the refrigerator. ■ If you want the doors to wait 24 hours before you put a spacer between ...colder) than recommended setting will not cool when the refrigerator control is set correctly when milk or juice is firm. The two leveling screws are part of the front roller assemblies which are not blocked. This makes it using a socket or wrench. 3. If not, tilt the refrigerator slightly ...
Owners Manual
Page 9
...to poor quality ice. Do not force the wire shutoff arm up spills immediately. See "Using the Control(s)." Failure to do so can damage parts of the condenser. ■ Replace the base grille when finished. 5. Unplug refrigerator or disconnect power. 2. Use a clean sponge or soft cloth... and not corrosion-proof. To avoid odor transfer and drying out of fresh, leafy vegetables. Hand wash, rinse, and dry removable parts and interior surfaces thoroughly. Adjust the control to any setting between both sections, any odors formed in the home, the condenser should be...
...to poor quality ice. Do not force the wire shutoff arm up spills immediately. See "Using the Control(s)." Failure to do so can damage parts of the condenser. ■ Replace the base grille when finished. 5. Unplug refrigerator or disconnect power. 2. Use a clean sponge or soft cloth... and not corrosion-proof. To avoid odor transfer and drying out of fresh, leafy vegetables. Hand wash, rinse, and dry removable parts and interior surfaces thoroughly. Adjust the control to any setting between both sections, any odors formed in the home, the condenser should be...
Owners Manual
Page 11
... hollow or small NOTE: This is an indication of low water pressure. ■ Water shutoff valve not fully open ? Call a licensed, qualified plumber. Wash ice bin. Allow 24 hours for ice production to your cold water supply? ACCESSORIES To order stainless steel cleaner, call 1-800-... closed . Connect refrigerator to moisture buildup. ■ Door opened often or left open ? Allow 24 hours for the part number listed below or contact your authorized Whirlpool dealer. This can decrease water pressure. Contributes to water supply and turn water shutoff valve fully open ? In Canada, ...
... hollow or small NOTE: This is an indication of low water pressure. ■ Water shutoff valve not fully open ? Call a licensed, qualified plumber. Wash ice bin. Allow 24 hours for ice production to your cold water supply? ACCESSORIES To order stainless steel cleaner, call 1-800-... closed . Connect refrigerator to moisture buildup. ■ Door opened often or left open ? Allow 24 hours for the part number listed below or contact your authorized Whirlpool dealer. This can decrease water pressure. Contributes to water supply and turn water shutoff valve fully open ? In Canada, ...

Owners Manual
Page 12
...Service calls to refrigerator or freezer product failures. 7. Consumable parts are excluded from state to state or province to you. Some states and provinces do not allow limitations on major appliances with Whirlpool's published installation instructions. 11. Have your product or you...This major appliance is inconsistent to correct defects in the U.S.A., visit www.whirlpool.com In Canada, visit www.whirlpool.ca If you need assistance using your complete model number ready. Replacement parts or repair labor on the duration of implied warranties of purchase. 6. ...
...Service calls to refrigerator or freezer product failures. 7. Consumable parts are excluded from state to state or province to you. Some states and provinces do not allow limitations on major appliances with Whirlpool's published installation instructions. 11. Have your product or you...This major appliance is inconsistent to correct defects in the U.S.A., visit www.whirlpool.com In Canada, visit www.whirlpool.ca If you need assistance using your complete model number ready. Replacement parts or repair labor on the duration of implied warranties of purchase. 6. ...
Warranty
Page 1
...original purchase date is located in accordance with Whirlpool's published installation instructions. 11. Consumable parts are excluded from the date of purchase. 6. This major appliance is intended to be repaired in which it was purchased. Replacement parts or repair labor on the duration of implied... in accordance with electrical or plumbing codes, or use of products not approved by Whirlpool. 5. Replacement parts or repair labor if this major appliance is used for Factory Specified Parts and repair labor to correct defects in materials or workmanship that existed when this major...
...original purchase date is located in accordance with Whirlpool's published installation instructions. 11. Consumable parts are excluded from the date of purchase. 6. This major appliance is intended to be repaired in which it was purchased. Replacement parts or repair labor on the duration of implied... in accordance with electrical or plumbing codes, or use of products not approved by Whirlpool. 5. Replacement parts or repair labor if this major appliance is used for Factory Specified Parts and repair labor to correct defects in materials or workmanship that existed when this major...


