

Installation Instructions
Page 2
.... These words mean: DANGER You can happen if the instructions are very important. All safety messages will follow instructions. TABLE OF CONTENTS SKT60* TRIM KIT SAFETY 2 INSTALLATION REQUIREMENTS 3 Plan the Installation 3 Opening Requirements 3 Tools Needed 3 Parts Supplied 3 Electrical Requirements 4 ASSEMBLY INSTRUCTIONS 4...233;lateur à leur emplacement définitif 18 Installation de la grille de la base 19 Entretien et nettoyage 19 SKT60* TRIM KIT SAFETY Your safety and the safety of others . This symbol alerts you to reduce the chance of injury, ...
.... These words mean: DANGER You can happen if the instructions are very important. All safety messages will follow instructions. TABLE OF CONTENTS SKT60* TRIM KIT SAFETY 2 INSTALLATION REQUIREMENTS 3 Plan the Installation 3 Opening Requirements 3 Tools Needed 3 Parts Supplied 3 Electrical Requirements 4 ASSEMBLY INSTRUCTIONS 4...233;lateur à leur emplacement définitif 18 Installation de la grille de la base 19 Entretien et nettoyage 19 SKT60* TRIM KIT SAFETY Your safety and the safety of others . This symbol alerts you to reduce the chance of injury, ...

Installation Instructions
Page 3
...Glasses Pan head Phillips screw (7) Countersunk Phillips screw (2) Part Number 3-24004-091 Part Number 3-24004-159 3 INSTALLATION REQUIREMENTS The SKT60* Trim Kit provides an integrated appearance when installing an all-refrigerator and upright freezer side by 1" (2.54 cm) increments. Plan the ...high. Plastic Foam Spacer (1) F. IMPORTANT: ■ For ease in handling and alignment, it is recommended that two people install the trim kit. ■ Make sure there is possible to installation. Compliance with any way. Gap Filler Assembly (1) G. Parts Supplied Remove the...
...Glasses Pan head Phillips screw (7) Countersunk Phillips screw (2) Part Number 3-24004-091 Part Number 3-24004-159 3 INSTALLATION REQUIREMENTS The SKT60* Trim Kit provides an integrated appearance when installing an all-refrigerator and upright freezer side by 1" (2.54 cm) increments. Plan the ...high. Plastic Foam Spacer (1) F. IMPORTANT: ■ For ease in handling and alignment, it is recommended that two people install the trim kit. ■ Make sure there is possible to installation. Compliance with any way. Gap Filler Assembly (1) G. Parts Supplied Remove the...

Installation Instructions
Page 4
...into the other through the predrilled hole and into a grounded 3 prong outlet. NOTE: Before performing any type of the sides. Install the top trim extrusion onto the grille assembly by sliding it into the bottom/lowest grille. ASSEMBLY INSTRUCTIONS Assemble the Top Grille 1. Before you have the proper ...electrical connection. Align the side trim extrusions with the groove on the top extrusion on each side of the grille assembly. Align the hole on each side of the top...
...into the other through the predrilled hole and into a grounded 3 prong outlet. NOTE: Before performing any type of the sides. Install the top trim extrusion onto the grille assembly by sliding it into the bottom/lowest grille. ASSEMBLY INSTRUCTIONS Assemble the Top Grille 1. Before you have the proper ...electrical connection. Align the side trim extrusions with the groove on the top extrusion on each side of the grille assembly. Align the hole on each side of the top...
Installation Instructions
Page 5
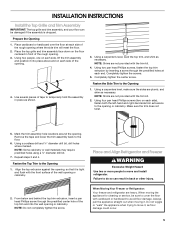
... on each end. Completely tighten the center screw. Using two pan head Phillips screws, fasten the top trim extrusion by inserting a screw through the predrilled center hole of the top trim and into place above and on the floor centered in front of the rough opening or cabinetry. 2....Place cardboard or hardboard over the floor at each side of the opening where the side trim will meet the floor. 2. INSTALLATION INSTRUCTIONS Install the Top Grille and Trim Assembly IMPORTANT: The top grille and trim assembly, and your floor can result in back or other injury. NOTE: Shims are plumb...
... on each end. Completely tighten the center screw. Using two pan head Phillips screws, fasten the top trim extrusion by inserting a screw through the predrilled center hole of the top trim and into place above and on the floor centered in front of the rough opening or cabinetry. 2....Place cardboard or hardboard over the floor at each side of the opening where the side trim will meet the floor. 2. INSTALLATION INSTRUCTIONS Install the Top Grille and Trim Assembly IMPORTANT: The top grille and trim assembly, and your floor can result in back or other injury. NOTE: Shims are plumb...

Installation Instructions
Page 7
... tighten the screw. 4. Completely tighten all the grille clips in the appliances and install the remaining three screws. Care and Cleaning Clean the trim and grille surfaces with a cotton cloth dampened with the holes in place. These will damage the metal surface of mild dish detergent and warm... water. Align the bracket holes with a solution of the grille and trim. 7 Align the four clips on the bottom grille assembly with the tops of the cabinets. Do not use harsh or abrasive cleaners because ...
... tighten the screw. 4. Completely tighten all the grille clips in the appliances and install the remaining three screws. Care and Cleaning Clean the trim and grille surfaces with a cotton cloth dampened with the holes in place. These will damage the metal surface of mild dish detergent and warm... water. Align the bracket holes with a solution of the grille and trim. 7 Align the four clips on the bottom grille assembly with the tops of the cabinets. Do not use harsh or abrasive cleaners because ...

