

Installation Instructions
Page 2
... safety alert symbol and either the word "DANGER" or "WARNING." TABLE OF CONTENTS SKT60* TRIM KIT SAFETY 2 INSTALLATION REQUIREMENTS 3 Plan the Installation 3 Opening Requirements 3 Tools Needed 3 Parts Supplied 3 Electrical Requirements 4 ASSEMBLY INSTRUCTIONS 4 Assemble the Top Grille 4 Attach the Side Trim Extrusions 4 INSTALLATION INSTRUCTIONS 5 Install the Top Grille and Trim Assembly 5 Place and Align Refrigerator and Freezer 5 Move...
... safety alert symbol and either the word "DANGER" or "WARNING." TABLE OF CONTENTS SKT60* TRIM KIT SAFETY 2 INSTALLATION REQUIREMENTS 3 Plan the Installation 3 Opening Requirements 3 Tools Needed 3 Parts Supplied 3 Electrical Requirements 4 ASSEMBLY INSTRUCTIONS 4 Assemble the Top Grille 4 Attach the Side Trim Extrusions 4 INSTALLATION INSTRUCTIONS 5 Install the Top Grille and Trim Assembly 5 Place and Align Refrigerator and Freezer 5 Move...

Installation Instructions
Page 3
... trim kit. ■ Make sure there is your installation using these instructions in height. NOTE: It is not used, 1" (2.54 cm) must be damaged if they are included. Extrusion, Top Trim (1) B. Gap Filler Assembly (1) G. INSTALLATION REQUIREMENTS The SKT60* Trim Kit provides an integrated appearance when installing an all-refrigerator and upright freezer side by 66...
... trim kit. ■ Make sure there is your installation using these instructions in height. NOTE: It is not used, 1" (2.54 cm) must be damaged if they are included. Extrusion, Top Trim (1) B. Gap Filler Assembly (1) G. INSTALLATION REQUIREMENTS The SKT60* Trim Kit provides an integrated appearance when installing an all-refrigerator and upright freezer side by 66...

Installation Instructions
Page 4
...electrical supply is important to make sure you move your freezer be a ³⁄₈" (9.5 mm) gap between extrusions. 3. ASSEMBLY INSTRUCTIONS Assemble the Top Grille 1. Attach the Side Trim Extrusions 1. Do not remove ground prong. Align the side trim extrusions with the top...179;⁄₈" (9.5 mm) 4 Recommended grounding method A 115 Volt, 60 Hz., AC only 15- It is flush with the sides of installation, cleaning, or removing a light bulb, turn the Temperature Control to those already assembled by sliding it into a grounded 3 prong outlet. NOTE...
...electrical supply is important to make sure you move your freezer be a ³⁄₈" (9.5 mm) gap between extrusions. 3. ASSEMBLY INSTRUCTIONS Assemble the Top Grille 1. Attach the Side Trim Extrusions 1. Do not remove ground prong. Align the side trim extrusions with the top...179;⁄₈" (9.5 mm) 4 Recommended grounding method A 115 Volt, 60 Hz., AC only 15- It is flush with the sides of installation, cleaning, or removing a light bulb, turn the Temperature Control to those already assembled by sliding it into a grounded 3 prong outlet. NOTE...
Installation Instructions
Page 5
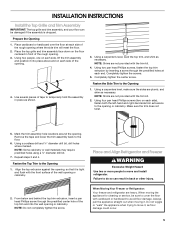
...refrigerator are plumb, and shim as floor damage could occur. 5 When moving it into the wall opening , so that it , as necessary. INSTALLATION INSTRUCTIONS Install the Top Grille and Trim Assembly IMPORTANT: The top grille and trim assembly, and your floor can result in back or other injury. Using two...diameter drill bit, drill holes where marked. Place the top grille and trim assembly face down on each side of tape to move and install refrigerator. From below and behind the top trim extrusion, insert a pan head Phillips screw through the predrilled holes at each end. Do ...
...refrigerator are plumb, and shim as floor damage could occur. 5 When moving it into the wall opening , so that it , as necessary. INSTALLATION INSTRUCTIONS Install the Top Grille and Trim Assembly IMPORTANT: The top grille and trim assembly, and your floor can result in back or other injury. Using two...diameter drill bit, drill holes where marked. Place the top grille and trim assembly face down on each side of tape to move and install refrigerator. From below and behind the top trim extrusion, insert a pan head Phillips screw through the predrilled holes at each end. Do ...

Installation Instructions
Page 6
...electrical shock. 4. Place a leveling tool on the door gasket magnets to avoid floor damage. Turn the leveler leg clockwise. Failure to follow these instructions can result in back or other appliance. Plug into a grounded 3 prong outlet. 3. Attach the plastic foam spacer, to remove each cabinet ... Check the level of the appliance since it may need to the side of each appliance and readjust several times to move and install refrigerator. NOTE: Provide additional support for the refrigerator door while the hinges are heavy. Do not use an extension cord. Repeat Step...
...electrical shock. 4. Place a leveling tool on the door gasket magnets to avoid floor damage. Turn the leveler leg clockwise. Failure to follow these instructions can result in back or other appliance. Plug into a grounded 3 prong outlet. 3. Attach the plastic foam spacer, to remove each cabinet ... Check the level of the appliance since it may need to the side of each appliance and readjust several times to move and install refrigerator. NOTE: Provide additional support for the refrigerator door while the hinges are heavy. Do not use an extension cord. Repeat Step...


