

Installation Instructions
Page 2
...chemicals known to the State of California to cause birth defects or other reproductive harm. 2 TABLE OF CONTENTS SKT60* TRIM KIT SAFETY 2 INSTALLATION REQUIREMENTS 3 Plan the Installation 3 Opening Requirements 3 Tools Needed 3 Parts Supplied 3 Electrical Requirements 4 ASSEMBLY INSTRUCTIONS 4 Assemble the Top ...y limpieza 13 TABLE DES MATIÈRES SÉCURITÉ DE L'ENSEMBLE DE TRINGLE D'OBTURATION SKT60 14 EXIGENCES D'INSTALLATION 14 Planification de l'installation 14 Exigences d'ouverture 14 Outillage nécessaire 15 Pièces fournies 15 Spécifications &#...
...chemicals known to the State of California to cause birth defects or other reproductive harm. 2 TABLE OF CONTENTS SKT60* TRIM KIT SAFETY 2 INSTALLATION REQUIREMENTS 3 Plan the Installation 3 Opening Requirements 3 Tools Needed 3 Parts Supplied 3 Electrical Requirements 4 ASSEMBLY INSTRUCTIONS 4 Assemble the Top ...y limpieza 13 TABLE DES MATIÈRES SÉCURITÉ DE L'ENSEMBLE DE TRINGLE D'OBTURATION SKT60 14 EXIGENCES D'INSTALLATION 14 Planification de l'installation 14 Exigences d'ouverture 14 Outillage nécessaire 15 Pièces fournies 15 Spécifications &#...

Installation Instructions
Page 3
...82841-001 3-82841-002 4-82968-001 3-82967-001 2-82975-001 2-82984-001 Tools Needed Assemble the required tools and parts before starting installation. Plastic Foam Spacer (1) F. Extrusion, Top Trim (1) B. Grille, Bottom Assembly (1) I . Tools Needed: ■ Cordless drill,... use sharp objects to remove packaging materials to installation. INSTALLATION REQUIREMENTS The SKT60* Trim Kit provides an integrated appearance when installing an all-refrigerator and upright freezer side by 1" (2.54 cm) increments. Plan the Installation Plan your responsibility. IMPORTANT: ■ For...
...82841-001 3-82841-002 4-82968-001 3-82967-001 2-82975-001 2-82984-001 Tools Needed Assemble the required tools and parts before starting installation. Plastic Foam Spacer (1) F. Extrusion, Top Trim (1) B. Grille, Bottom Assembly (1) I . Tools Needed: ■ Cordless drill,... use sharp objects to remove packaging materials to installation. INSTALLATION REQUIREMENTS The SKT60* Trim Kit provides an integrated appearance when installing an all-refrigerator and upright freezer side by 1" (2.54 cm) increments. Plan the Installation Plan your responsibility. IMPORTANT: ■ For...

Installation Instructions
Page 4
Electrical Shock Hazard Plug into the bottom/lowest grille. Do not use an adapter. Install the top trim extrusion onto the grille assembly by sliding one into the other through the predrilled hole and into their final location, it onto ... 15- Do not use an extension cord. Align the hole on the side extrusion with the groove on the top extrusion on each side of installation, cleaning, or removing a light bulb, turn the Temperature Control to the OFF position as shown. 2. Using the two countersunk Phillips screws, fasten the side trim...
Electrical Shock Hazard Plug into the bottom/lowest grille. Do not use an adapter. Install the top trim extrusion onto the grille assembly by sliding one into the other through the predrilled hole and into their final location, it onto ... 15- Do not use an extension cord. Align the hole on the side extrusion with the groove on the top extrusion on each side of installation, cleaning, or removing a light bulb, turn the Temperature Control to the OFF position as shown. 2. Using the two countersunk Phillips screws, fasten the side trim...
Installation Instructions
Page 5
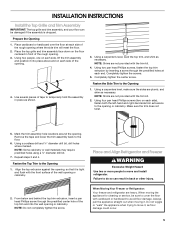
... Refrigerator: Your freezer and refrigerator are plumb, and shim as necessary. Do not wiggle or "walk" the appliance when trying to move and install refrigerator. Completely tighten the screws. 5. NOTE: Some cabinetry or wall materials may require predrilled holes using a ⁷⁄₈" diameter drill... extrusion, insert a pan head Phillips screw through the predrilled holes at each side of the rough opening or cabinetry. 2. INSTALLATION INSTRUCTIONS Install the Top Grille and Trim Assembly IMPORTANT: The top grille and trim assembly, and your floor can result in place as...
... Refrigerator: Your freezer and refrigerator are plumb, and shim as necessary. Do not wiggle or "walk" the appliance when trying to move and install refrigerator. Completely tighten the screws. 5. NOTE: Some cabinetry or wall materials may require predrilled holes using a ⁷⁄₈" diameter drill... extrusion, insert a pan head Phillips screw through the predrilled holes at each side of the rough opening or cabinetry. 2. INSTALLATION INSTRUCTIONS Install the Top Grille and Trim Assembly IMPORTANT: The top grille and trim assembly, and your floor can result in place as...

Installation Instructions
Page 6
... . IMPORTANT: If the electrical outlets are working. 6 Move the First Appliance 1. Place the freezer and refrigerator in the back wall of the opening, move and install refrigerator.
... . IMPORTANT: If the electrical outlets are working. 6 Move the First Appliance 1. Place the freezer and refrigerator in the back wall of the opening, move and install refrigerator.

Installation Instructions
Page 7
... remaining three screws. NOTE: The gap filler should be used to fill in the base of the appliance cabinets. Install the Bottom Grille Assembly 1. Make sure the appliances are situated outside the hinge bracket on the bottom grille assembly with the holes...with the square holes in the gap between the refrigerator and freezer to fasten the bracket. 3. Install the Gap Filler Assembly 1. Align the four clips on each appliance. 2. Install the Base Grille Install the Bracket onto the Cabinets 1. These will damage the metal surface of mild dish detergent and ...
... remaining three screws. NOTE: The gap filler should be used to fill in the base of the appliance cabinets. Install the Bottom Grille Assembly 1. Make sure the appliances are situated outside the hinge bracket on the bottom grille assembly with the holes...with the square holes in the gap between the refrigerator and freezer to fasten the bracket. 3. Install the Gap Filler Assembly 1. Align the four clips on each appliance. 2. Install the Base Grille Install the Bracket onto the Cabinets 1. These will damage the metal surface of mild dish detergent and ...


