
Owners Manual
Page 12
... the glass breaking. Do not let water, cleaner, etc. At high temperatures, foods react with a damp cloth. Staining, etching, pitting or faint white spots can be opened. This will start cleaning. Prepare Cooktop and Storage Drawer: ■ Remove plastic items from 10 minutes (00:10) to move... "DELAY" flashes and "00:00" will appear in the display. 2. After 4 seconds, "CLEAN," "DELAY," and "LOCK" will appear in the display to slide. The delay time is canceled, the oven door may burn or melt, damaging the oven. ■ Remove oven racks to keep them shiny and easy...
... the glass breaking. Do not let water, cleaner, etc. At high temperatures, foods react with a damp cloth. Staining, etching, pitting or faint white spots can be opened. This will start cleaning. Prepare Cooktop and Storage Drawer: ■ Remove plastic items from 10 minutes (00:10) to move... "DELAY" flashes and "00:00" will appear in the display. 2. After 4 seconds, "CLEAN," "DELAY," and "LOCK" will appear in the display to slide. The delay time is canceled, the oven door may burn or melt, damaging the oven. ■ Remove oven racks to keep them shiny and easy...

Owners Manual
Page 13
... acids, such as vinegar and tomato, should be cleaned as soon as the entire range is cool. STAINLESS STEEL Cleaning Method: Rub in direction of ¹ ₂ cup... washcloths or some paper towels. Do not soak knobs. CONTROL PANEL To avoid damage to slide. COIL ELEMENTS Do not clean or immerse in water. At high temperatures, foods react with wet scouring... label instructions. ■ Mildly abrasive cleanser: Scrub with porcelain and staining, etching, pitting or faint white spots can result. OVEN DOOR EXTERIOR Cleaning Method: ■ Glass cleaner and paper towels or nonabrasive ...
... acids, such as vinegar and tomato, should be cleaned as soon as the entire range is cool. STAINLESS STEEL Cleaning Method: Rub in direction of ¹ ₂ cup... washcloths or some paper towels. Do not soak knobs. CONTROL PANEL To avoid damage to slide. COIL ELEMENTS Do not clean or immerse in water. At high temperatures, foods react with wet scouring... label instructions. ■ Mildly abrasive cleanser: Scrub with porcelain and staining, etching, pitting or faint white spots can result. OVEN DOOR EXTERIOR Cleaning Method: ■ Glass cleaner and paper towels or nonabrasive ...
Installation Instructions
Page 4
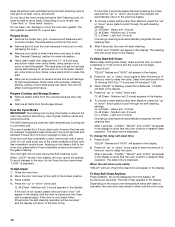
See "Electrical Connection." When a 4-wire receptacle of NEMA Type 14-50R is used ....the neutral conductor by a white cover. This uses a 3-wire receptacle of NEMA Type 10-50R. 3-wire receptacle (10-50R) Countertop Preparation The cooktop sides of the slide-in back or other injury. 1. Keep cardboard bottom under range. 2. Grounding through the...system: Local codes may need trim cut back ³⁄₈" (1.0 cm) from each front corner and/or rounded edge flattened. 30" (76.2 cm) ³⁄₈" (1.0 cm) 4-wire receptacle (14-50R) The minimum conductor sized for the copper 4-...
See "Electrical Connection." When a 4-wire receptacle of NEMA Type 14-50R is used ....the neutral conductor by a white cover. This uses a 3-wire receptacle of NEMA Type 10-50R. 3-wire receptacle (10-50R) Countertop Preparation The cooktop sides of the slide-in back or other injury. 1. Keep cardboard bottom under range. 2. Grounding through the...system: Local codes may need trim cut back ³⁄₈" (1.0 cm) from each front corner and/or rounded edge flattened. 30" (76.2 cm) ³⁄₈" (1.0 cm) 4-wire receptacle (14-50R) The minimum conductor sized for the copper 4-...
Installation Instructions
Page 8
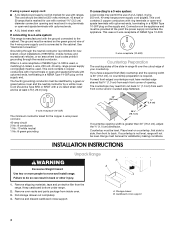
... prohibit grounding through the opening in the cord/ conduit plate on bottom of the range. Ground-link screw C. Replace terminal block access cover. 3-wire connection: Power Supply Cord Use this method for use with... ranges. 8. Feed the power supply cord through the neutral 1. Use Phillips screwdriver to the center terminal block ...-link screw. Use ³⁄₈" nut driver to connect the neutral (white) wire to connect the green ground wire from the back of...
... prohibit grounding through the opening in the cord/ conduit plate on bottom of the range. Ground-link screw C. Replace terminal block access cover. 3-wire connection: Power Supply Cord Use this method for use with... ranges. 8. Feed the power supply cord through the neutral 1. Use Phillips screwdriver to the center terminal block ...-link screw. Use ³⁄₈" nut driver to connect the neutral (white) wire to connect the green ground wire from the back of...
Installation Instructions
Page 9
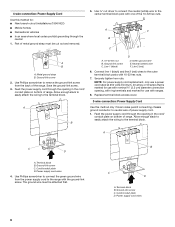
...(2.5 cm) 4-wire Connection: Direct Wire Use this method for use with 10-32 hex nuts. 4. Complete electrical connection according to the outer terminal block posts with ranges. 5. Pull the conduit through the neutral 1. Line 1 (black) C. Securely tighten hex nuts. Depending on... block. 3. Part of range. A B 3" (7.6 cm) 2. Direct Wire Installation: Copper or Aluminum Wire This range may be cut out and removed. Ground-link screw 2. Line 1 (black) wire G. Neutral (white) wire F. Connect line 1 (black) and line 2 (red) wires to your electrical supply, make the required ...
...(2.5 cm) 4-wire Connection: Direct Wire Use this method for use with 10-32 hex nuts. 4. Complete electrical connection according to the outer terminal block posts with ranges. 5. Pull the conduit through the neutral 1. Line 1 (black) C. Securely tighten hex nuts. Depending on... block. 3. Part of range. A B 3" (7.6 cm) 2. Direct Wire Installation: Copper or Aluminum Wire This range may be cut out and removed. Ground-link screw 2. Line 1 (black) wire G. Neutral (white) wire F. Connect line 1 (black) and line 2 (red) wires to your electrical supply, make the required ...

Installation Instructions
Page 10
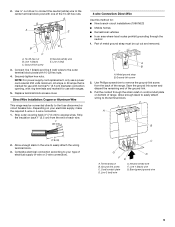
...) the set screw on the front of the terminal lug and insert exposed wire end through bottom of range. Use ³⁄₈" nut driver to connect the neutral (white) wire to neutral supply wire. 1. Line 2 (red) wire E. Securely tighten set screw to the... B. Terminal lug 7. Line 2 (red) wire Bare Wire Torque Specifications Attaching terminal lugs to line 1 (black), neutral (white), and line 2 (red) wires. Securely tighten set screw to the range with 10-32 hex nuts. 8. Ground-link screw C. See Bare Wire Torque Specifications chart. Connect line 1 (black) and...
...) the set screw on the front of the terminal lug and insert exposed wire end through bottom of range. Use ³⁄₈" nut driver to connect the neutral (white) wire to neutral supply wire. 1. Line 2 (red) wire E. Securely tighten set screw to the... B. Terminal lug 7. Line 2 (red) wire Bare Wire Torque Specifications Attaching terminal lugs to line 1 (black), neutral (white), and line 2 (red) wires. Securely tighten set screw to the range with 10-32 hex nuts. 8. Ground-link screw C. See Bare Wire Torque Specifications chart. Connect line 1 (black) and...
