
Owners Manual
Page 3
... result in this manual and on your appliance. This appliance can kill or hurt you what the potential hazard is the safety alert symbol. This symbol alerts you apply too much force or weight to floor or wall. • Slide range back so rear range foot is moved.... will tell you don't immediately follow these instructions can happen if the instructions are very important. Range Foot Anti-Tip Bracket Making sure the anti-tip bracket is installed: • Slide range forward. • Look for details. Connect anti-tip bracket to cause cancer, birth defects, or...
... result in this manual and on your appliance. This appliance can kill or hurt you what the potential hazard is the safety alert symbol. This symbol alerts you apply too much force or weight to floor or wall. • Slide range back so rear range foot is moved.... will tell you don't immediately follow these instructions can happen if the instructions are very important. Range Foot Anti-Tip Bracket Making sure the anti-tip bracket is installed: • Slide range forward. • Look for details. Connect anti-tip bracket to cause cancer, birth defects, or...
Owners Manual
Page 4
... ■ Clean Only Parts Listed in use. IMPORTANT SAFETY INSTRUCTIONS WARNING: To reduce the risk of fire, electrical shock, injury to cause burns - Be sure the range is in Manual. ■ Before Self-Cleaning the Oven - Improper installation of these openings, oven doors, and windows of ...to damage. ■ Protective Liners - TO CHECK IF THE DEVICES ARE INSTALLED PROPERLY, SLIDE RANGE FORWARD, LOOK FOR ANTI-TIP BRACKET SECURELY ATTACHED TO FLOOR OR WALL, AND SLIDE RANGE BACK SO REAR RANGE FOOT IS UNDER ANTI-TIP BRACKET. ■ CAUTION: Do not store items of interest...
... ■ Clean Only Parts Listed in use. IMPORTANT SAFETY INSTRUCTIONS WARNING: To reduce the risk of fire, electrical shock, injury to cause burns - Be sure the range is in Manual. ■ Before Self-Cleaning the Oven - Improper installation of these openings, oven doors, and windows of ...to damage. ■ Protective Liners - TO CHECK IF THE DEVICES ARE INSTALLED PROPERLY, SLIDE RANGE FORWARD, LOOK FOR ANTI-TIP BRACKET SECURELY ATTACHED TO FLOOR OR WALL, AND SLIDE RANGE BACK SO REAR RANGE FOOT IS UNDER ANTI-TIP BRACKET. ■ CAUTION: Do not store items of interest...
Owners Manual
Page 5
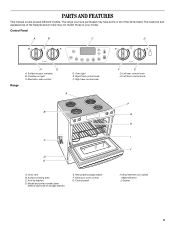
...of the items listed. Left rear control knob H. Bake element J. Anti-tip bracket D. Electronic oven control G. Gasket 5 Surface cooking area C. The range you have purchased may not match those of your model. Cooktop on light C. Right rear control knob A B C D E A. Removable storage drawer ...F. Left front control knob F G H I . PARTS AND FEATURES This manual covers several different models. The locations and appearances of the features shown here may have some or all of storage drawer) E. Electronic oven control...
...of the items listed. Left rear control knob H. Bake element J. Anti-tip bracket D. Electronic oven control G. Gasket 5 Surface cooking area C. The range you have purchased may not match those of your model. Cooktop on light C. Right rear control knob A B C D E A. Removable storage drawer ...F. Left front control knob F G H I . PARTS AND FEATURES This manual covers several different models. The locations and appearances of the features shown here may have some or all of storage drawer) E. Electronic oven control...

Installation Instructions
Page 1
... in this manual and on your appliance. INSTALLATION INSTRUCTIONS SLIDE-IN ELECTRIC RANGE Table of Contents RANGE SAFETY 1 INSTALLATION REQUIREMENTS 2 Tools and Parts 2 Location Requirements 2 Electrical Requirements 3 Countertop Preparation 4 INSTALLATION INSTRUCTIONS 4 Unpack Range 4 Adjust Leveling Legs 5 Install Anti-Tip Bracket 5 Electrical Connection 6 Verify Anti-Tip Bracket Location 11 Level Range 11 Complete Installation 11 Moving the Range 12 RANGE SAFETY Your...
... in this manual and on your appliance. INSTALLATION INSTRUCTIONS SLIDE-IN ELECTRIC RANGE Table of Contents RANGE SAFETY 1 INSTALLATION REQUIREMENTS 2 Tools and Parts 2 Location Requirements 2 Electrical Requirements 3 Countertop Preparation 4 INSTALLATION INSTRUCTIONS 4 Unpack Range 4 Adjust Leveling Legs 5 Install Anti-Tip Bracket 5 Electrical Connection 6 Verify Anti-Tip Bracket Location 11 Level Range 11 Complete Installation 11 Moving the Range 12 RANGE SAFETY Your...


