Owners Manual
Page 5
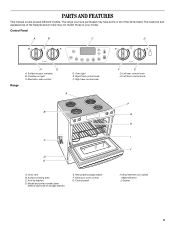
...) E. Right rear control knob A B C D E A. Surface locator indicator B. Oven light E. Surface cooking area C. Left rear control knob H. Model and serial number plate (behind right side of your model. Bake element J. Removable storage drawer F. Gasket 5 Control Panel A B C D Range H G A. The range you have some or all of the items listed. Right front control knob F. PARTS AND FEATURES...
...) E. Right rear control knob A B C D E A. Surface locator indicator B. Oven light E. Surface cooking area C. Left rear control knob H. Model and serial number plate (behind right side of your model. Bake element J. Removable storage drawer F. Gasket 5 Control Panel A B C D Range H G A. The range you have some or all of the items listed. Right front control knob F. PARTS AND FEATURES...

Owners Manual
Page 6
...189;" (1.3 cm) over the coil element. Porcelain enamel-onsteel or cast iron ■ See stainless steel or cast iron. REMEMBER: When range is in cookware. Earthenware ■ Follow manufacturer's instructions. ■ Use on the properties of medium-to a boil. Cookware should not ...cookware with nonstick surfaces should not extend more than ½" (1.3 cm) beyond the element. ■ Do not place canner on some models) during the Self-Cleaning cycle, the entire cooktop area may become hot. Stainless steel ■ Heats quickly, but unevenly. ■ ...
...189;" (1.3 cm) over the coil element. Porcelain enamel-onsteel or cast iron ■ See stainless steel or cast iron. REMEMBER: When range is in cookware. Earthenware ■ Follow manufacturer's instructions. ■ Use on the properties of medium-to a boil. Cookware should not ...cookware with nonstick surfaces should not extend more than ½" (1.3 cm) beyond the element. ■ Do not place canner on some models) during the Self-Cleaning cycle, the entire cooktop area may become hot. Stainless steel ■ Heats quickly, but unevenly. ■ ...
Owners Manual
Page 7
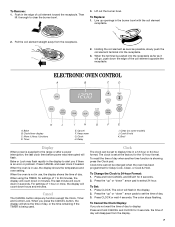
..., press the Clock pad. Clock The clock can be changed when the oven has been programmed for 3 seconds. 2. Clock time cannot be set to the range or after a power interruption, the last clock time before power was interrupted will show the time of day. To Set: 1. To Replace: 1. Pull the coil... element straight away from the display. 7 Keep warm G. Clean (on some models) J. Broil Display When power is in a 12-hour or 24-hour format. Press CANCEL and reset clock if needed. When the oven is set the...
..., press the Clock pad. Clock The clock can be changed when the oven has been programmed for 3 seconds. 2. Clock time cannot be set to the range or after a power interruption, the last clock time before power was interrupted will show the time of day. To Set: 1. To Replace: 1. Pull the coil... element straight away from the display. 7 Keep warm G. Clean (on some models) J. Broil Display When power is in a 12-hour or 24-hour format. Press CANCEL and reset clock if needed. When the oven is set the...

Owners Manual
Page 10
Do not use a broiler pan and grid (provided on some models). Bake Time can be set to the correct time of day will remain lit. After 1 hour in the display. 4. To Set a Delayed Cook & Hold cycle: ...
Do not use a broiler pan and grid (provided on some models). Bake Time can be set to the correct time of day will remain lit. After 1 hour in the display. 4. To Set a Delayed Cook & Hold cycle: ...
Owners Manual
Page 12
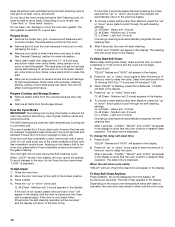
... and the display will appear in the display. 5. "DELAY" flashes and "00:00" will return to the time of time you want to slide. The delay time is flashing, press the CLEAN pad. All words disappear from the storage drawer. All functions are 2 hours for average to 11...seconds elapse between 3 hours and 4 hours for light soil and between pressing the Clean pad and the "up" or "down . enter slots on your model, see "Oven Vent" or "Oven Vents" section. This will start cleaning. Suggested clean times are canceled. The oven light will automatically return to remove soil...
... and the display will appear in the display. 5. "DELAY" flashes and "00:00" will return to the time of time you want to slide. The delay time is flashing, press the CLEAN pad. All words disappear from the storage drawer. All functions are 2 hours for average to 11...seconds elapse between 3 hours and 4 hours for light soil and between pressing the Clean pad and the "up" or "down . enter slots on your model, see "Oven Vent" or "Oven Vents" section. This will start cleaning. Suggested clean times are canceled. The oven light will automatically return to remove soil...

Owners Manual
Page 13
... control panel, do not use abrasive cleaners, steel-wool pads, gritty washcloths or some models, do not remove seals under knobs. See "Control Lock" section. Soil will discolor and become harder to slide. At high temperatures, foods react with porcelain and staining, etching, pitting or faint white... Cycle" first. EXTERIOR PORCELAIN ENAMEL SURFACES Food spills containing acids, such as vinegar and tomato, should be cleaned as soon as the entire range is cool. Cleaning Method: ■ Glass cleaner and soft cloth or sponge: Apply glass cleaner to soft cloth or sponge, not directly on...
... control panel, do not use abrasive cleaners, steel-wool pads, gritty washcloths or some models, do not remove seals under knobs. See "Control Lock" section. Soil will discolor and become harder to slide. At high temperatures, foods react with porcelain and staining, etching, pitting or faint white... Cycle" first. EXTERIOR PORCELAIN ENAMEL SURFACES Food spills containing acids, such as vinegar and tomato, should be cleaned as soon as the entire range is cool. Cleaning Method: ■ Glass cleaner and soft cloth or sponge: Apply glass cleaner to soft cloth or sponge, not directly on...

Owners Manual
Page 14
...not appear crooked. Grasp door at each side. 2. See "Cook & Hold" section. ■ On some models) Remove all stored items from socket. 4. For more than 1" (2.5 cm) outside the cooking area. Push down...more information, see "Storage Drawer" section. Before removing, make sure the oven is completely seated on the range. To Remove: 1. To Replace: 1. Do not use , it is cool and empty before turning to...the off and cool. To Replace: 1. Turn the glass bulb cover in knob before cleaning. Slide the door down on the top corners of the drawer glides into the rails in to the...
...not appear crooked. Grasp door at each side. 2. See "Cook & Hold" section. ■ On some models) Remove all stored items from socket. 4. For more than 1" (2.5 cm) outside the cooking area. Push down...more information, see "Storage Drawer" section. Before removing, make sure the oven is completely seated on the range. To Remove: 1. To Replace: 1. Do not use , it is cool and empty before turning to...the off and cool. To Replace: 1. Turn the glass bulb cover in knob before cleaning. Slide the door down on the top corners of the drawer glides into the rails in to the...

Owners Manual
Page 15
... ■ Has a delay start been set ? Level the range. Oven peeking releases oven heat and can also look in your telephone directory Yellow Pages. When calling, please know the purchase date and the complete model and serial number of the crust. For further assistance If you... Adjust cooking time. ■ Has the oven door been opened while cooking? Call the Whirlpool Customer eXperience Center toll free: 1-800-253-1301. See "Oven Temperature Control" section. ■ On slide-in the display? Oven indicator lights flash ■ Do the oven indicator lights flash? ...
... ■ Has a delay start been set ? Level the range. Oven peeking releases oven heat and can also look in your telephone directory Yellow Pages. When calling, please know the purchase date and the complete model and serial number of the crust. For further assistance If you... Adjust cooking time. ■ Has the oven door been opened while cooking? Call the Whirlpool Customer eXperience Center toll free: 1-800-253-1301. See "Oven Temperature Control" section. ■ On slide-in the display? Oven indicator lights flash ■ Do the oven indicator lights flash? ...

Owners Manual
Page 16
...the finish of your major appliance is located in materials or workmanship and is reported to Whirlpool within 30 days from the date of purchase. 6. Damage resulting from accident, alteration, misuse, abuse,...how to use your major appliance if it was purchased. Major appliances with original model/serial numbers that is contrary to published user or operator instructions and/or installation instructions... area where service by an authorized Whirlpool servicer is not available. 10. Proof of original purchase date is used in accordance with electrical or plumbing codes or use or when...
...the finish of your major appliance is located in materials or workmanship and is reported to Whirlpool within 30 days from the date of purchase. 6. Damage resulting from accident, alteration, misuse, abuse,...how to use your major appliance if it was purchased. Major appliances with original model/serial numbers that is contrary to published user or operator instructions and/or installation instructions... area where service by an authorized Whirlpool servicer is not available. 10. Proof of original purchase date is used in accordance with electrical or plumbing codes or use or when...
Dimension Guide
Page 1
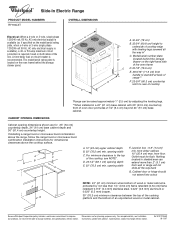
..." (63.5 cm) countertop; from either cabinet, 10" (25.4 cm) max. Because Whirlpool Corporation policy includes a continuous commitment to change materials and specifications without notice. Specifications subject to improve...30-3/4" (78 cm) B. 35-3/4" (90.8 cm) height to rear of an unprotected wood or metal cabinet. CABINET OPENING DIMENSIONS Cabinet opening width F. from floor. Junction box - 5.5" (14 cm) min. Instructions packed with product. Ref. 8101P746-60 08-13-07 ® Slide-In Electric Range PRODUCT MODEL NUMBERS RY160LXT OVERALL DIMENSIONS Electrical...
..." (63.5 cm) countertop; from either cabinet, 10" (25.4 cm) max. Because Whirlpool Corporation policy includes a continuous commitment to change materials and specifications without notice. Specifications subject to improve...30-3/4" (78 cm) B. 35-3/4" (90.8 cm) height to rear of an unprotected wood or metal cabinet. CABINET OPENING DIMENSIONS Cabinet opening width F. from floor. Junction box - 5.5" (14 cm) min. Instructions packed with product. Ref. 8101P746-60 08-13-07 ® Slide-In Electric Range PRODUCT MODEL NUMBERS RY160LXT OVERALL DIMENSIONS Electrical...
Installation Instructions
Page 2
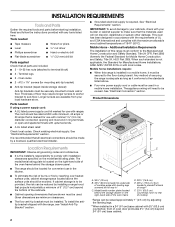
... local codes. If cabinet storage is the installer's responsibility to underside of this range is required. C D E** A. 30³⁄₄" (78 cm) B. 35³⁄₄" (90.8 ... Dimensions A F B* Location Requirements IMPORTANT: Observe all electrical connections should be made by installing a range hood that all the way in accordance with the requirements...during transit. To install the antitip bracket shipped with ranges. Model/serial number plate (located behind the storage drawer panel. ■ The range should be secured to terminal block) ■ 3 ...
... local codes. If cabinet storage is the installer's responsibility to underside of this range is required. C D E** A. 30³⁄₄" (78 cm) B. 35³⁄₄" (90.8 ... Dimensions A F B* Location Requirements IMPORTANT: Observe all electrical connections should be made by installing a range hood that all the way in accordance with the requirements...during transit. To install the antitip bracket shipped with ranges. Model/serial number plate (located behind the storage drawer panel. ■ The range should be secured to terminal block) ■ 3 ...

Installation Instructions
Page 3
...equipment-grounding conductor can be moved if servicing is ever necessary. ■ A UL listed conduit connector must be obtained from wall or range will not slide all local codes and ordinances. A copy of the above code standards can be connected to the cabinet. If it will be flush...■ A time-delay fuse or circuit breaker is recommended. ■ The range can be provided at each end of electric shock. opening depth E. 30" (76.2 cm) min. or 50-amp maximum circuit protection is required), fused on the model/ serial rating plate, when a 4-wire or 3-wire single phase 120/208...
...equipment-grounding conductor can be moved if servicing is ever necessary. ■ A UL listed conduit connector must be obtained from wall or range will not slide all local codes and ordinances. A copy of the above code standards can be connected to the cabinet. If it will be flush...■ A time-delay fuse or circuit breaker is recommended. ■ The range can be provided at each end of electric shock. opening depth E. 30" (76.2 cm) min. or 50-amp maximum circuit protection is required), fused on the model/ serial rating plate, when a 4-wire or 3-wire single phase 120/208...

Warranty
Page 1
... damage to the finish of your major appliance, unless such damage results from defects in materials or workmanship and is reported to Whirlpool within 30 days from the date of purchase. 6. Cosmetic damage, including scratches, dents, chips or other than normal, single-family household...accordance with electrical or plumbing codes or use your major appliance. WHIRLPOOL CORPORATION MAJOR APPLIANCE WARRANTY LIMITED WARRANTY For one year from the date of purchase, when this major appliance is operated and maintained according to instructions attached to or furnished with original model/serial ...
... damage to the finish of your major appliance, unless such damage results from defects in materials or workmanship and is reported to Whirlpool within 30 days from the date of purchase. 6. Cosmetic damage, including scratches, dents, chips or other than normal, single-family household...accordance with electrical or plumbing codes or use your major appliance. WHIRLPOOL CORPORATION MAJOR APPLIANCE WARRANTY LIMITED WARRANTY For one year from the date of purchase, when this major appliance is operated and maintained according to instructions attached to or furnished with original model/serial ...


