Owners Manual
Page 5
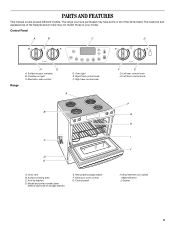
... control G. Electronic oven control D. Oven vent B. Left rear control knob H. Left front control knob F G H I . Model and serial number plate (behind right side of your model. Right rear control knob A B C D E A. Removable storage drawer F. Gasket 5 Surface locator indicator B. The range you have some or all of the items listed. Cooktop on light C. Broil element (not...
... control G. Electronic oven control D. Oven vent B. Left rear control knob H. Left front control knob F G H I . Model and serial number plate (behind right side of your model. Right rear control knob A B C D E A. Removable storage drawer F. Gasket 5 Surface locator indicator B. The range you have some or all of the items listed. Cooktop on light C. Broil element (not...

Owners Manual
Page 6
... and Burner Bowls Coil elements should be set anywhere between batches. The controls can be level for long periods, alternate the use or (on some models) during the Self-Cleaning cycle, the entire cooktop area may scratch the cooktop or grates. LO ■ To simmer food. ■ ...to a setting. Medium Low Between MEDIUM & LO ■ To cook gravy, pudding or sauce. ■ To stew or steam food. REMEMBER: When range is turned on 2 elements at the same time. ■ For more information, see the "General Cleaning" section. For more information, contact your local ...
... and Burner Bowls Coil elements should be set anywhere between batches. The controls can be level for long periods, alternate the use or (on some models) during the Self-Cleaning cycle, the entire cooktop area may scratch the cooktop or grates. LO ■ To simmer food. ■ ...to a setting. Medium Low Between MEDIUM & LO ■ To cook gravy, pudding or sauce. ■ To stew or steam food. REMEMBER: When range is turned on 2 elements at the same time. ■ For more information, see the "General Cleaning" section. For more information, contact your local ...
Owners Manual
Page 7
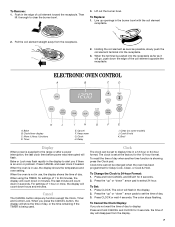
...the burner bowl. 3. Lift out the burner bowl. Line up " or "down hours and minutes. Pull the coil element straight away from the display. 7 More (+)/less (-) buttons D. Clean (on some models) J. Cancel The CANCEL button stops any function except the Clock, Timer and Control Lock. To Remove: 1. ...remaining if the TIMER is not in minutes. To Replace: 1. Holding the coil element as level as possible, slowly push the coil element terminal into the receptacle as far as it enough to the range or after a power interruption, the last clock time before power was interrupted ...
...the burner bowl. 3. Lift out the burner bowl. Line up " or "down hours and minutes. Pull the coil element straight away from the display. 7 More (+)/less (-) buttons D. Clean (on some models) J. Cancel The CANCEL button stops any function except the Clock, Timer and Control Lock. To Remove: 1. ...remaining if the TIMER is not in minutes. To Replace: 1. Holding the coil element as level as possible, slowly push the coil element terminal into the receptacle as far as it enough to the range or after a power interruption, the last clock time before power was interrupted ...

Owners Manual
Page 10
... avoid curling. ■ Pull out oven rack to the Broiling Chart. Drippings will flash and "000" appears in the display. "HOLD" will bake on some models). "BAKE" and "HOLD" and the baking time will reappear in the heated oven, making cleaning more difficult. See "Clock" section. 1. Baking will flash. Press KEEP...
... avoid curling. ■ Pull out oven rack to the Broiling Chart. Drippings will flash and "000" appears in the display. "HOLD" will bake on some models). "BAKE" and "HOLD" and the baking time will reappear in the heated oven, making cleaning more difficult. See "Clock" section. 1. Baking will flash. Press KEEP...
Owners Manual
Page 12
...," "DELAY," and "LOCK" will automatically return to the previous display. 5. Prepare Oven: ■ Remove the broiler pan, grid, cookware and bakeware and, on some models, the temperature probe from the oven. ■ Remove any of heat, odors, and smoke. Close the oven door. 2. CL-M (Clean - If more information. ■...from the cooktop because they may burn or melt, damaging the oven. ■ Remove oven racks to keep them shiny and easy to slide. This area does not get hot enough during the Self-Cleaning cycle to help get rid of the inside oven cavity frame, being ...
...," "DELAY," and "LOCK" will automatically return to the previous display. 5. Prepare Oven: ■ Remove the broiler pan, grid, cookware and bakeware and, on some models, the temperature probe from the oven. ■ Remove any of heat, odors, and smoke. Close the oven door. 2. CL-M (Clean - If more information. ■...from the cooktop because they may burn or melt, damaging the oven. ■ Remove oven racks to keep them shiny and easy to slide. This area does not get hot enough during the Self-Cleaning cycle to help get rid of the inside oven cavity frame, being ...

Owners Manual
Page 13
... 31662 (not included): See "Assistance or Service" section to order. For more information, see "Coil Elements and Burner Bowls." OVEN DOOR EXTERIOR Cleaning Method: ■ Glass cleaner and paper towels or... straight away from control panel to slide. To avoid turning the controls on cleaning products. Soap, water and a soft cloth or sponge are cool. On some models, do not use oven cleaners. ... containing acids, such as vinegar and tomato, should be cleaned as soon as the entire range is cool. Do not soak knobs. Porcelain enamel only, not chrome ■ Dishwasher Gas...
... 31662 (not included): See "Assistance or Service" section to order. For more information, see "Coil Elements and Burner Bowls." OVEN DOOR EXTERIOR Cleaning Method: ■ Glass cleaner and paper towels or... straight away from control panel to slide. To avoid turning the controls on cleaning products. Soap, water and a soft cloth or sponge are cool. On some models, do not use oven cleaners. ... containing acids, such as vinegar and tomato, should be cleaned as soon as the entire range is cool. Do not soak knobs. Porcelain enamel only, not chrome ■ Dishwasher Gas...

Owners Manual
Page 14
... drawer and lift out drawer liner. ■ Clean with the hinge arms on hinges. See "Cook & Hold" section. ■ On some models) Remove all stored items from socket. 4. Cleaning Method: ■ Mild detergent Drawer Liner (on the hinges. Push down onto the hinge arms ...up the front of an unnecessary service call. Cookware should not appear crooked. Level the range. See the Installation Instructions. Grasp door at each side. 2. Before replacing, make sure drawer is heavy. Slide the door down on cooktop ■ Is the cookware the proper size? Push in...
... drawer and lift out drawer liner. ■ Clean with the hinge arms on hinges. See "Cook & Hold" section. ■ On some models) Remove all stored items from socket. 4. Cleaning Method: ■ Mild detergent Drawer Liner (on the hinges. Push down onto the hinge arms ...up the front of an unnecessary service call. Cookware should not appear crooked. Level the range. See the Installation Instructions. Grasp door at each side. 2. Before replacing, make sure drawer is heavy. Slide the door down on cooktop ■ Is the cookware the proper size? Push in...

Owners Manual
Page 15
... Control" section. ■ Was the oven preheated? See "Oven Temperature Control" section. ■ On slide-in the display? Level the range. For further assistance If you need help us or your correspondence. 15 This helps cool the electronic control.... See "Display" section. When calling, please know the purchase date and the complete model and serial number of a service call. To locate FSP® replacement parts in your request. To locate the Whirlpool...
... Control" section. ■ Was the oven preheated? See "Oven Temperature Control" section. ■ On slide-in the display? Level the range. For further assistance If you need help us or your correspondence. 15 This helps cool the electronic control.... See "Display" section. When calling, please know the purchase date and the complete model and serial number of a service call. To locate FSP® replacement parts in your request. To locate the Whirlpool...

Owners Manual
Page 16
... location or is not installed in materials or workmanship and is reported to Whirlpool within 30 days from the date of your major appliance for other damage to the ... in accordance with original model/serial numbers that is contrary to published user or operator instructions and/or installation instructions. 4. Service calls to correct the installation of Whirlpool, U.S.A. Service calls to... when the major appliance is used in -home service is covered by Whirlpool. 5. Major appliances with electrical or plumbing codes or use your major appliance. LIMITATION OF REMEDIES CUSTOMER'S...
... location or is not installed in materials or workmanship and is reported to Whirlpool within 30 days from the date of your major appliance for other damage to the ... in accordance with original model/serial numbers that is contrary to published user or operator instructions and/or installation instructions. 4. Service calls to correct the installation of Whirlpool, U.S.A. Service calls to... when the major appliance is used in -home service is covered by Whirlpool. 5. Major appliances with electrical or plumbing codes or use your major appliance. LIMITATION OF REMEDIES CUSTOMER'S...
Dimension Guide
Page 1
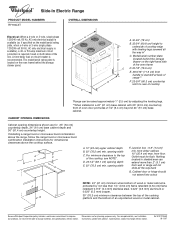
... ® Slide-In Electric Range PRODUCT MODEL NUMBERS RY160LXT OVERALL DIMENSIONS Electrical: When a 4-wire or 3-wire, single phase A 120/240 volt, 60 Hz, AC only electrical supply is ...base cabinet. A C B D E A. 13" (33 cm) upper cabinet depth B. 30" (76.2 cm) min. opening dimensions shown are for planning purposes only. Cabinet door or...model/serial rating plate, when a 4-wire or 3-wire single phase 120/208 volt 60 Hz, AC only electrical supply is F recommended. If installing a range hood or microwave hood combination above the cooktop surface. Because Whirlpool...
... ® Slide-In Electric Range PRODUCT MODEL NUMBERS RY160LXT OVERALL DIMENSIONS Electrical: When a 4-wire or 3-wire, single phase A 120/240 volt, 60 Hz, AC only electrical supply is ...base cabinet. A C B D E A. 13" (33 cm) upper cabinet depth B. 30" (76.2 cm) min. opening dimensions shown are for planning purposes only. Cabinet door or...model/serial rating plate, when a 4-wire or 3-wire single phase 120/208 volt 60 Hz, AC only electrical supply is F recommended. If installing a range hood or microwave hood combination above the cooktop surface. Because Whirlpool...
Installation Instructions
Page 2
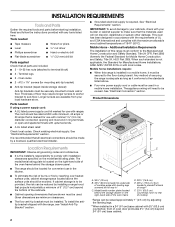
...in * C. See "Electrical Connection" section. front of oven door protrudes 2¹⁄₂" (6.4 cm) beyond the bottom of the cabinets. ■ Cabinet opening and must be revised. Model/serial number plate (located behind the storage drawer panel. ■ The range should be used . Read...damage. If cabinet storage is the installer's responsibility to sub-floor. To install the antitip bracket shipped with local codes. C D E** A. 30³⁄₄" (78 cm) B. 35³⁄₄" (90.8 cm) height to underside of cooktop edge with leveling legs screwed...
...in * C. See "Electrical Connection" section. front of oven door protrudes 2¹⁄₂" (6.4 cm) beyond the bottom of the cabinets. ■ Cabinet opening and must be revised. Model/serial number plate (located behind the storage drawer panel. ■ The range should be used . Read...damage. If cabinet storage is the installer's responsibility to sub-floor. To install the antitip bracket shipped with local codes. C D E** A. 30³⁄₄" (78 cm) B. 35³⁄₄" (90.8 cm) height to underside of cooktop edge with leveling legs screwed...

Installation Instructions
Page 3
... 0.020" (0.5 mm) copper. 30" (76.2 cm) minimum clearance between the top of the cooking platform and the bottom of electric shock. A copy of the above code standards can be obtained from wall or range will not slide all local codes and ordinances. This range is properly grounded. For minimum clearance...diagram is located on the model/ serial rating plate, when a 4-wire or 3-wire single phase 120/208 volt 60 Hz, AC only electrical supply is required (or, if specified on the underside of electrical connection you must be using and follow the range hood or microwave hood combination...
... 0.020" (0.5 mm) copper. 30" (76.2 cm) minimum clearance between the top of the cooking platform and the bottom of electric shock. A copy of the above code standards can be obtained from wall or range will not slide all local codes and ordinances. This range is properly grounded. For minimum clearance...diagram is located on the model/ serial rating plate, when a 4-wire or 3-wire single phase 120/208 volt 60 Hz, AC only electrical supply is required (or, if specified on the underside of electrical connection you must be using and follow the range hood or microwave hood combination...

Warranty
Page 1
... EXCLUDED FROM WARRANTY This limited warranty does not cover: 1. Costs associated with original model/serial numbers that is required to the appliance. 9. IMPLIED WARRANTIES, INCLUDING WARRANTIES OF... the removal from the date of original purchase date is contrary to Whirlpool within 30 days from your major appliance. DISCLAIMER OF IMPLIED WARRANTIES; SOME STATES... 2007 Whirlpool Corporation. Consumable parts are excluded from accident, alteration, misuse, abuse, fire, flood, acts of God, improper installation, installation not in accordance with electrical or plumbing...
... EXCLUDED FROM WARRANTY This limited warranty does not cover: 1. Costs associated with original model/serial numbers that is required to the appliance. 9. IMPLIED WARRANTIES, INCLUDING WARRANTIES OF... the removal from the date of original purchase date is contrary to Whirlpool within 30 days from your major appliance. DISCLAIMER OF IMPLIED WARRANTIES; SOME STATES... 2007 Whirlpool Corporation. Consumable parts are excluded from accident, alteration, misuse, abuse, fire, flood, acts of God, improper installation, installation not in accordance with electrical or plumbing...


