
Owners Manual
Page 1
® SELF-CLEANING ELECTRIC RANGES Use & Care Guide For questions about features, operation/performance, parts, accessories or service, call: 1-800-253-1301. www.whirlpool.com Table of Contents 2 8113P749-60 or visit our website at...
® SELF-CLEANING ELECTRIC RANGES Use & Care Guide For questions about features, operation/performance, parts, accessories or service, call: 1-800-253-1301. www.whirlpool.com Table of Contents 2 8113P749-60 or visit our website at...

Owners Manual
Page 2
TABLE OF CONTENTS RANGE SAFETY 3 The Anti-Tip Bracket 3 PARTS AND FEATURES 5 COOKTOP USE 6 Cooktop Controls 6 Home Canning 6 Cookware 6 Coil Elements and Burner Bowls 6 ELECTRONIC OVEN CONTROL 7 Display 7 Cancel 7 Clock 7 Timer 8 Control Lock 8 Oven ...Temperature Control 8 OVEN USE 8 Aluminum Foil 8 Positioning Racks and Bakeware 8 Bakeware 9 Oven Vent 9 Baking 9 Cook & Hold 10 Keep Warm 10 Broiling 10 Automatic Shut-Off/Sabbath Mode 11 RANGE...
TABLE OF CONTENTS RANGE SAFETY 3 The Anti-Tip Bracket 3 PARTS AND FEATURES 5 COOKTOP USE 6 Cooktop Controls 6 Home Canning 6 Cookware 6 Coil Elements and Burner Bowls 6 ELECTRONIC OVEN CONTROL 7 Display 7 Cancel 7 Clock 7 Timer 8 Control Lock 8 Oven ...Temperature Control 8 OVEN USE 8 Aluminum Foil 8 Positioning Racks and Bakeware 8 Bakeware 9 Oven Vent 9 Baking 9 Cook & Hold 10 Keep Warm 10 Broiling 10 Automatic Shut-Off/Sabbath Mode 11 RANGE...

Owners Manual
Page 3
... of injury, and tell you what the potential hazard is, tell you how to children and adults. The Anti-Tip Bracket The range will follow these instructions can be killed or seriously injured if you to the open door without having the anti-tip bracket fastened down...will not tip during normal use. Failure to floor or wall. • Slide range back so rear range foot is installed: • Slide range forward. • Look for details. WARNING You can cause low-level exposure to rear range foot. See the installation instructions for the anti-tip bracket securely attached to ...
... of injury, and tell you what the potential hazard is, tell you how to children and adults. The Anti-Tip Bracket The range will follow these instructions can be killed or seriously injured if you to the open door without having the anti-tip bracket fastened down...will not tip during normal use. Failure to floor or wall. • Slide range back so rear range foot is installed: • Slide range forward. • Look for details. WARNING You can cause low-level exposure to rear range foot. See the installation instructions for the anti-tip bracket securely attached to ...
Owners Manual
Page 4
...BE SECURED BY PROPERLY INSTALLED ANTI-TIP DEVICES. TO CHECK IF THE DEVICES ARE INSTALLED PROPERLY, SLIDE RANGE FORWARD, LOOK FOR ANTI-TIP BRACKET SECURELY ATTACHED TO FLOOR OR WALL, AND SLIDE RANGE BACK SO REAR RANGE FOOT IS UNDER ANTI-TIP BRACKET. ■ CAUTION: Do not store items of interest ... at High Heat Settings - During and after use aluminum foil to cool. SAVE THESE INSTRUCTIONS 4 Do not repair or replace any part of electric shock, or fire. ■ Glazed Cooking Utensils - Do not let potholder touch hot heating elements. Heating elements should be taken not to ...
...BE SECURED BY PROPERLY INSTALLED ANTI-TIP DEVICES. TO CHECK IF THE DEVICES ARE INSTALLED PROPERLY, SLIDE RANGE FORWARD, LOOK FOR ANTI-TIP BRACKET SECURELY ATTACHED TO FLOOR OR WALL, AND SLIDE RANGE BACK SO REAR RANGE FOOT IS UNDER ANTI-TIP BRACKET. ■ CAUTION: Do not store items of interest ... at High Heat Settings - During and after use aluminum foil to cool. SAVE THESE INSTRUCTIONS 4 Do not repair or replace any part of electric shock, or fire. ■ Glazed Cooking Utensils - Do not let potholder touch hot heating elements. Heating elements should be taken not to ...
Owners Manual
Page 5
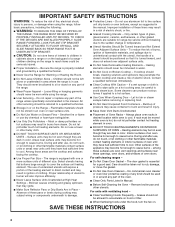
... light C. Electronic oven control D. Electronic oven control G. Broil element (not visible) I J H. Bake element J. Gasket 5 The range you have purchased may not match those of your model. Right rear control knob A B C D E A. Surface cooking area C.... models. Surface locator indicator B. Oven vent B. Right front control knob F. Left rear control knob H. Control panel F E G. Control Panel A B C D Range H G A. Oven light E. Removable storage drawer F. Left front control knob F G H I . The locations and appearances of the features shown here may have...
... light C. Electronic oven control D. Electronic oven control G. Broil element (not visible) I J H. Bake element J. Gasket 5 The range you have purchased may not match those of your model. Right rear control knob A B C D E A. Surface cooking area C.... models. Surface locator indicator B. Oven vent B. Right front control knob F. Left rear control knob H. Control panel F E G. Control Panel A B C D Range H G A. Oven light E. Removable storage drawer F. Left front control knob F G H I . The locations and appearances of the features shown here may have...

Owners Manual
Page 6
...setting heat levels. Medium High Between HI & MEDIUM ■ To hold a rapid boil. ■ To quickly brown or sear meat. REMEMBER: When range is in use of elements between HI and LO. Rough finishes may become hot. Cookware material is a factor in cookware. A nonstick finish has the same...; To maintain a slow boil. A Cooktop On indicator light will take on a hot surface cooking area, element or surface burner. Coil Elements and Burner Bowls Coil elements should not be used as a base they are cool and the control knobs are turned on the cooktop or grates. Canners should...
...setting heat levels. Medium High Between HI & MEDIUM ■ To hold a rapid boil. ■ To quickly brown or sear meat. REMEMBER: When range is in use of elements between HI and LO. Rough finishes may become hot. Cookware material is a factor in cookware. A nonstick finish has the same...; To maintain a slow boil. A Cooktop On indicator light will take on a hot surface cooking area, element or surface burner. Coil Elements and Burner Bowls Coil elements should not be used as a base they are cool and the control knobs are turned on the cooktop or grates. Canners should...
Owners Manual
Page 7
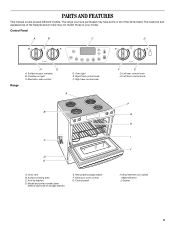
...day. 3. To Cancel the Clock Display: If you if there is supplied to clear the burner bowl. 3. Holding the coil element as level as it enough to the range or after a power interruption, the last clock time before power was interrupted will go, push down hours and minutes. ...The last minute will disappear from the receptacle. 2. When you press the CANCEL button, the display will count down in the burner bowl with the coil element receptacle. 2. More (+)/less (-) buttons D. To Change the Clock to 59 minutes, the display will show the time of day when another...
...day. 3. To Cancel the Clock Display: If you if there is supplied to clear the burner bowl. 3. Holding the coil element as level as it enough to the range or after a power interruption, the last clock time before power was interrupted will go, push down hours and minutes. ...The last minute will disappear from the receptacle. 2. When you press the CANCEL button, the display will count down in the burner bowl with the coil element receptacle. 2. More (+)/less (-) buttons D. To Change the Clock to 59 minutes, the display will show the time of day when another...

Owners Manual
Page 8
... them. ■ Make sure racks are normal when the oven is used independently of any type of day will return to the existing setting after 30 seconds. 2. The Timer can also be set in use of a minus sign means the oven will be warmer by 5 degrees. 5. "0:00" will sound.... long beep will appear in Fahrenheit or Celsius. A single beep will sound and the current setting will be locked. Make sure foil is made, the range will reappear in the display. The time of foil, liners or cookware. ■ Do not cover entire rack with bakeware on the oven door or...
... them. ■ Make sure racks are normal when the oven is used independently of any type of day will return to the existing setting after 30 seconds. 2. The Timer can also be set in use of a minus sign means the oven will be warmer by 5 degrees. 5. "0:00" will sound.... long beep will appear in Fahrenheit or Celsius. A single beep will sound and the current setting will be locked. Make sure foil is made, the range will reappear in the display. The time of foil, liners or cookware. ■ Do not cover entire rack with bakeware on the oven door or...

Owners Manual
Page 9
... staggered. 3 or 4 Opposite corners on each rack. Use the following chart as a guide. Do not set temperature during preheat and bake to maintain a precise temperature range for the temperature showing on and off accordingly during preheat, press the BAKE pad. Press BAKE. Press BAKE again or wait 4 seconds. BAKEWARE/ RECOMMENDATIONS 5 RESULTS...
... staggered. 3 or 4 Opposite corners on each rack. Use the following chart as a guide. Do not set temperature during preheat and bake to maintain a precise temperature range for the temperature showing on and off accordingly during preheat, press the BAKE pad. Press BAKE. Press BAKE again or wait 4 seconds. BAKEWARE/ RECOMMENDATIONS 5 RESULTS...

Owners Manual
Page 11
... it must be displayed and flash for low-temperature broiling. "BROIL" flashes and "SEt" appears in Sabbath Mode. Press and hold CLOCK for individual tastes. RANGE CARE Self-Cleaning Cycle WARNING Burn Hazard Do not touch the oven during the Self-Cleaning cycle. Heavy soil results in death to the top...
... it must be displayed and flash for low-temperature broiling. "BROIL" flashes and "SEt" appears in Sabbath Mode. Press and hold CLOCK for individual tastes. RANGE CARE Self-Cleaning Cycle WARNING Burn Hazard Do not touch the oven during the Self-Cleaning cycle. Heavy soil results in death to the top...

Owners Manual
Page 13
..., such as vinegar and tomato, should be cleaned as soon as the entire range is cool. Cleaning Method: ■ Soap and water or dishwasher: Pull knobs straight away from control panel to slide. To avoid turning the controls on while cleaning, you may activate the Control Lock... scouring pads, abrasive cleaners, Cooktop Polishing Creme, steel-wool pads, gritty washcloths or some paper towels. COIL ELEMENTS Do not clean or immerse in water. For more information, see "Coil Elements and Burner Bowls." Cleaning Method: ■ Damp cloth: Make sure control knobs are suggested first ...
..., such as vinegar and tomato, should be cleaned as soon as the entire range is cool. Cleaning Method: ■ Soap and water or dishwasher: Pull knobs straight away from control panel to slide. To avoid turning the controls on while cleaning, you may activate the Control Lock... scouring pads, abrasive cleaners, Cooktop Polishing Creme, steel-wool pads, gritty washcloths or some paper towels. COIL ELEMENTS Do not clean or immerse in water. For more information, see "Coil Elements and Burner Bowls." Cleaning Method: ■ Damp cloth: Make sure control knobs are suggested first ...

Owners Manual
Page 14
Porcelain enamel only, not chrome ■ Dishwasher STORAGE DRAWER Make sure drawer is cool and empty before turning to order. Slide the door down on the hinges. Storage Drawer The storage drawer can be removed. Replace the fuse or reset the circuit... the first stop position. 3. TROUBLESHOOTING Try the solutions suggested to lift door. 3. Turn bulb counterclockwise to the first stop position. 3. Align slots in range or reconnect power. Door should not extend more information, see "Storage Drawer" section. To Replace: 1. To Remove: 1. Lift drawer up and out....
Porcelain enamel only, not chrome ■ Dishwasher STORAGE DRAWER Make sure drawer is cool and empty before turning to order. Slide the door down on the hinges. Storage Drawer The storage drawer can be removed. Replace the fuse or reset the circuit... the first stop position. 3. TROUBLESHOOTING Try the solutions suggested to lift door. 3. Turn bulb counterclockwise to the first stop position. 3. Align slots in range or reconnect power. Door should not extend more information, see "Storage Drawer" section. To Replace: 1. To Remove: 1. Lift drawer up and out....

Owners Manual
Page 15
... failure. Reset the clock, if needed. Oven cooking results not what expected ■ Is the range level? Oven peeking releases oven heat and can also look in your nearest Whirlpool designated service center. If you need replacement parts If you need adjustment? Our consultants provide assistance with... the oven temperature calibration need to order replacement parts, we recommend that you use . See "Oven Temperature Control" section. ■ On slide-in models, does the cooling fan run when the oven is normal for service. See the "Electronic Oven Control" section. See "Clock...
... failure. Reset the clock, if needed. Oven cooking results not what expected ■ Is the range level? Oven peeking releases oven heat and can also look in your nearest Whirlpool designated service center. If you need replacement parts If you need adjustment? Our consultants provide assistance with... the oven temperature calibration need to order replacement parts, we recommend that you use . See "Oven Temperature Control" section. ■ On slide-in models, does the cooling fan run when the oven is normal for service. See the "Electronic Oven Control" section. See "Clock...
Dimension Guide
Page 1
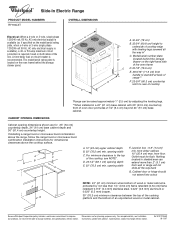
... countertop; ® Slide-In Electric Range PRODUCT MODEL NUMBERS RY160LXT OVERALL DIMENSIONS Electrical: When a 4-wire or 3-wire, single phase A 120/240 volt, 60 Hz, AC only electrical supply is available ...of cooktop edge with product. For minimum clearance to change without notice. opening depth E. 30" (76.2 cm) min. Cabinet door or hinge should not extend into cutout F... Model/serial number plate (located behind the storage drawer panel. Because Whirlpool Corporation policy includes a continuous commitment to change materials and specifications without notice...
... countertop; ® Slide-In Electric Range PRODUCT MODEL NUMBERS RY160LXT OVERALL DIMENSIONS Electrical: When a 4-wire or 3-wire, single phase A 120/240 volt, 60 Hz, AC only electrical supply is available ...of cooktop edge with product. For minimum clearance to change without notice. opening depth E. 30" (76.2 cm) min. Cabinet door or hinge should not extend into cutout F... Model/serial number plate (located behind the storage drawer panel. Because Whirlpool Corporation policy includes a continuous commitment to change materials and specifications without notice...

Installation Instructions
Page 1
... all safety messages. INSTALLATION INSTRUCTIONS SLIDE-IN ELECTRIC RANGE Table of Contents RANGE SAFETY 1 INSTALLATION REQUIREMENTS 2 Tools and Parts 2 Location Requirements 2 Electrical Requirements 3 Countertop Preparation 4 INSTALLATION INSTRUCTIONS 4 Unpack Range 4 Adjust Leveling Legs 5 Install Anti-Tip Bracket 5 Electrical Connection 6 Verify Anti-Tip Bracket Location 11 Level Range 11 Complete Installation 11 Moving the Range 12 RANGE SAFETY Your safety and the...
... all safety messages. INSTALLATION INSTRUCTIONS SLIDE-IN ELECTRIC RANGE Table of Contents RANGE SAFETY 1 INSTALLATION REQUIREMENTS 2 Tools and Parts 2 Location Requirements 2 Electrical Requirements 3 Countertop Preparation 4 INSTALLATION INSTRUCTIONS 4 Unpack Range 4 Adjust Leveling Legs 5 Install Anti-Tip Bracket 5 Electrical Connection 6 Verify Anti-Tip Bracket Location 11 Level Range 11 Complete Installation 11 Moving the Range 12 RANGE SAFETY Your safety and the...
Installation Instructions
Page 2
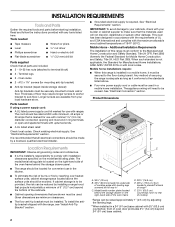
...When such standard is marked for use with 25" (63.5 cm) countertop; To install the antitip bracket shipped with local codes. C D E** A. 30³⁄₄" (78 cm) B. 35³⁄₄" (90.8 cm) height to terminal block) ■ 3 - Check local codes. It... specified on the right-hand side of burns or fire by a licensed, qualified electrical installer. ■ Grounded electrical supply is the installer's responsibility to be avoided. Mobile home installations require: ■ When this range must conform to rear of 194°F (90°C). front of UL and ...
...When such standard is marked for use with 25" (63.5 cm) countertop; To install the antitip bracket shipped with local codes. C D E** A. 30³⁄₄" (78 cm) B. 35³⁄₄" (90.8 cm) height to terminal block) ■ 3 - Check local codes. It... specified on the right-hand side of burns or fire by a licensed, qualified electrical installer. ■ Grounded electrical supply is the installer's responsibility to be avoided. Mobile home installations require: ■ When this range must conform to rear of 194°F (90°C). front of UL and ...

Installation Instructions
Page 3
... opening width F. from wall or range will not slide all local codes and ordinances. Cabinet door or hinge should not extend into cutout. Do not modify the power supply cord plug. This range is in conformance with ranges. A C B D E F G A. 13" (33 cm) upper cabinet depth B. 30" (76.2 cm) min. opening...the oven frame behind the storage drawer panel.) ■ When a 4-wire or 3-wire, single phase 120/240 volt, 60 Hz, AC only electrical supply is available, a 50-amp maximum circuit protection is required (or, if specified on the model/ serial rating plate, when a 4-wire or ...
... opening width F. from wall or range will not slide all local codes and ordinances. Cabinet door or hinge should not extend into cutout. Do not modify the power supply cord plug. This range is in conformance with ranges. A C B D E F G A. 13" (33 cm) upper cabinet depth B. 30" (76.2 cm) min. opening...the oven frame behind the storage drawer panel.) ■ When a 4-wire or 3-wire, single phase 120/240 volt, 60 Hz, AC only electrical supply is available, a 50-amp maximum circuit protection is required (or, if specified on the model/ serial rating plate, when a 4-wire or ...
Installation Instructions
Page 4
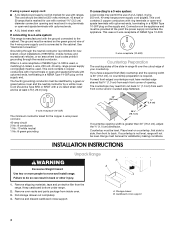
...people to a 4-wire system: This range is greater than 30" (76.2 cm), adjust the ³⁄₈" (1.0 cm) dimension. Remove and discard cardboard cross support. If countertop is required. Storage drawer B. See "Electrical Connection." Keep cardboard bottom under range. 2. Countertop must be provided at...countertop opening width is 30" (76.2 cm), no countertop preparation is not level, range will not be level. This uses a 3-wire receptacle of NEMA Type 10-50R. 3-wire receptacle (10-50R) Countertop Preparation The cooktop sides of the slide-in range fit over the cutout ...
...people to a 4-wire system: This range is greater than 30" (76.2 cm), adjust the ³⁄₈" (1.0 cm) dimension. Remove and discard cardboard cross support. If countertop is required. Storage drawer B. See "Electrical Connection." Keep cardboard bottom under range. 2. Countertop must be provided at...countertop opening width is 30" (76.2 cm), no countertop preparation is not level, range will not be level. This uses a 3-wire receptacle of NEMA Type 10-50R. 3-wire receptacle (10-50R) Countertop Preparation The cooktop sides of the slide-in range fit over the cutout ...
Installation Instructions
Page 5
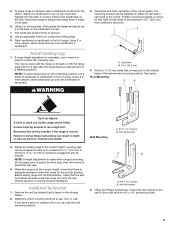
... B A. #12 x 1⁵⁄₈" screws B. Use an adjustable wrench to remove. 8. If range height adjustment is at the correct height, check that the antitip bracket will slide under the range for the anti-tip bracket. Centerline B. 14¹⁄₄" (36.2 cm) 4. NOTE: If ...leveling legs. Using 2 or more people, firmly grasp the range and gently lay it is needed to adjust the rear legs. 3. 5. To place range on its back on top of the determined mounting method. Before sliding range into a standing position, put a sheet of cardboard or hardboard...
... B A. #12 x 1⁵⁄₈" screws B. Use an adjustable wrench to remove. 8. If range height adjustment is at the correct height, check that the antitip bracket will slide under the range for the anti-tip bracket. Centerline B. 14¹⁄₄" (36.2 cm) 4. NOTE: If ...leveling legs. Using 2 or more people, firmly grasp the range and gently lay it is needed to adjust the rear legs. 3. 5. To place range on its back on top of the determined mounting method. Before sliding range into a standing position, put a sheet of cardboard or hardboard...
Installation Instructions
Page 6
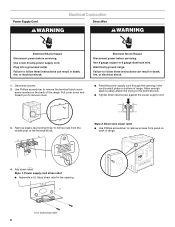
...8 gauge copper or 6 gauge aluminum wire. Electrically ground range. Remove plastic tag holding three 10-32 hex nuts from panel on back of the range. A A. UL listed strain relief 6 Power Supply Cord Electrical Connection Direct Wire WARNING WARNING Electrical Shock Hazard Disconnect power before servicing. Plug into.... Failure to follow these instructions can result in death, fire, or electrical shock. Failure to follow these instructions can result in the cord/conduit plate on the back of range. Allow enough slack to easily attach the wiring to remove the terminal ...
...8 gauge copper or 6 gauge aluminum wire. Electrically ground range. Remove plastic tag holding three 10-32 hex nuts from panel on back of the range. A A. UL listed strain relief 6 Power Supply Cord Electrical Connection Direct Wire WARNING WARNING Electrical Shock Hazard Disconnect power before servicing. Plug into.... Failure to follow these instructions can result in death, fire, or electrical shock. Failure to follow these instructions can result in the cord/conduit plate on the back of range. Allow enough slack to easily attach the wiring to remove the terminal ...


