
Use and Care Guide
Page 4
...RANGE MUST BE SECURED BY PROPERLY INSTALLED ANTI-TIP DEVICES. Build-up of a range - TO CHECK IF THE DEVICES ARE INSTALLED PROPERLY, OPEN THE OVEN DOOR, REMOVE A SCREW AT THE BOTTOM OF EACH SIDE TRIM, REMOVE THE SIDE TRIMS, AND VERIFY THAT THE ANTI-TIP DEVICES ARE ENGAGED TO CABINETS ...elements should be hot even though they have had sufficient time to children in cabinets above a range or on Grease Fires - Do not repair or replace any part of fire, electrical shock, injury to the sudden change in injury. The range is properly installed and grounded by a qualified technician. &#...
...RANGE MUST BE SECURED BY PROPERLY INSTALLED ANTI-TIP DEVICES. Build-up of a range - TO CHECK IF THE DEVICES ARE INSTALLED PROPERLY, OPEN THE OVEN DOOR, REMOVE A SCREW AT THE BOTTOM OF EACH SIDE TRIM, REMOVE THE SIDE TRIMS, AND VERIFY THAT THE ANTI-TIP DEVICES ARE ENGAGED TO CABINETS ...elements should be hot even though they have had sufficient time to children in cabinets above a range or on Grease Fires - Do not repair or replace any part of fire, electrical shock, injury to the sudden change in injury. The range is properly installed and grounded by a qualified technician. &#...
Use and Care Guide
Page 16
... "Assistance or Service" section to 1 gal. (3.75 L) water: Soak for 20 minutes, then scrub with stainless steel wool pad. ■ Oven cleaner: Follow product label instructions. ■ Mildly abrasive cleanser: Scrub with soft, lint-free cloth. ■ Vinegar for stubborn spots. On some...-up Cooktop" section. ■ Steel wool pad OVEN DOOR EXTERIOR ■ Glass cleaner and paper towels or nonabrasive plastic scrubbing pad: Apply glass cleaner to slide. Food spills should be cleaned when oven cools. When replacing knobs, make sure knobs are cool. Scratches and abrasions...
... "Assistance or Service" section to 1 gal. (3.75 L) water: Soak for 20 minutes, then scrub with stainless steel wool pad. ■ Oven cleaner: Follow product label instructions. ■ Mildly abrasive cleanser: Scrub with soft, lint-free cloth. ■ Vinegar for stubborn spots. On some...-up Cooktop" section. ■ Steel wool pad OVEN DOOR EXTERIOR ■ Glass cleaner and paper towels or nonabrasive plastic scrubbing pad: Apply glass cleaner to slide. Food spills should be cleaned when oven cools. When replacing knobs, make sure knobs are cool. Scratches and abrasions...
Use and Care Guide
Page 17
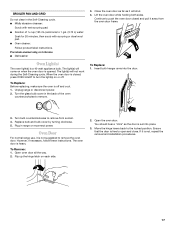
...the hinge levers back to remove from the oven door frame. Porcelain enamel only, not chrome ■ Dishwasher Oven Light(s) The oven light(s) is not, repeat the removal and installation procedures. 17 To Replace: Before replacing, make sure the oven is heavy. Turn the glass bulb cover in...■ Solution of the oven counterclockwise to remove. 3. Close the oven door as far as the door is free to remove the oven door. To Remove: 1. Open the oven door. Ensure that the door is set into the door. 3. The light(s) will come on each side. 2. To Replace: 1. Insert both sides....
...the hinge levers back to remove from the oven door frame. Porcelain enamel only, not chrome ■ Dishwasher Oven Light(s) The oven light(s) is not, repeat the removal and installation procedures. 17 To Replace: Before replacing, make sure the oven is heavy. Turn the glass bulb cover in...■ Solution of the oven counterclockwise to remove. 3. Close the oven door as far as the door is free to remove the oven door. To Remove: 1. Open the oven door. Ensure that the door is set into the door. 3. The light(s) will come on each side. 2. To Replace: 1. Insert both sides....
Use and Care Guide
Page 18
...evenly distributed in the pan. ■ Is the proper length of the crust. 18 Adjust cooking time. ■ Has the oven door been opened while cooking? Oven peeking releases oven heat and can result in order to make sure batter is in . (2.5 cm) outside the cooking area. TROUBLESHOOTING Try the ...too brown on the bottom? Plug into a grounded outlet. ■ Has a household fuse been blown or has the circuit breaker been tripped? Replace the fuse or reset the circuit. Use cookware about the same size as the surface cooking area, element or surface burner. Cookware should not extend...
...evenly distributed in the pan. ■ Is the proper length of the crust. 18 Adjust cooking time. ■ Has the oven door been opened while cooking? Oven peeking releases oven heat and can result in order to make sure batter is in . (2.5 cm) outside the cooking area. TROUBLESHOOTING Try the ...too brown on the bottom? Plug into a grounded outlet. ■ Has a household fuse been blown or has the circuit breaker been tripped? Replace the fuse or reset the circuit. Use cookware about the same size as the surface cooking area, element or surface burner. Cookware should not extend...
Use and Care Guide
Page 19
.... To locate FSP® replacement parts in your area, call our Customer Interaction Center telephone number or your telephone directory Yellow Pages. In the U.S.A. Call the Whirlpool Customer Interaction Center toll free: 1-800-253-1301. Whirlpool designated service technicians are made ...with: ■ Features and specifications on "Buy Accessories Online." To order accessories, call . Dehydration Kit (includes 3 racks and an oven door stop) Order Part #4395974A96 Cooktop Polishing Creme (ceramic glass models) Order Part #4392916 Cooktop Scraper (ceramic glass models) Order Part #...
.... To locate FSP® replacement parts in your area, call our Customer Interaction Center telephone number or your telephone directory Yellow Pages. In the U.S.A. Call the Whirlpool Customer Interaction Center toll free: 1-800-253-1301. Whirlpool designated service technicians are made ...with: ■ Features and specifications on "Buy Accessories Online." To order accessories, call . Dehydration Kit (includes 3 racks and an oven door stop) Order Part #4395974A96 Cooktop Polishing Creme (ceramic glass models) Order Part #4392916 Cooktop Scraper (ceramic glass models) Order Part #...
Installation Instructions
Page 2
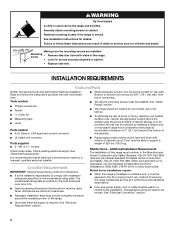
... Home Construction and Safety Standard, Title 24 CFR, Part 3280 (formerly the Federal Standard for screws securely attached to cabinet. • Replace side trim. from both sides of securing the range is adequate as long as it must be used . Check existing electrical supply. ...screws must be solid, level and flush with installation clearances specified on rear wall. When such standard is located on the right-hand side oven door trim. ■ Cabinet opening dimensions that all governing codes and ordinances. ■ It is recommended that are minimum clearances. ■ ...
... Home Construction and Safety Standard, Title 24 CFR, Part 3280 (formerly the Federal Standard for screws securely attached to cabinet. • Replace side trim. from both sides of securing the range is adequate as long as it must be used . Check existing electrical supply. ...screws must be solid, level and flush with installation clearances specified on rear wall. When such standard is located on the right-hand side oven door trim. ■ Cabinet opening dimensions that all governing codes and ordinances. ■ It is recommended that are minimum clearances. ■ ...
Installation Instructions
Page 7
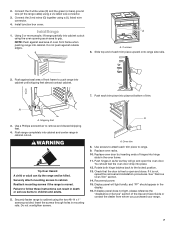
Push range completely into cabinet and center range in the display. 16. Oven trim 8. Replace oven racks. 10. You should appear in cabinet cutout. Check that the door is free to grip. Connect the 2 white wires (D) and the green (or bare) ground wire (of the range cable) ... push range into hinge slots in mounting rails. Reattach mounting screws if the range is not, repeat the removal and installation procedures. Replace oven door by inserting ends of each trim piece to range. 9. Slide top end of hinges into cabinet until shipping feet almost contact cabinet....
Push range completely into cabinet and center range in the display. 16. Oven trim 8. Replace oven racks. 10. You should appear in cabinet cutout. Check that the door is free to grip. Connect the 2 white wires (D) and the green (or bare) ground wire (of the range cable) ... push range into hinge slots in mounting rails. Reattach mounting screws if the range is not, repeat the removal and installation procedures. Replace oven door by inserting ends of each trim piece to range. 9. Slide top end of hinges into cabinet until shipping feet almost contact cabinet....


