
Use and Care Guide
Page 1
Use And Care G U I D E A Note to You 2 Range Safety 3 Parts and Features .........6 Using Your Range...........8 Using the Self-Cleaning Cycle ......38 Caring for Your Range 44 Troubleshooting............52 Requesting Assistance or Service 54 Index 55 Warranty 56 1-800-253-1301 Call our Consumer Assistance Center with questions or comments. SELF-CLEANING AND STANDARD-CLEANING ELECTRIC DROP-IN RANGES MODELS RS610PXG RS675PXG RS696PXG 3191537
Use And Care G U I D E A Note to You 2 Range Safety 3 Parts and Features .........6 Using Your Range...........8 Using the Self-Cleaning Cycle ......38 Caring for Your Range 44 Troubleshooting............52 Requesting Assistance or Service 54 Index 55 Warranty 56 1-800-253-1301 Call our Consumer Assistance Center with questions or comments. SELF-CLEANING AND STANDARD-CLEANING ELECTRIC DROP-IN RANGES MODELS RS610PXG RS675PXG RS696PXG 3191537
Use and Care Guide
Page 6
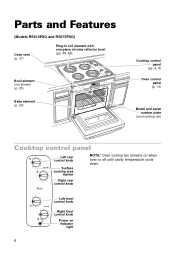
Parts and Features (Models RS610PXG and RS675PXG) Oven vent (p. 37) Plug-in coil element with one-piece chrome reflector bowl (pp. 48, 49) Broil element (not shown) (p. 23) Bake element (p. 20) ELEECCTTRRONICONOICVOEN ...
Parts and Features (Models RS610PXG and RS675PXG) Oven vent (p. 37) Plug-in coil element with one-piece chrome reflector bowl (pp. 48, 49) Broil element (not shown) (p. 23) Bake element (p. 20) ELEECCTTRRONICONOICVOEN ...
Use and Care Guide
Page 8
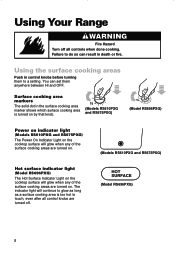
... in the surface cooking area marker shows which surface cooking area is turned on by that knob. (Models RS610PXG and RS675PXG) (Model RS696PXG) Power on indicator light (Models RS610PXG and RS675PXG) The Power On Indicator Light on the cooktop surface will glow when any of the surface cooking areas are turned on... turning them anywhere between HI and OFF. The indicator light will glow when any of the surface cooking areas are turned on. (Models RS610PXG and RS675PXG) Hot surface indicator light (Model RS696PXG) The Hot Surface Indicator Light on .
... in the surface cooking area marker shows which surface cooking area is turned on by that knob. (Models RS610PXG and RS675PXG) (Model RS696PXG) Power on indicator light (Models RS610PXG and RS675PXG) The Power On Indicator Light on the cooktop surface will glow when any of the surface cooking areas are turned on... turning them anywhere between HI and OFF. The indicator light will glow when any of the surface cooking areas are turned on. (Models RS610PXG and RS675PXG) Hot surface indicator light (Model RS696PXG) The Hot Surface Indicator Light on .
Use and Care Guide
Page 14
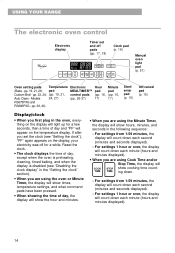
... are using the Minute Timer, the display will count down each minute (hours and minutes displayed). 14 Models 24, 27) (pp. 26-37) 17) 17) RS675PXG and RS696PXG - If after you are using the oven or Minute Timer, the display will show times, temperature settings, and what command pads have been...
... are using the Minute Timer, the display will count down each minute (hours and minutes displayed). 14 Models 24, 27) (pp. 26-37) 17) 17) RS675PXG and RS696PXG - If after you are using the oven or Minute Timer, the display will show times, temperature settings, and what command pads have been...
Use and Care Guide
Page 38
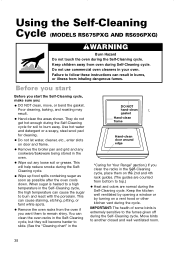
... closed and well ventilated room. 38 Poor cleaning, baking, and roasting may result. • Hand-clean the areas shown. Using the Self-Cleaning Cycle (MODELS RS675PXG AND RS696PXG) wWARNING Burn Hazard Do not touch the oven during Self-Cleaning cycle. Keep children away from inhaling dangerous fumes.
... closed and well ventilated room. 38 Poor cleaning, baking, and roasting may result. • Hand-clean the areas shown. Using the Self-Cleaning Cycle (MODELS RS675PXG AND RS696PXG) wWARNING Burn Hazard Do not touch the oven during Self-Cleaning cycle. Keep children away from inhaling dangerous fumes.
Use and Care Guide
Page 44
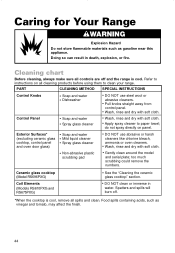
.... • Wash, rinse and dry with soft cloth. too much scrubbing could remove the numbers. Ceramic glass cooktop (Model RS696PXG) Coil Elements (Models RS610PXG and RS675PXG) • See the "Cleaning the ceramic glass cooktop" section. • DO NOT clean or immerse in death, explosion, or fire. Food spills containing acids, such...
.... • Wash, rinse and dry with soft cloth. too much scrubbing could remove the numbers. Ceramic glass cooktop (Model RS696PXG) Coil Elements (Models RS610PXG and RS675PXG) • See the "Cleaning the ceramic glass cooktop" section. • DO NOT clean or immerse in death, explosion, or fire. Food spills containing acids, such...
Use and Care Guide
Page 45
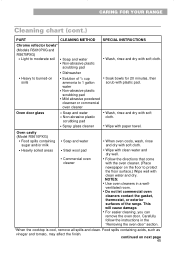
... is cool, remove all spills and clean. CARING FOR YOUR RANGE Cleaning chart (cont.) PART CLEANING METHOD SPECIAL INSTRUCTIONS Chrome reflector bowls* (Models RS610PXG and RS675PXG) • Light to moderate soil • Soap and water • Non-abrasive plastic scrubbing pad • Wash, rinse and dry with soft cloth. • Dishwasher...
... is cool, remove all spills and clean. CARING FOR YOUR RANGE Cleaning chart (cont.) PART CLEANING METHOD SPECIAL INSTRUCTIONS Chrome reflector bowls* (Models RS610PXG and RS675PXG) • Light to moderate soil • Soap and water • Non-abrasive plastic scrubbing pad • Wash, rinse and dry with soft cloth. • Dishwasher...
Use and Care Guide
Page 46
CARING FOR YOUR RANGE Cleaning chart (cont.) PART CLEANING METHOD SPECIAL INSTRUCTIONS Oven cavity (Models RS675PXG and RS696PXG) • Food spills containing sugar and/or milk • All other spills • Soap and water • Self-cleaning cycle • When oven ...
CARING FOR YOUR RANGE Cleaning chart (cont.) PART CLEANING METHOD SPECIAL INSTRUCTIONS Oven cavity (Models RS675PXG and RS696PXG) • Food spills containing sugar and/or milk • All other spills • Soap and water • Self-cleaning cycle • When oven ...

Use and Care Guide
Page 48
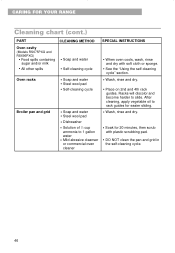
Lift out the reflector bowl. BAKE OFF CARING FOR YOUR RANGE Coil elements and reflector bowls (Models RS610PXG and RS675PXG) Removing 1. Pull the coil element straight away from the receptacle. 4. See the "Cleaning chart" earlier in the edge of the coil element, opposite the receptacle. Then lift it just enough to clear the reflector bowl. 3. Make sure all coil elements are off and cool before removing coil elements and reflector bowls. 2. Push in this section for cleaning instructions. 48
Lift out the reflector bowl. BAKE OFF CARING FOR YOUR RANGE Coil elements and reflector bowls (Models RS610PXG and RS675PXG) Removing 1. Pull the coil element straight away from the receptacle. 4. See the "Cleaning chart" earlier in the edge of the coil element, opposite the receptacle. Then lift it just enough to clear the reflector bowl. 3. Make sure all coil elements are off and cool before removing coil elements and reflector bowls. 2. Push in this section for cleaning instructions. 48

Use and Care Guide
Page 49
... element as level as it to the cookware on the coil elements. CARING FOR YOUR RANGE Coil elements and reflector bowls (cont.) (Models RS610PXG and RS675PXG) Replacing 1.
... element as level as it to the cookware on the coil elements. CARING FOR YOUR RANGE Coil elements and reflector bowls (cont.) (Models RS610PXG and RS675PXG) Replacing 1.
Use and Care Guide
Page 52
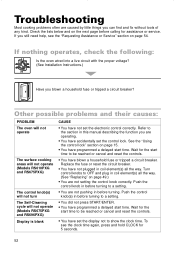
... their causes: PROBLEM The oven will not operate The surface cooking areas will not operate (Models RS610PXG and RS675PXG) The control knob(s) will not turn The Self-Cleaning cycle will not operate (Models RS675PXG and RS696PXG) Display is blank CAUSE • You have accidentally set the control lock. Wait for assistance or...
... their causes: PROBLEM The oven will not operate The surface cooking areas will not operate (Models RS610PXG and RS675PXG) The control knob(s) will not turn The Self-Cleaning cycle will not operate (Models RS675PXG and RS696PXG) Display is blank CAUSE • You have accidentally set the control lock. Wait for assistance or...