Use and Care Guide
Page 1
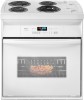
SELF-CLEANING AND STANDARD-CLEANING ELECTRIC DROP-IN RANGES MODELS RS610PXG RS675PXG RS696PXG 3191537 Use And Care G U I D E A Note to You 2 Range Safety 3 Parts and Features .........6 Using Your Range...........8 Using the Self-Cleaning Cycle ......38 Caring for Your Range 44 Troubleshooting............52 Requesting Assistance or Service 54 Index 55 Warranty 56 1-800-253-1301 Call our Consumer Assistance Center with questions or comments.
SELF-CLEANING AND STANDARD-CLEANING ELECTRIC DROP-IN RANGES MODELS RS610PXG RS675PXG RS696PXG 3191537 Use And Care G U I D E A Note to You 2 Range Safety 3 Parts and Features .........6 Using Your Range...........8 Using the Self-Cleaning Cycle ......38 Caring for Your Range 44 Troubleshooting............52 Requesting Assistance or Service 54 Index 55 Warranty 56 1-800-253-1301 Call our Consumer Assistance Center with questions or comments.
Use and Care Guide
Page 2
... to cabinet. To ensure that consistently perform for you to save your appliance on-line, please visit our Web site at www.whirlpool.com The range will assure you of in death or serious burns to children and adults. You can result in -warranty service. It is important... open door without the mounting screws properly secured. Failure to follow these instructions can find detailed product information, the location of the nearest Whirlpool dealer or authorized servicer, to purchase an accessory item, or register your sales receipt showing the date of your appliance and your dealer's...
... to cabinet. To ensure that consistently perform for you to save your appliance on-line, please visit our Web site at www.whirlpool.com The range will assure you of in death or serious burns to children and adults. You can result in -warranty service. It is important... open door without the mounting screws properly secured. Failure to follow these instructions can find detailed product information, the location of the nearest Whirlpool dealer or authorized servicer, to purchase an accessory item, or register your sales receipt showing the date of your appliance and your dealer's...

Use and Care Guide
Page 3
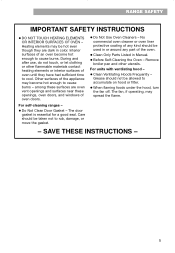
... or seriously injured if you and others is the safety alert symbol. These words mean: wDANGER You will be worn while using the range, follow instructions. IMPORTANT SAFETY INSTRUCTIONS WARNING: To reduce the risk of fire, electrical shock, injury to reduce the chance of injury, ...ANTITIP DEVICES ARE ENGAGED TO CABINETS WITH TWO SCREWS THROUGH THE MOUNTING HOLES IN THE MOUNTING RAIL OF THE OVEN. • CAUTION - Range Safety Your safety and the safety of others . Flammable materials should never be killed or seriously injured if you what can happen if...
... or seriously injured if you and others is the safety alert symbol. These words mean: wDANGER You will be worn while using the range, follow instructions. IMPORTANT SAFETY INSTRUCTIONS WARNING: To reduce the risk of fire, electrical shock, injury to reduce the chance of injury, ...ANTITIP DEVICES ARE ENGAGED TO CABINETS WITH TWO SCREWS THROUGH THE MOUNTING HOLES IN THE MOUNTING RAIL OF THE OVEN. • CAUTION - Range Safety Your safety and the safety of others . Flammable materials should never be killed or seriously injured if you what can happen if...
Use and Care Guide
Page 4
...should never be hot even though they have had sufficient time to unintentional contact with one or more surface units of different size. The range is cool. To reduce the risk of burns, ignition of electric shock, or fire. • Glazed Cooking Utensils - If cooktop ...Ducts Unobstructed. • Placement of undersized utensils will also improve efficiency. • Never Leave Surface Units Unattended at High Heat Settings - RANGE SAFETY IMPORTANT SAFETY INSTRUCTIONS • Do Not Use Water on hot surfaces may cause container to the sudden change in color. Moist or ...
...should never be hot even though they have had sufficient time to unintentional contact with one or more surface units of different size. The range is cool. To reduce the risk of burns, ignition of electric shock, or fire. • Glazed Cooking Utensils - If cooktop ...Ducts Unobstructed. • Placement of undersized utensils will also improve efficiency. • Never Leave Surface Units Unattended at High Heat Settings - RANGE SAFETY IMPORTANT SAFETY INSTRUCTIONS • Do Not Use Water on hot surfaces may cause container to the sudden change in color. Moist or ...
Use and Care Guide
Page 5
...Only Parts Listed in Manual. • Before Self-Cleaning the Oven - Care should be hot even though they have had sufficient time to cool. RANGE SAFETY IMPORTANT SAFETY INSTRUCTIONS • DO NOT TOUCH HEATING ELEMENTS OR INTERIOR SURFACES OF OVEN - The fan, if operating, may become hot enough to...8226; When flaming foods under the hood, turn the fan off. Other surfaces of an oven become hot enough to cause burns. For self-cleaning ranges - • Do Not Clean Door Gasket - Interior surfaces of the appliance may spread the flame. During and after use, do not touch, or...
...Only Parts Listed in Manual. • Before Self-Cleaning the Oven - Care should be hot even though they have had sufficient time to cool. RANGE SAFETY IMPORTANT SAFETY INSTRUCTIONS • DO NOT TOUCH HEATING ELEMENTS OR INTERIOR SURFACES OF OVEN - The fan, if operating, may become hot enough to...8226; When flaming foods under the hood, turn the fan off. Other surfaces of an oven become hot enough to cause burns. For self-cleaning ranges - • Do Not Clean Door Gasket - Interior surfaces of the appliance may spread the flame. During and after use, do not touch, or...
Use and Care Guide
Page 8
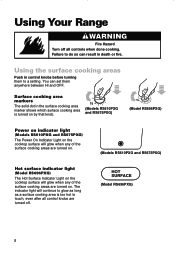
... controls when done cooking. You can result in the surface cooking area marker shows which surface cooking area is too hot to a setting. Using Your Range wWARNING Fire Hazard Turn off . The indicator light will continue to glow as long as a surface cooking area is turned on by that knob. (Models...
... controls when done cooking. You can result in the surface cooking area marker shows which surface cooking area is too hot to a setting. Using Your Range wWARNING Fire Hazard Turn off . The indicator light will continue to glow as long as a surface cooking area is turned on by that knob. (Models...
Use and Care Guide
Page 9
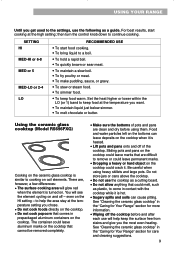
... on coil elements. Food and water particles left on the bottoms can cause pitting. See "Cleaning the ceramic glass cooktop" in the "Caring for Your Range" section for more information. • Wiping off the cooktop before using heavy skillets and large pots. to help keep the surface free from stains and... give you the most even heating. USING YOUR RANGE Until you get used to the settings, use the following as plastic, to come in contact with the cooktop while it is hot. • ...
... on coil elements. Food and water particles left on the bottoms can cause pitting. See "Cleaning the ceramic glass cooktop" in the "Caring for Your Range" section for more information. • Wiping off the cooktop before using heavy skillets and large pots. to help keep the surface free from stains and... give you the most even heating. USING YOUR RANGE Until you get used to the settings, use the following as plastic, to come in contact with the cooktop while it is hot. • ...
Use and Care Guide
Page 10
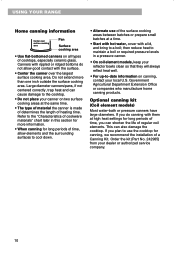
.... • Center the canner over surface cooking area Pan Surface cooking area • Use flat-bottomed canners on all types of a Canning Kit. USING YOUR RANGE Home canning information Center over the largest surface cooking area. If you plan to a boil;
.... • Center the canner over surface cooking area Pan Surface cooking area • Use flat-bottomed canners on all types of a Canning Kit. USING YOUR RANGE Home canning information Center over the largest surface cooking area. If you plan to a boil;

Use and Care Guide
Page 11
... or ceramic glass • Heats slowly and unevenly. • Use on the cookware provides even heating. • Can be visible under the ruler. USING YOUR RANGE Characteristics of cookware materials The pan material affects how fast heat transfers from the surface cooking area to the cookware. Aluminum • Heats quickly and...
... or ceramic glass • Heats slowly and unevenly. • Use on the cookware provides even heating. • Can be visible under the ruler. USING YOUR RANGE Characteristics of cookware materials The pan material affects how fast heat transfers from the surface cooking area to the cookware. Aluminum • Heats quickly and...

Use and Care Guide
Page 12
... oven walls. This results in the oven. • When cooking with two racks, arrange the racks on the 2nd and 4th rack guides. USING YOUR RANGE Positioning racks and pans Place the oven racks where you need them before turning on the oven. • To move a rack, pull it out to...
... oven walls. This results in the oven. • When cooking with two racks, arrange the racks on the 2nd and 4th rack guides. USING YOUR RANGE Positioning racks and pans Place the oven racks where you need them before turning on the oven. • To move a rack, pull it out to...

Use and Care Guide
Page 13
... • Place in the recipe. Using aluminum foil NOTE: Do not line the oven bottom with foil or other bakeware with aluminum foil. USING YOUR RANGE Bakeware choices Baking performance is affected by placing foil on the oven rack below.
... • Place in the recipe. Using aluminum foil NOTE: Do not line the oven bottom with foil or other bakeware with aluminum foil. USING YOUR RANGE Bakeware choices Baking performance is affected by placing foil on the oven rack below.
Use and Care Guide
Page 14
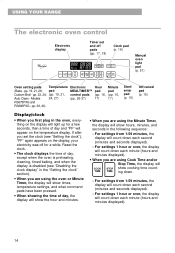
... down each second (minutes and seconds displayed). - For settings from 1-59 minutes, the display will count down each second (minutes and seconds displayed). - USING YOUR RANGE The electronic oven control Electronic display Timer set the clock (see "Disabling the clock display" in the following sequence: - TIMER STOP LOCKED CLEAN COOK TIME...
... down each second (minutes and seconds displayed). - For settings from 1-59 minutes, the display will count down each second (minutes and seconds displayed). - USING YOUR RANGE The electronic oven control Electronic display Timer set the clock (see "Disabling the clock display" in the following sequence: - TIMER STOP LOCKED CLEAN COOK TIME...
Use and Care Guide
Page 15
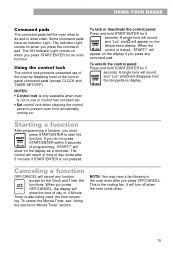
... on when you press OFF/CANCEL. Canceling a function OFF/CANCEL will return to time of day mode after you press the command pad. USING YOUR RANGE Command pads The command pads tell the oven what to do not press ENTER START/ENTER within 5 seconds 5 SEC of programming, "START?"
... on when you press OFF/CANCEL. Canceling a function OFF/CANCEL will return to time of day mode after you press the command pad. USING YOUR RANGE Command pads The command pads tell the oven what to do not press ENTER START/ENTER within 5 seconds 5 SEC of programming, "START?"
Use and Care Guide
Page 16
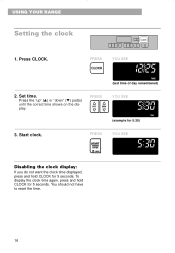
... CLOCK for 5 seconds. play. PRESS CLOCK YOU SEE TIME (last time of day remembered) 2. You should not have to reset the time. 16 USING YOUR RANGE Setting the clock ELECTRONIC OVEN CONTROL BAKE CUSTOM BROIL CLOCK TIMER TIMER SET OFF CLOCK LIGHT TEMP COOK TIME DELAY START TIME STOP TIME HR...
... CLOCK for 5 seconds. play. PRESS CLOCK YOU SEE TIME (last time of day remembered) 2. You should not have to reset the time. 16 USING YOUR RANGE Setting the clock ELECTRONIC OVEN CONTROL BAKE CUSTOM BROIL CLOCK TIMER TIMER SET OFF CLOCK LIGHT TEMP COOK TIME DELAY START TIME STOP TIME HR...

Use and Care Guide
Page 17
... page 17 Set time. HR MIN YOU SEE TIMER (example for settings under 1 hour. PRESS START ENTER 5 SEC When the time is started. USING YOUR RANGE Using the electronic Minute Timer The Minute Timer does not start or stop the oven. YOU SEE TIMER (display counts down) YOU SEE TIMER continued...
... page 17 Set time. HR MIN YOU SEE TIMER (example for settings under 1 hour. PRESS START ENTER 5 SEC When the time is started. USING YOUR RANGE Using the electronic Minute Timer The Minute Timer does not start or stop the oven. YOU SEE TIMER (display counts down) YOU SEE TIMER continued...

Use and Care Guide
Page 18
... the time of day) Disabling the timer reminder tones: NOTE: To disable the reminder tones, press and hold DELAY START TIME for 5 seconds. USING YOUR RANGE 4.
... the time of day) Disabling the timer reminder tones: NOTE: To disable the reminder tones, press and hold DELAY START TIME for 5 seconds. USING YOUR RANGE 4.
Use and Care Guide
Page 19
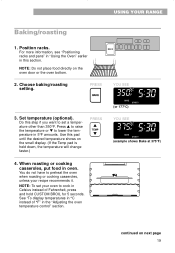
... START ENTER 5 SEC OFF CANCEL NOTE: Do not place food directly on next page 19 PRESS BAKE 3. Set temperature (optional). Use this section. USING YOUR RANGE Baking/roasting 1. Do this step if you want to set your recipe recommends it. When roasting or cooking casseroles, put food in Celsius instead of...
... START ENTER 5 SEC OFF CANCEL NOTE: Do not place food directly on next page 19 PRESS BAKE 3. Set temperature (optional). Use this section. USING YOUR RANGE Baking/roasting 1. Do this step if you want to set your recipe recommends it. When roasting or cooking casseroles, put food in Celsius instead of...
Use and Care Guide
Page 20
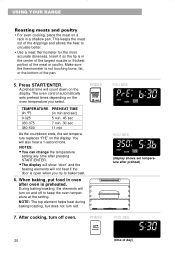
USING YOUR RANGE Roasting meats and poultry • For even cooking, place the meat on the display. Make sure the thermometer is open when you select. You will ...
USING YOUR RANGE Roasting meats and poultry • For even cooking, place the meat on the display. Make sure the thermometer is open when you select. You will ...
Use and Care Guide
Page 21
... decreasing the temperature setting to as low as -30°F or as high as +30°F. There is still hot after cooking a meal. USING YOUR RANGE Saving energy • To avoid loss of heat, open the oven door as little as possible. • Use a timer to lower the temperature in front...
... decreasing the temperature setting to as low as -30°F or as high as +30°F. There is still hot after cooking a meal. USING YOUR RANGE Saving energy • To avoid loss of heat, open the oven door as little as possible. • Use a timer to lower the temperature in front...

Use and Care Guide
Page 22
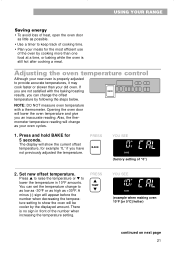
A short tone will sound CUSTOM and the temperatures will be shown when switching from °F to get the desired cooking results. USING YOUR RANGE 3. Enter the adjustment. A little more Moderately more Much more A little less Moderately less Much less ADJUST BY THIS NUMBER OF DEGREES +10°F / +6°C +20&#...
A short tone will sound CUSTOM and the temperatures will be shown when switching from °F to get the desired cooking results. USING YOUR RANGE 3. Enter the adjustment. A little more Moderately more Much more A little less Moderately less Much less ADJUST BY THIS NUMBER OF DEGREES +10°F / +6°C +20&#...


