
Use and Care Guide
Page 3
..., THE RANGE MUST BE SECURED BY PROPERLY INSTALLED ANTI-TIP DEVICES. Loose-fitting or hanging garments should never be left alone or unattended in an oven or near surface units. - wWARNING You can kill or hurt you don't follow instructions. Do not store items of interest to reach items could... SIDE TRIMS, AND VERIFY THAT THE ANTITIP DEVICES ARE ENGAGED TO CABINETS WITH TWO SCREWS THROUGH THE MOUNTING HOLES IN THE MOUNTING RAIL OF THE OVEN. • CAUTION - continued on the range to children in cabinets above a range or on your appliance. This is in the manual. All safety ...
..., THE RANGE MUST BE SECURED BY PROPERLY INSTALLED ANTI-TIP DEVICES. Loose-fitting or hanging garments should never be left alone or unattended in an oven or near surface units. - wWARNING You can kill or hurt you don't follow instructions. Do not store items of interest to reach items could... SIDE TRIMS, AND VERIFY THAT THE ANTITIP DEVICES ARE ENGAGED TO CABINETS WITH TWO SCREWS THROUGH THE MOUNTING HOLES IN THE MOUNTING RAIL OF THE OVEN. • CAUTION - continued on the range to children in cabinets above a range or on your appliance. This is in the manual. All safety ...
Use and Care Guide
Page 4
... Do not let potholder touch hot heating elements. Surface units may be hot even though they have had sufficient time to the sudden change in oven. - Among those areas are suitable for range-top service without breaking due to cool. Absence of these liners may result in a risk of.... Select utensils having flat bottoms large enough to a hot surface. • Use Care When Opening Door - If cooktop should be moved while oven is equipped with one or more surface units of different size. Proper relationship of utensil to burner will expose a portion of the heating element to...
... Do not let potholder touch hot heating elements. Surface units may be hot even though they have had sufficient time to the sudden change in oven. - Among those areas are suitable for range-top service without breaking due to cool. Absence of these liners may result in a risk of.... Select utensils having flat bottoms large enough to a hot surface. • Use Care When Opening Door - If cooktop should be moved while oven is equipped with one or more surface units of different size. Proper relationship of utensil to burner will expose a portion of the heating element to...
Use and Care Guide
Page 5
...do not touch, or let clothing or other utensils. Remove broiler pan and other flammable materials contact heating elements or interior surfaces of oven until they are oven vent openings and surfaces near these surfaces are dark in color. For self-cleaning ranges - • Do Not Clean Door Gasket ...- SAVE THESE INSTRUCTIONS - 5 Interior surfaces of the appliance may spread the flame. Other surfaces of an oven become hot enough to accumulate on hood or filter. • When flaming foods under the hood, turn the fan off. The door gasket is...
...do not touch, or let clothing or other utensils. Remove broiler pan and other flammable materials contact heating elements or interior surfaces of oven until they are oven vent openings and surfaces near these surfaces are dark in color. For self-cleaning ranges - • Do Not Clean Door Gasket ...- SAVE THESE INSTRUCTIONS - 5 Interior surfaces of the appliance may spread the flame. Other surfaces of an oven become hot enough to accumulate on hood or filter. • When flaming foods under the hood, turn the fan off. The door gasket is...
Use and Care Guide
Page 6
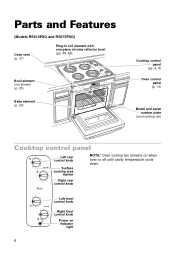
... Y T TIME STOP TIME TIMER SET TIMER OFF MIN HR CLOCK LIGHT START ENTER 5 SEC OFF CANCEL Cooktop control panel (pp. 6, 8) Oven control panel (p. 14) Model and serial number plate (on mounting rail) Cooktop control panel Left rear control knob Surface cooking area marker NOTE...: Oven cooling fan remains on indicator light 6 Right rear control knob Left front control knob Right front control knob Power on when oven is off until cavity temperature cools down.
... Y T TIME STOP TIME TIMER SET TIMER OFF MIN HR CLOCK LIGHT START ENTER 5 SEC OFF CANCEL Cooktop control panel (pp. 6, 8) Oven control panel (p. 14) Model and serial number plate (on mounting rail) Cooktop control panel Left rear control knob Surface cooking area marker NOTE...: Oven cooling fan remains on indicator light 6 Right rear control knob Left front control knob Right front control knob Power on when oven is off until cavity temperature cools down.
Use and Care Guide
Page 7
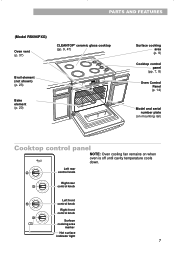
...SEC OFF CANCEL Surface cooking area (p. 9) Cooktop control panel (pp. 7, 8) Oven Control Panel (p. 14) Model and serial number plate (on mounting rail) Cooktop control panel NOTE: Oven cooling fan remains on when oven is off until cavity temperature cools down. Left rear control knob Right rear control knob... Left front control knob Right front control knob Surface cooking area marker Hot surface indicator light 7 PARTS AND FEATURES (Model RS696PXG) Oven vent (p. 37) CLEANTOP® ceramic glass cooktop (pp. 9, 47) Broil element (not shown) (p. 23) Bake element (p. 20) HSOUTRFACE ...
...SEC OFF CANCEL Surface cooking area (p. 9) Cooktop control panel (pp. 7, 8) Oven Control Panel (p. 14) Model and serial number plate (on mounting rail) Cooktop control panel NOTE: Oven cooling fan remains on when oven is off until cavity temperature cools down. Left rear control knob Right rear control knob... Left front control knob Right front control knob Surface cooking area marker Hot surface indicator light 7 PARTS AND FEATURES (Model RS696PXG) Oven vent (p. 37) CLEANTOP® ceramic glass cooktop (pp. 9, 47) Broil element (not shown) (p. 23) Bake element (p. 20) HSOUTRFACE ...

Use and Care Guide
Page 12
... no pan is hot. • For best performance, cook on one rack. USING YOUR RANGE Positioning racks and pans Place the oven racks where you need them before turning on the oven. • To move a rack, pull it out to the stop position, raise the front edge and lift it out. •...; Be sure the rack(s) is level. • Use pot holders or oven mitts to protect your rack when broiling, see "Broiling guidelines" later in this section. 12 Rack placement for even heat to place pans: WHEN YOU...
... no pan is hot. • For best performance, cook on one rack. USING YOUR RANGE Positioning racks and pans Place the oven racks where you need them before turning on the oven. • To move a rack, pull it out to the stop position, raise the front edge and lift it out. •...; Be sure the rack(s) is level. • Use pot holders or oven mitts to protect your rack when broiling, see "Broiling guidelines" later in this section. 12 Rack placement for even heat to place pans: WHEN YOU...

Use and Care Guide
Page 13
... baking time. • Uneven browning • Crisp crusts • Follow manufacturer's instructions. Using aluminum foil NOTE: Do not line the oven bottom with aluminum foil. It will reduce air circulation and give you poor cooking results. • Use aluminum foil to catch spillovers from ... foil for pies, breads, and casseroles. • Place rack in recipe for the last 30 minutes. • Use narrow strips of oven. • May reduce baking temperature 25°F. BAKEWARE TYPE Light colored aluminum Dark aluminum and other liners. Insulated cookie sheets or baking pans...
... baking time. • Uneven browning • Crisp crusts • Follow manufacturer's instructions. Using aluminum foil NOTE: Do not line the oven bottom with aluminum foil. It will reduce air circulation and give you poor cooking results. • Use aluminum foil to catch spillovers from ... foil for pies, breads, and casseroles. • Place rack in recipe for the last 30 minutes. • Use narrow strips of oven. • May reduce baking temperature 25°F. BAKEWARE TYPE Light colored aluminum Dark aluminum and other liners. Insulated cookie sheets or baking pans...
Use and Care Guide
Page 14
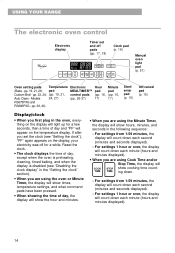
...Hour Minute (Bake - pp. 19, 21, 26; If after you set and off for a few seconds, then a time of day, except when the oven is preheating, cleaning, timed baking, and when the display is disabled (see "Setting the clock"), "PF" again appears on the temperature display. Reset the clock... displays the time of day and "PF" will appear on the display, your electricity was off pads (pp. 17, 18) Clock pad (p. 16) ELECTRONIC OVEN CONTROL C F HEAT DELAY BAKE TIMED BROIL ON START? For settings 1 hour or over , the display will count down each second (minutes and seconds displayed)....
...Hour Minute (Bake - pp. 19, 21, 26; If after you set and off for a few seconds, then a time of day, except when the oven is preheating, cleaning, timed baking, and when the display is disabled (see "Setting the clock"), "PF" again appears on the temperature display. Reset the clock... displays the time of day and "PF" will appear on the display, your electricity was off pads (pp. 17, 18) Clock pad (p. 16) ELECTRONIC OVEN CONTROL C F HEAT DELAY BAKE TIMED BROIL ON START? For settings 1 hour or over , the display will count down each second (minutes and seconds displayed)....
Use and Care Guide
Page 15
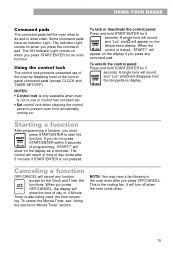
...you press the command pad. This is locked, "START?" When the 5 SEC control is the cooling fan. When you do and in what to prevent oven from ENTER the temperature display. 5 SEC Starting a function After programming a function, you must press START/ENTER to time of day or, if Minute ... remaining. To unlock the control panel: Press and hold START/ENTER for 5 seconds. NOTE: You may hear a fan blowing in use of the oven by disabling most of programming, "START?" The Indicator Light comes on when you press OFF/CANCEL. The ON Indicator Light comes on when you press...
...you press the command pad. This is locked, "START?" When the 5 SEC control is the cooling fan. When you do and in what to prevent oven from ENTER the temperature display. 5 SEC Starting a function After programming a function, you must press START/ENTER to time of day or, if Minute ... remaining. To unlock the control panel: Press and hold START/ENTER for 5 seconds. NOTE: You may hear a fan blowing in use of the oven by disabling most of programming, "START?" The Indicator Light comes on when you press OFF/CANCEL. The ON Indicator Light comes on when you press...
Use and Care Guide
Page 16
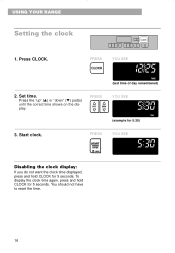
... (last time of day remembered) 2. play. To display the clock time again, press and hold CLOCK for 5 seconds. USING YOUR RANGE Setting the clock ELECTRONIC OVEN CONTROL BAKE CUSTOM BROIL CLOCK TIMER TIMER SET OFF CLOCK LIGHT TEMP COOK TIME DELAY START TIME STOP TIME HR MIN START ENTER 5 SEC OFF...
... (last time of day remembered) 2. play. To display the clock time again, press and hold CLOCK for 5 seconds. USING YOUR RANGE Setting the clock ELECTRONIC OVEN CONTROL BAKE CUSTOM BROIL CLOCK TIMER TIMER SET OFF CLOCK LIGHT TEMP COOK TIME DELAY START TIME STOP TIME HR MIN START ENTER 5 SEC OFF...

Use and Care Guide
Page 17
...display minutes and seconds for 10 minutes) 3. USING YOUR RANGE Using the electronic Minute Timer The Minute Timer does not start or stop the oven. Press TIMER SET. The Minute Timer will begin counting down immediately after the timer is started. It can be set time is up: ...second tones when the set in hours and minutes up unless reminder tones are disabled (see "Disabling the timer reminder tones.") ELECTRONIC OVEN CONTROL UPPER OVEN LOWER OVEN BAKE CUSTOM BROIL TIMER TIMER TIMER TIMER SET OFF CLOCK LIGHT SET OFF TEMP COOK TIME DELAY START TIME STOP TIME HR MIN ...
...display minutes and seconds for 10 minutes) 3. USING YOUR RANGE Using the electronic Minute Timer The Minute Timer does not start or stop the oven. Press TIMER SET. The Minute Timer will begin counting down immediately after the timer is started. It can be set time is up: ...second tones when the set in hours and minutes up unless reminder tones are disabled (see "Disabling the timer reminder tones.") ELECTRONIC OVEN CONTROL UPPER OVEN LOWER OVEN BAKE CUSTOM BROIL TIMER TIMER TIMER TIMER SET OFF CLOCK LIGHT SET OFF TEMP COOK TIME DELAY START TIME STOP TIME HR MIN ...
Use and Care Guide
Page 19
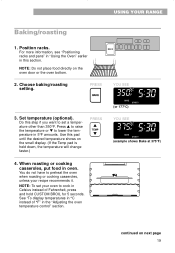
... BAKE CUSTOM BROIL BAKE C F HEAT DELAY BAKE ON TIMED BROIL LOCKED? For more information, see "Positioning racks and pans" in "Using the Oven" earlier in 5°F amounts. Choose baking/roasting setting. Press s to raise the temperature or t to lower the temperature in this step if ...you want to cook in Celsius instead of °F" in oven. See "To display temperatures in °C instead of Fahrenheit, press and hold CUSTOM BROIL for 5 seconds. continued on next page 19 NOTE: To ...
... BAKE CUSTOM BROIL BAKE C F HEAT DELAY BAKE ON TIMED BROIL LOCKED? For more information, see "Positioning racks and pans" in "Using the Oven" earlier in 5°F amounts. Choose baking/roasting setting. Press s to raise the temperature or t to lower the temperature in this step if ...you want to cook in Celsius instead of °F" in oven. See "To display temperatures in °C instead of Fahrenheit, press and hold CUSTOM BROIL for 5 seconds. continued on next page 19 NOTE: To ...
Use and Care Guide
Page 20
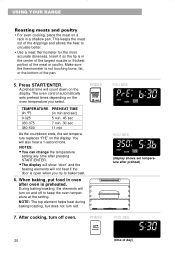
... temperature setting any time after preheat) YOU SEE (time of the drippings and allows the heat to bake/roast. 6. The oven control automatically sets preheat times depending on the oven temperature you try to circulate better. • Use a meat thermometer for the most accurate doneness. Insert it so the tip... is in oven after oven is preheated. When baking, put food in the center of the largest muscle or thickest portion of the pan. 5. USING YOUR RANGE Roasting ...
... temperature setting any time after preheat) YOU SEE (time of the drippings and allows the heat to bake/roast. 6. The oven control automatically sets preheat times depending on the oven temperature you try to circulate better. • Use a meat thermometer for the most accurate doneness. Insert it so the tip... is in oven after oven is preheated. When baking, put food in the center of the largest muscle or thickest portion of the pan. 5. USING YOUR RANGE Roasting ...
Use and Care Guide
Page 21
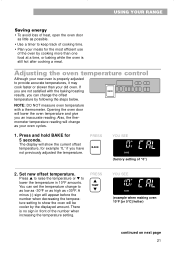
... START TIME STOP TIME HR MIN START ENTER 5 SEC OFF CANCEL NOTE: DO NOT measure oven temperature with the baking/roasting results, you an inaccurate reading. Opening the oven door will lower the oven temperature and give you can set the temperature change to keep track of cooking time. •...; Plan your meals for the most efficient use of the oven by cooking more than your old oven. PRESS BAKE YOU SEE F BAKE (factory setting of the number when increasing the temperature setting. USING YOUR RANGE Saving energy ...
... START TIME STOP TIME HR MIN START ENTER 5 SEC OFF CANCEL NOTE: DO NOT measure oven temperature with the baking/roasting results, you an inaccurate reading. Opening the oven door will lower the oven temperature and give you can set the temperature change to keep track of cooking time. •...; Plan your meals for the most efficient use of the oven by cooking more than your old oven. PRESS BAKE YOU SEE F BAKE (factory setting of the number when increasing the temperature setting. USING YOUR RANGE Saving energy ...
Use and Care Guide
Page 23
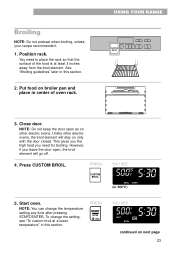
... rack. Put food on only with the door closed. Press CUSTOM BROIL. PRESS START ENTER 5 SEC YOU SEE HEAT F BROIL continued on other electric ovens, the broil element will go off. 4. You need for broiling. USING YOUR RANGE OFF CANCEL CUSTOM BROIL 3. Close door. PRESS CUSTOM BROIL YOU SEE F BROIL ...
... rack. Put food on only with the door closed. Press CUSTOM BROIL. PRESS START ENTER 5 SEC YOU SEE HEAT F BROIL continued on other electric ovens, the broil element will go off. 4. You need for broiling. USING YOUR RANGE OFF CANCEL CUSTOM BROIL 3. Close door. PRESS CUSTOM BROIL YOU SEE F BROIL ...

Use and Care Guide
Page 24
... broil heating element cycle and slow cooking results. The lower the temperature, the slower the cooking. NOTE: If the Temp pad is done, turn off oven. NOTE: Thicker cuts and unevenly shaped pieces of day) YOU SEE F HEAT ON BROIL (example shows Broil at a lower temperature: • If food is cooking...
... broil heating element cycle and slow cooking results. The lower the temperature, the slower the cooking. NOTE: If the Temp pad is done, turn off oven. NOTE: Thicker cuts and unevenly shaped pieces of day) YOU SEE F HEAT ON BROIL (example shows Broil at a lower temperature: • If food is cooking...

Use and Care Guide
Page 25
... 8-9 9-10 7-8 10-11 4-5 3-4 8-9 17-20 11-16 17-20 11-16 8-10 4-5 16-18 8-9 NOTE: Times are numbered from the oven when removing the food. Recommended rack positions are guidelines only and may need to be adjusted for individual tastes. 25 For best results, place food...;4 lb well done 4 Pork Chops, 1" thick 4 Ham Slice, 1⁄2" thick, precooked 4 Frankfurters 4 Lamb Chops, 1" thick 4 Chicken bone-in the heated oven, making cleaning more from the cooking surface. Drippings will bake on the edges to prevent curling. • Use tongs to turn meat to avoid losing...
... 8-9 9-10 7-8 10-11 4-5 3-4 8-9 17-20 11-16 17-20 11-16 8-10 4-5 16-18 8-9 NOTE: Times are numbered from the oven when removing the food. Recommended rack positions are guidelines only and may need to be adjusted for individual tastes. 25 For best results, place food...;4 lb well done 4 Pork Chops, 1" thick 4 Ham Slice, 1⁄2" thick, precooked 4 Frankfurters 4 Lamb Chops, 1" thick 4 Chicken bone-in the heated oven, making cleaning more from the cooking surface. Drippings will bake on the edges to prevent curling. • Use tongs to turn meat to avoid losing...

Use and Care Guide
Page 26
...carefully to the correct time of day. (See the "Setting the clock" section.) wWARNING Food Poisoning Hazard Do not let food sit in oven more than one hour before or after cooking. Choose Bake setting. USING YOUR RANGE Using the electronic MEALTIMER™ control The electronic MEALTIMER ...control will not rise properly. Doing so can result in the oven. TIMER TIMER SET OFF CLOCK LIGHT CTOIMOEK DSTTEIAMLRAEYT TEMP COOK TIME DELAY START TIME STOP TIME HR MIN STOP TIME START ENTER 5 SEC ...
...carefully to the correct time of day. (See the "Setting the clock" section.) wWARNING Food Poisoning Hazard Do not let food sit in oven more than one hour before or after cooking. Choose Bake setting. USING YOUR RANGE Using the electronic MEALTIMER™ control The electronic MEALTIMER ...control will not rise properly. Doing so can result in the oven. TIMER TIMER SET OFF CLOCK LIGHT CTOIMOEK DSTTEIAMLRAEYT TEMP COOK TIME DELAY START TIME STOP TIME HR MIN STOP TIME START ENTER 5 SEC ...

Use and Care Guide
Page 27
... TIME. PRESS COOK TIME YOU SEE F BAKE (example shows Bake at 375°F [or 191°C]) YOU SEE F BAKE COOK TIME 5. Set temperature (optional). Start oven. NOTES: • You can change the temperature or time settings any time after pressing START/ENTER by repeating Steps 2 through 5. • The display will show...
... TIME. PRESS COOK TIME YOU SEE F BAKE (example shows Bake at 375°F [or 191°C]) YOU SEE F BAKE COOK TIME 5. Set temperature (optional). Start oven. NOTES: • You can change the temperature or time settings any time after pressing START/ENTER by repeating Steps 2 through 5. • The display will show...

Use and Care Guide
Page 28
... To reactivate tones repeat this section. 2. PRESS OFF CANCEL YOU SEE (time of day) COOK TIME Method 2 - When baking/roasting is done: The oven will also hear four 1-second tones every minute (unless they have been disabled [see "Positioning racks and pans" in "Using the... oven" earlier in the oven. You will turn off oven. Using Stop Time 1. Prepare oven. Disabling the cook time reminder tones NOTE: To disable reminder tones, press and hold COOK TIME for 5 seconds....
... To reactivate tones repeat this section. 2. PRESS OFF CANCEL YOU SEE (time of day) COOK TIME Method 2 - When baking/roasting is done: The oven will also hear four 1-second tones every minute (unless they have been disabled [see "Positioning racks and pans" in "Using the... oven" earlier in the oven. You will turn off oven. Using Stop Time 1. Prepare oven. Disabling the cook time reminder tones NOTE: To disable reminder tones, press and hold COOK TIME for 5 seconds....


