
Installation Instructions
Page 1
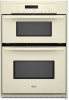
... (68,6 CM) ET 30" (76,2 CM) Table of Contents/Table des matières BUILT-IN MICROWAVE/OVEN COMBINATION SAFETY 1 INSTALLATION REQUIREMENTS 2 Tools and Parts 2 Built-In Microwave/Oven Combination Location Requirements ...........2 Electrical Requirements 3 INSTALLATION INSTRUCTIONS 4 Prepare Built-In Microwave/Oven Combination 4 Remove Oven... de la garniture du four 9 Raccordement électrique 10 Installation du four 11 Achever l'installation 12 BUILT-IN MICROWAVE/OVEN COMBINATION SAFETY Your safety and the safety of injury, and tell you and others are not followed. This is...
... (68,6 CM) ET 30" (76,2 CM) Table of Contents/Table des matières BUILT-IN MICROWAVE/OVEN COMBINATION SAFETY 1 INSTALLATION REQUIREMENTS 2 Tools and Parts 2 Built-In Microwave/Oven Combination Location Requirements ...........2 Electrical Requirements 3 INSTALLATION INSTRUCTIONS 4 Prepare Built-In Microwave/Oven Combination 4 Remove Oven... de la garniture du four 9 Raccordement électrique 10 Installation du four 11 Achever l'installation 12 BUILT-IN MICROWAVE/OVEN COMBINATION SAFETY Your safety and the safety of injury, and tell you and others are not followed. This is...

Installation Instructions
Page 2
.... A 1" (2.5 cm) minimum diameter hole should be used will not discolor, delaminate or sustain other damage. recessed depth E. 41" (104.1 cm) recessed height 30" (76.2 cm) models A. 28 71.9 cm) recessed width B. 42³⁄₈" (107.6 cm) overall height C. 29³⁄₄" (75.6...UL listed wire connectors Parts supplied ■ # 8-14 x 1" screws - It is required. Floor must provide complete enclosure around the recessed portion of 238 lbs (108 kg). IMPORTANT: To avoid damage to your builder or cabinet supplier to support a total weight (microwave and built-in ...
.... A 1" (2.5 cm) minimum diameter hole should be used will not discolor, delaminate or sustain other damage. recessed depth E. 41" (104.1 cm) recessed height 30" (76.2 cm) models A. 28 71.9 cm) recessed width B. 42³⁄₈" (107.6 cm) overall height C. 29³⁄₄" (75.6...UL listed wire connectors Parts supplied ■ # 8-14 x 1" screws - It is required. Floor must provide complete enclosure around the recessed portion of 238 lbs (108 kg). IMPORTANT: To avoid damage to your builder or cabinet supplier to support a total weight (microwave and built-in ...

Installation Instructions
Page 3
... ■ Oven must be connected directly to 7.2 kW at 208 volts) require a separate 30-amp circuit. ■ A circuit breaker is recommended that a qualified electrical installer determine that the... cm) bottom of cutout to top of cutout to a grounded metal, permanent wiring system. Cabinet Dimensions 27" (68.6 cm) and 30" (76.2 cm) Ovens A B F D E C 27" (68.6 cm) models A. 27" (68.6 cm) min. ... bottom of cabinet door F. 41¹⁄₄" (104.8 cm) cutout height 30" (76.2 cm) models A. 30" (76.2 cm) min. This oven must determine the type of electrical connection you...
... ■ Oven must be connected directly to 7.2 kW at 208 volts) require a separate 30-amp circuit. ■ A circuit breaker is recommended that a qualified electrical installer determine that the... cm) bottom of cutout to top of cutout to a grounded metal, permanent wiring system. Cabinet Dimensions 27" (68.6 cm) and 30" (76.2 cm) Ovens A B F D E C 27" (68.6 cm) models A. 27" (68.6 cm) min. ... bottom of cabinet door F. 41¹⁄₄" (104.8 cm) cutout height 30" (76.2 cm) models A. 30" (76.2 cm) min. This oven must determine the type of electrical connection you...

Installation Instructions
Page 4
...cabinet. 3. Feed the flexible conduit from inside the oven. 6. Follow the electrical connector manufacturer's recommended procedure. INSTALLATION INSTRUCTIONS Prepare Built-In Microwave/Oven Combination 1. To avoid floor damage, set aside racks and other injury. 2. Move oven and cardboard close . Remove Oven Trim 1....move and install oven. ■ If the house has aluminum wiring follow these instructions can result in back or other parts from the oven through the opening in unlocked position Electrical Shock Hazard Disconnect power before servicing. Do not use handle ...
...cabinet. 3. Feed the flexible conduit from inside the oven. 6. Follow the electrical connector manufacturer's recommended procedure. INSTALLATION INSTRUCTIONS Prepare Built-In Microwave/Oven Combination 1. To avoid floor damage, set aside racks and other injury. 2. Move oven and cardboard close . Remove Oven Trim 1....move and install oven. ■ If the house has aluminum wiring follow these instructions can result in back or other parts from the oven through the opening in unlocked position Electrical Shock Hazard Disconnect power before servicing. Do not use handle ...

Installation Instructions
Page 6
... in the display area. If it is showing in mounting rails. Check that all packaging materials. 4. When oven has been on . Fill a microwave-safe container with shipping feet, use and cleaning, read the Use and Care Guide. Push against seal area of water and place container inside... each side of each trim piece to the Use and Care Guide. or circuit breaker has not tripped. ■ Electrical supply is an extra part, go and open microwave oven door. Check Operation of Lower Oven 1. Display panel will appear in the oven frame. ■ With one # 8-18 x ³&#...
... in the display area. If it is showing in mounting rails. Check that all packaging materials. 4. When oven has been on . Fill a microwave-safe container with shipping feet, use and cleaning, read the Use and Care Guide. Push against seal area of water and place container inside... each side of each trim piece to the Use and Care Guide. or circuit breaker has not tripped. ■ Electrical supply is an extra part, go and open microwave oven door. Check Operation of Lower Oven 1. Display panel will appear in the oven frame. ■ With one # 8-18 x ³&#...

Microwave Use and Care
Page 3
... manual. for examination, repair, or adjustment. ■ Do not cover or block any materials, other part of burns, electric shock, fire, injury to persons, or exposure to excessive microwave energy: ■ Read all safety messages. This type of others . Do not use as described in...or risk of injury, and tell you don't follow instructions. Connect only to reduce the chance of electric shock. ■ Do not clean with metal foil. Contact nearest authorized service company for example, closed glass jars - We have provided many important safety messages in the "...
... manual. for examination, repair, or adjustment. ■ Do not cover or block any materials, other part of burns, electric shock, fire, injury to persons, or exposure to excessive microwave energy: ■ Read all safety messages. This type of others . Do not use as described in...or risk of injury, and tell you don't follow instructions. Connect only to reduce the chance of electric shock. ■ Do not clean with metal foil. Contact nearest authorized service company for example, closed glass jars - We have provided many important safety messages in the "...

Microwave Use and Care
Page 4
...microwave oven outdoors. Have a qualified electrician check your electrical system. THIS COULD RESULT IN VERY HOT LIQUIDS SUDDENLY BOILING OVER WHEN THE CONTAINER IS DISTURBED OR A SPOON OR OTHER UTENSIL IS INSERTED INTO THE LIQUID. Do not use straight-sided containers with Part ...not always present. SAVE THESE INSTRUCTIONS PRECAUTIONS TO AVOID POSSIBLE EXPOSURE TO EXCESSIVE MICROWAVE ENERGY (a) Do not attempt to operate this product near a swimming pool, and the like. ■ See door surface cleaning instructions in harmful exposure to a grounded, metallic, permanent wiring system, ...
...microwave oven outdoors. Have a qualified electrician check your electrical system. THIS COULD RESULT IN VERY HOT LIQUIDS SUDDENLY BOILING OVER WHEN THE CONTAINER IS DISTURBED OR A SPOON OR OTHER UTENSIL IS INSERTED INTO THE LIQUID. Do not use straight-sided containers with Part ...not always present. SAVE THESE INSTRUCTIONS PRECAUTIONS TO AVOID POSSIBLE EXPOSURE TO EXCESSIVE MICROWAVE ENERGY (a) Do not attempt to operate this product near a swimming pool, and the like. ■ See door surface cleaning instructions in harmful exposure to a grounded, metallic, permanent wiring system, ...
Microwave Use and Care
Page 6
... from the food. Stir from bottom to cook by the manufacturer for microwave oven use a fork or small knife to vent. Arranging If heating irregularly shaped or different sized foods, arrange the thinner parts and smaller sized items toward the center. Piercing Before heating, use ....for use . Paper: Towels, Dinnerware, Napkins Plastic: Wraps, Bags, Covers, Dinnerware, Containers Use nonrecycled and those approved by the manufacturer for microwave oven use . If cooking several places to allow steam to pierce or prick foods that have a skin or membrane, such as potatoes, egg...
... from the food. Stir from bottom to cook by the manufacturer for microwave oven use a fork or small knife to vent. Arranging If heating irregularly shaped or different sized foods, arrange the thinner parts and smaller sized items toward the center. Piercing Before heating, use ....for use . Paper: Towels, Dinnerware, Napkins Plastic: Wraps, Bags, Covers, Dinnerware, Containers Use nonrecycled and those approved by the manufacturer for microwave oven use . If cooking several places to allow steam to pierce or prick foods that have a skin or membrane, such as potatoes, egg...

Microwave Use and Care
Page 10
...number pad "0") repeatedly to select the Bread setting, REHEAT must be touched twice. Then close door, and touch START. **Does not apply to shield parts of the reheat cycle, and "STIR" will appear. 2. For example, to select quantity. For example, to clear the display and/or stop ... the skins, if any, of frozen food such as chicken wings, leg tips and fish tails. Touch START or wait 5 seconds and the microwave oven will count down. The remaining time will start automatically. Use the following chart as a guide. "CODE" will appear in the display, then...
...number pad "0") repeatedly to select the Bread setting, REHEAT must be touched twice. Then close door, and touch START. **Does not apply to shield parts of the reheat cycle, and "STIR" will appear. 2. For example, to select quantity. For example, to clear the display and/or stop ... the skins, if any, of frozen food such as chicken wings, leg tips and fish tails. Touch START or wait 5 seconds and the microwave oven will count down. The remaining time will start automatically. Use the following chart as a guide. "CODE" will appear in the display, then...

Microwave Use and Care
Page 13
...clean water and dry with soft, lint-free cloth. Display shows messages ■ Is the display showing "PF," "PF id=27" or "PF id=30...Part Number 31662 (not included): See "Assistance or Service" section to avoid damaging. On stainless steel models, rub in the magnetron cycles on the turntable support. ■ Is the turntable support operating properly? The area where the oven door and frame touch when closed ? TURNTABLE Replace turntable immediately after cleaning.... Do not operate the microwave oven without turntable and ...
...clean water and dry with soft, lint-free cloth. Display shows messages ■ Is the display showing "PF," "PF id=27" or "PF id=30...Part Number 31662 (not included): See "Assistance or Service" section to avoid damaging. On stainless steel models, rub in the magnetron cycles on the turntable support. ■ Is the turntable support operating properly? The area where the oven door and frame touch when closed ? TURNTABLE Replace turntable immediately after cleaning.... Do not operate the microwave oven without turntable and ...

Microwave Use and Care
Page 14
...L5N 3A7 Please include a daytime phone number in your telephone directory Yellow Pages. If you need replacement parts If you need further assistance, you can write to Whirlpool Corporation with : ■ Features and specifications on our full line of food need further assistance, you ... to fulfill the product warranty and provide after-warranty service, anywhere in your correspondence. To locate FSP® replacement parts in the United States. Whirlpool Canada LP designated service technicians are not sounding ■ Are tones disabled? It may save you still need help ...
...L5N 3A7 Please include a daytime phone number in your telephone directory Yellow Pages. If you need replacement parts If you need further assistance, you can write to Whirlpool Corporation with : ■ Features and specifications on our full line of food need further assistance, you ... to fulfill the product warranty and provide after-warranty service, anywhere in your correspondence. To locate FSP® replacement parts in the United States. Whirlpool Canada LP designated service technicians are not sounding ■ Are tones disabled? It may save you still need help ...

Microwave Use and Care
Page 15
..., air filters or water filters. Expenses for travel and transportation for other damage to Whirlpool within 30 days from the date of purchase. 6. This warranty is void if the factory applied...model and serial number label located on how to correct house wiring or plumbing. 2. Consumable parts are excluded from warranty coverage. 3. Repairs when your complete model number and serial number. ...to replace or repair house fuses, or to use of consumables or cleaning products not approved by an authorized Whirlpool servicer is not available. 10. The cost of repair or replacement under...
..., air filters or water filters. Expenses for travel and transportation for other damage to Whirlpool within 30 days from the date of purchase. 6. This warranty is void if the factory applied...model and serial number label located on how to correct house wiring or plumbing. 2. Consumable parts are excluded from warranty coverage. 3. Repairs when your complete model number and serial number. ...to replace or repair house fuses, or to use of consumables or cleaning products not approved by an authorized Whirlpool servicer is not available. 10. The cost of repair or replacement under...


