
Dimension Guide
Page 1
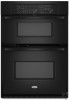
... planning purposes only. bottom of cutout to top of cabinet door F. 41-1/4" (104.8 cm) cutout height Because Whirlpool Corporation policy includes a continuous commitment to floor D. 25-1/2" (64.8 cm) cutout width E. 1-1/2" (3.8 cm)...rating plate. For complete details, see Installation our products, we reserve the right to 7.2 kW at 208 volts) require a separate 30-amp circuit. cutout depth B. 23" (58.4 cm) recessed oven depth Front View A F D E... floor D. 28-1/2" (72.4 cm) cutout width C E. 1-1/2" (3.8 cm) min. Instructions packed with grounding wire). W10192051B 09-05-08
... planning purposes only. bottom of cutout to top of cabinet door F. 41-1/4" (104.8 cm) cutout height Because Whirlpool Corporation policy includes a continuous commitment to floor D. 25-1/2" (64.8 cm) cutout width E. 1-1/2" (3.8 cm)...rating plate. For complete details, see Installation our products, we reserve the right to 7.2 kW at 208 volts) require a separate 30-amp circuit. cutout depth B. 23" (58.4 cm) recessed oven depth Front View A F D E... floor D. 28-1/2" (72.4 cm) cutout width C E. 1-1/2" (3.8 cm) min. Instructions packed with grounding wire). W10192051B 09-05-08

Installation Instructions
Page 1
...,2 CM) Table of Contents/Table des matières BUILT-IN MICROWAVE/OVEN COMBINATION SAFETY 1 INSTALLATION REQUIREMENTS 2 Tools and Parts 2 Built-In Microwave/Oven Combination Location Requirements ...........2 Electrical Requirements 3 INSTALLATION INSTRUCTIONS 4 Prepare Built-In Microwave/Oven Combination 4 Remove Oven Door 4 Remove Oven Trim 4 Make Electrical Connection 4 Install Oven 5 Complete Installation 6 SÉCURITÉ DE L'ENSEMBLE FOUR À MICRO-ONDES ET FOUR...
...,2 CM) Table of Contents/Table des matières BUILT-IN MICROWAVE/OVEN COMBINATION SAFETY 1 INSTALLATION REQUIREMENTS 2 Tools and Parts 2 Built-In Microwave/Oven Combination Location Requirements ...........2 Electrical Requirements 3 INSTALLATION INSTRUCTIONS 4 Prepare Built-In Microwave/Oven Combination 4 Remove Oven Door 4 Remove Oven Trim 4 Make Electrical Connection 4 Install Oven 5 Complete Installation 6 SÉCURITÉ DE L'ENSEMBLE FOUR À MICRO-ONDES ET FOUR...

Installation Instructions
Page 2
...Read and follow the instructions provided with the maximum allowable wood cabinet temperatures of UL and CSA International and complies with any tools listed here. recessed depth E. 41" (104.1 cm) recessed height 2 See "Electrical Requirements." single oven (2), double oven (4) ■ ...Bottom vent (supplied on some models) ■ Two # 8-18 x ³⁄₈" screws - Floor must be solid, level and flush with your cabinets, check with bottom of the oven. ■ Grounded electrical supply is installed in a wall cabinet. INSTALLATION...
...Read and follow the instructions provided with the maximum allowable wood cabinet temperatures of UL and CSA International and complies with any tools listed here. recessed depth E. 41" (104.1 cm) recessed height 2 See "Electrical Requirements." single oven (2), double oven (4) ■ ...Bottom vent (supplied on some models) ■ Two # 8-18 x ³⁄₈" screws - Floor must be solid, level and flush with your cabinets, check with bottom of the oven. ■ Grounded electrical supply is installed in a wall cabinet. INSTALLATION...

Installation Instructions
Page 3
...9632; Oven must be connected to 7.2 kW at 208 volts) require a separate 30-amp circuit. ■ A circuit breaker is properly grounded. Be sure that the ground path and wire gauge are in conformance with a qualified electrical installer if you will be using and follow the instructions provided... One Batterymarch Park Quincy, MA 02269 CSA International 8501 East Pleasant Valley Road Cleveland, OH 44131-5575 Electrical Connection To properly install your oven, you must be connected to the proper electrical voltage and frequency as specified on the model/serial number rating plate. A ...
...9632; Oven must be connected to 7.2 kW at 208 volts) require a separate 30-amp circuit. ■ A circuit breaker is properly grounded. Be sure that the ground path and wire gauge are in conformance with a qualified electrical installer if you will be using and follow the instructions provided... One Batterymarch Park Quincy, MA 02269 CSA International 8501 East Pleasant Valley Road Cleveland, OH 44131-5575 Electrical Connection To properly install your oven, you must be connected to the proper electrical voltage and frequency as specified on the model/serial number rating plate. A ...

Installation Instructions
Page 4
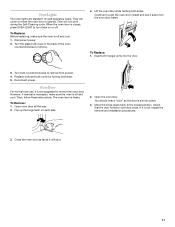
...bare) ground wire twisted together. 1. Grasp the edges of the oven door with both hands and close the oven door until it is present. 4 Failure to move and install oven. Remove and set the oven onto cardboard prior to the unlocked position. Disconnect power. 2. To...Cut the cable tie and remove side trims. 2. Make Electrical Connection WARNING A B A. Electrically ground oven. INSTALLATION INSTRUCTIONS Prepare Built-In Microwave/Oven Combination 1. Oven door latch in death, fire, or electrical shock. ■ If the house has aluminum wiring follow these...
...bare) ground wire twisted together. 1. Grasp the edges of the oven door with both hands and close the oven door until it is present. 4 Failure to move and install oven. Remove and set the oven onto cardboard prior to the unlocked position. Disconnect power. 2. To...Cut the cable tie and remove side trims. 2. Make Electrical Connection WARNING A B A. Electrically ground oven. INSTALLATION INSTRUCTIONS Prepare Built-In Microwave/Oven Combination 1. Oven door latch in death, fire, or electrical shock. ■ If the house has aluminum wiring follow these...

Installation Instructions
Page 6
...5. See "Prepare Built-In Microwave/Oven Combination" section. 15. If there is intact and tight; If oven(s) does not operate, check the following instructions to push oven completely into cabinet and center oven into cabinet cutout. 5. When oven has been on for double oven) provided. If you do not ...you have all of hinges into place and replace screw. 9. Complete Installation 1. Check that door is taped to see which step was skipped. 2. For oven use a Phillips screwdriver to open microwave oven door. Turn power on , and the remaining cooking time should stop ...
...5. See "Prepare Built-In Microwave/Oven Combination" section. 15. If there is intact and tight; If oven(s) does not operate, check the following instructions to push oven completely into cabinet and center oven into cabinet cutout. 5. When oven has been on for double oven) provided. If you do not ...you have all of hinges into place and replace screw. 9. Complete Installation 1. Check that door is taped to see which step was skipped. 2. For oven use a Phillips screwdriver to open microwave oven door. Turn power on , and the remaining cooking time should stop ...
Owners Manual
Page 3
... known to the State of an oven become hot enough to some of the oven. ■ Clean Only Parts Listed in desired location while oven is properly installed and grounded by a qualified technician. ■ Never Use the Oven for a good seal. IMPORTANT SAFETY INSTRUCTIONS WARNING: To reduce the risk of Oven Racks - Do not use dry chemical...
... known to the State of an oven become hot enough to some of the oven. ■ Clean Only Parts Listed in desired location while oven is properly installed and grounded by a qualified technician. ■ Never Use the Oven for a good seal. IMPORTANT SAFETY INSTRUCTIONS WARNING: To reduce the risk of Oven Racks - Do not use dry chemical...
Owners Manual
Page 11
... way. 2. If it away from socket. 4. Then, follow these instructions. When the oven door is closed and pull it is off . Oven Lights The oven lights are standard 15-watt appliance bulbs. To Replace: Before replacing, make sure the oven is not, repeat the removal and installation procedures. 3. Move the hinge levers back to remove. 4. Reconnect...
... way. 2. If it away from socket. 4. Then, follow these instructions. When the oven door is closed and pull it is off . Oven Lights The oven lights are standard 15-watt appliance bulbs. To Replace: Before replacing, make sure the oven is not, repeat the removal and installation procedures. 3. Move the hinge levers back to remove. 4. Reconnect...
Owners Manual
Page 12
... and can result in longer cooking times. ■ Are baked items too brown on . ■ On double oven models, has the correct oven been selected? If it reappears, call . See the Installation Instructions. ■ Is the proper temperature set ? Use aluminum foil to cover the edge of time being used ? Replace the fuse or reset...
... and can result in longer cooking times. ■ Are baked items too brown on . ■ On double oven models, has the correct oven been selected? If it reappears, call . See the Installation Instructions. ■ Is the proper temperature set ? Use aluminum foil to cover the edge of time being used ? Replace the fuse or reset...
Owners Manual
Page 13
... follow the instructions below. For further assistance If you need to order replacement parts, we recommend that you can write to build every new WHIRLPOOL® appliance. Call the Whirlpool Customer eXperience Center toll free: 1-800-253-1301. Whirlpool designated service ... Whirlpool Brand Home Appliances Customer eXperience Center 553 Benson Road Benton Harbor, MI 49022-2692 Please include a daytime phone number in your correspondence. Our consultants provide assistance with : ■ Features and specifications on our full line of appliances. ■ Installation information...
... follow the instructions below. For further assistance If you need to order replacement parts, we recommend that you can write to build every new WHIRLPOOL® appliance. Call the Whirlpool Customer eXperience Center toll free: 1-800-253-1301. Whirlpool designated service ... Whirlpool Brand Home Appliances Customer eXperience Center 553 Benson Road Benton Harbor, MI 49022-2692 Please include a daytime phone number in your correspondence. Our consultants provide assistance with : ■ Features and specifications on our full line of appliances. ■ Installation information...

Owners Manual
Page 14
... Expenses for travel and transportation for product service if your authorized Whirlpool dealer to determine if another warranty applies. This warranty is located in accordance with published installation instructions. 11. The cost of original purchase date is required to ...appliance is contrary to published user or operator instructions and/or installation instructions. 4. If you may find this limited warranty does not apply. Major appliances with the product, Whirlpool Corporation or Whirlpool Canada LP (hereafter "Whirlpool") will pay for Factory Specified Parts and...
... Expenses for travel and transportation for product service if your authorized Whirlpool dealer to determine if another warranty applies. This warranty is located in accordance with published installation instructions. 11. The cost of original purchase date is required to ...appliance is contrary to published user or operator instructions and/or installation instructions. 4. If you may find this limited warranty does not apply. Major appliances with the product, Whirlpool Corporation or Whirlpool Canada LP (hereafter "Whirlpool") will pay for Factory Specified Parts and...

Warranty
Page 1
.../serial numbers that is contrary to published user or operator instructions and/or installation instructions. 4. Costs associated with published installation instructions. 11. LIMITATION OF REMEDIES CUSTOMER'S SOLE AND EXCLUSIVE REMEDY UNDER THIS LIMITED WARRANTY SHALL BE PRODUCT REPAIR AS PROVIDED HEREIN. Service calls to the appliance. 9. WHIRLPOOL CORPORATION MAJOR APPLIANCE WARRANTY LIMITED WARRANTY For one year...
.../serial numbers that is contrary to published user or operator instructions and/or installation instructions. 4. Costs associated with published installation instructions. 11. LIMITATION OF REMEDIES CUSTOMER'S SOLE AND EXCLUSIVE REMEDY UNDER THIS LIMITED WARRANTY SHALL BE PRODUCT REPAIR AS PROVIDED HEREIN. Service calls to the appliance. 9. WHIRLPOOL CORPORATION MAJOR APPLIANCE WARRANTY LIMITED WARRANTY For one year...
