

Use & Care Guide
Page 3
...in the manual. Do not use dry chemical or foam-type extinguisher. Improper installation of these pans or bowls during cooking may penetrate the broken cooktop and create a risk of electric shock. Flammable materials should break, cleaning solutions and spillovers may subject wiring or...other flammable materials contact surface units or areas near units until they are dark in a risk of electric shock, or fire. Contact a qualified technician immediately. SAVE THESE INSTRUCTIONS 3 Loose-fitting or hanging garments should be immersed in the manual. Moist or damp potholders on...
...in the manual. Do not use dry chemical or foam-type extinguisher. Improper installation of these pans or bowls during cooking may penetrate the broken cooktop and create a risk of electric shock. Flammable materials should break, cleaning solutions and spillovers may subject wiring or...other flammable materials contact surface units or areas near units until they are dark in a risk of electric shock, or fire. Contact a qualified technician immediately. SAVE THESE INSTRUCTIONS 3 Loose-fitting or hanging garments should be immersed in the manual. Moist or damp potholders on...

Use & Care Guide
Page 10
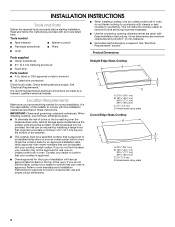
..., element or surface burner. This allows time for the most even heating. On electric cooktops, canners should not extend more than ½" (1.3 cm) outside the area. If a kit ... heat level. It is not installed, the life of medium-to-heavy thickness. s Do not store jars or cans above the cooktop. Allow the cooktop to change color when surface cooking... A C A. Cookware/canner C. ½" (1.3 cm) Maximum overhang s Use flat-bottomed cookware for ordering instructions. s Determine flatness by placing the straight edge of aluminum. 10 s Make sure the bottoms of pots and...
..., element or surface burner. This allows time for the most even heating. On electric cooktops, canners should not extend more than ½" (1.3 cm) outside the area. If a kit ... heat level. It is not installed, the life of medium-to-heavy thickness. s Do not store jars or cans above the cooktop. Allow the cooktop to change color when surface cooking... A C A. Cookware/canner C. ½" (1.3 cm) Maximum overhang s Use flat-bottomed cookware for ordering instructions. s Determine flatness by placing the straight edge of aluminum. 10 s Make sure the bottoms of pots and...

Use & Care Guide
Page 12
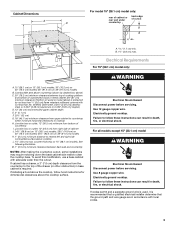
...? A. 30" (76.2 cm) models B. 36" (91.4 cm) models 12 See Installation Instructions. Make sure the cooktop controls are permanently pressed. See "Coil Elements and Burner Bowls" section. See "Cookware" section. Clean the cooktop touch control panel thoroughly. Follow the steps below. See the Installation Instructions. See "Coil Elements and Burner Bowls" section. Replace the fuse or...
...? A. 30" (76.2 cm) models B. 36" (91.4 cm) models 12 See Installation Instructions. Make sure the cooktop controls are permanently pressed. See "Coil Elements and Burner Bowls" section. See "Cookware" section. Clean the cooktop touch control panel thoroughly. Follow the steps below. See the Installation Instructions. See "Coil Elements and Burner Bowls" section. Replace the fuse or...

Use & Care Guide
Page 13
...replacement parts. Call the Whirlpool Customer eXperience Center toll free: 1-800-253-1301. s Installation information. Whirlpool designated service technicians are ... our website at 1-800-442-9991 and follow the instructions below. s Use and maintenance procedures. This information will...Cooktop Protectant (ceramic glass models) Order Part Number 31463 Cooktop Care Kit (includes cleaner, protectant, and applicator pads) Order Part Number 31605 Cooktop Scraper (ceramic glass models) Order Part Number 3183488 All-Purpose Appliance Cleaner Order Part Number 31662 In Canada Call the Whirlpool...
...replacement parts. Call the Whirlpool Customer eXperience Center toll free: 1-800-253-1301. s Installation information. Whirlpool designated service technicians are ... our website at 1-800-442-9991 and follow the instructions below. s Use and maintenance procedures. This information will...Cooktop Protectant (ceramic glass models) Order Part Number 31463 Cooktop Care Kit (includes cleaner, protectant, and applicator pads) Order Part Number 31605 Cooktop Scraper (ceramic glass models) Order Part Number 3183488 All-Purpose Appliance Cleaner Order Part Number 31662 In Canada Call the Whirlpool...
Use & Care Guide
Page 14
... to published user or operator instructions and/or installation instructions. 4. Cosmetic damage, including scratches, dents, chips or other than normal, single-family household use of consumables or cleaning products not approved by an authorized Whirlpool servicer is not available. 10..., fire, flood, acts of God, improper installation, installation not in accordance with electrical or plumbing codes, or use or when it is installed in an inaccessible location or is not installed in accordance with published installation instructions. 11. Expenses for travel and transportation for ...
... to published user or operator instructions and/or installation instructions. 4. Cosmetic damage, including scratches, dents, chips or other than normal, single-family household use of consumables or cleaning products not approved by an authorized Whirlpool servicer is not available. 10..., fire, flood, acts of God, improper installation, installation not in accordance with electrical or plumbing codes, or use or when it is installed in an inaccessible location or is not installed in accordance with published installation instructions. 11. Expenses for travel and transportation for ...

Installation Instructions
Page 1
... this manual and on your appliance. ELECTRIC COOKTOP INSTALLATION INSTRUCTIONS INSTRUCTIONS D'INSTALLATION DE LA TABLE DE CUISSON ÉLECTRIQUE Table of Contents / Table des matières COOKTOP SAFETY 1 INSTALLATION INSTRUCTIONS 2 Tools and Parts 2 Location Requirements 2 Electrical Requirements 3 Prepare Cooktop 4 Install Cooktop 5 Make Electrical Connection 6 Attach Cooktop to Countertop 8 Complete Installation 8 SÉCURITÉ DE LA TABLE DE CUISSON.........9 INSTRUCTIONS D'INSTALLATION 10 Outillage et pièces 10...
... this manual and on your appliance. ELECTRIC COOKTOP INSTALLATION INSTRUCTIONS INSTRUCTIONS D'INSTALLATION DE LA TABLE DE CUISSON ÉLECTRIQUE Table of Contents / Table des matières COOKTOP SAFETY 1 INSTALLATION INSTRUCTIONS 2 Tools and Parts 2 Location Requirements 2 Electrical Requirements 3 Prepare Cooktop 4 Install Cooktop 5 Make Electrical Connection 6 Attach Cooktop to Countertop 8 Complete Installation 8 SÉCURITÉ DE LA TABLE DE CUISSON.........9 INSTRUCTIONS D'INSTALLATION 10 Outillage et pièces 10...
Installation Instructions
Page 2
... by reaching over an undercounter built-in undercounter use and proper cutout dimensions. Check the cooktop base for this label, your oven is approved. INSTALLATION INSTRUCTIONS Tools and Parts Gather the required tools and parts before starting installation. See "Electrical Requirements" section. Location Requirements Make sure you do not find this label, contact your dealer...
... by reaching over an undercounter built-in undercounter use and proper cutout dimensions. Check the cooktop base for this label, your oven is approved. INSTALLATION INSTRUCTIONS Tools and Parts Gather the required tools and parts before starting installation. See "Electrical Requirements" section. Location Requirements Make sure you do not find this label, contact your dealer...
Installation Instructions
Page 3
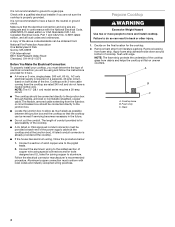
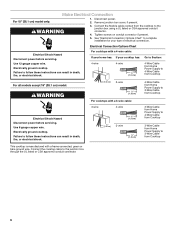
...;" [0.6 cm] flame retardant millboard covered with not less than the cutout. Electrical Shock Hazard Disconnect power before servicing. Electrically ground cooktop. If installing a hood above the cooktop, follow these instructions can result in base cabinet is protected by dashed box above cooktop L. 1½" (3.8 cm) max. Cabinet Dimensions A D C B M L F G E H I . Electrical Requirements For 15" (38.1 cm) model only: WARNING A. 15" (38...
...;" [0.6 cm] flame retardant millboard covered with not less than the cutout. Electrical Shock Hazard Disconnect power before servicing. Electrically ground cooktop. If installing a hood above the cooktop, follow these instructions can result in base cabinet is protected by dashed box above cooktop L. 1½" (3.8 cm) max. Cabinet Dimensions A D C B M L F G E H I . Electrical Requirements For 15" (38.1 cm) model only: WARNING A. 15" (38...
Installation Instructions
Page 4
...OH 44131-5575 Before You Make the Electrical Connection: To properly install your cooktop, you must determine the type of conduit provided is for it here. Follow the electrical connector manufacturer's recommended procedure. Failure to...electrical supply is required on a separate, 40-amp circuit, fused on both sides of solid copper wire to move and install cooktop. Cooktop base B. Connect a section of the line. Decide on uneven counters. Check with edge. Cooktops with local codes and industry accepted wiring practices. I If the house has aluminum wiring, follow the instructions...
...OH 44131-5575 Before You Make the Electrical Connection: To properly install your cooktop, you must determine the type of conduit provided is for it here. Follow the electrical connector manufacturer's recommended procedure. Failure to...electrical supply is required on a separate, 40-amp circuit, fused on both sides of solid copper wire to move and install cooktop. Cooktop base B. Connect a section of the line. Decide on uneven counters. Check with edge. Cooktops with local codes and industry accepted wiring practices. I If the house has aluminum wiring, follow the instructions...
Installation Instructions
Page 6
...cooktop to complete installation for your cooktop has: Go to Section: 4-wire 4-wire ¹⁄₂" (1.3 cm) 4-Wire Cable from Home Power Supply to 4-Wire Cable from Cooktop ½" (1.3 cm) 3-wire ¹⁄₂" (1.3 cm) 4-Wire Cable from Cooktop For cooktops with a 3-wire cable: Electrical...If your type of electrical connection. WARNING 3. Electrically ground cooktop. Failure to 3-Wire Cable from Home Power Supply to follow these instructions can result in death, fire, or electrical shock. Disconnect power. 2. Connect the cooktop cable to 3-Wire ...
...cooktop to complete installation for your cooktop has: Go to Section: 4-wire 4-wire ¹⁄₂" (1.3 cm) 4-Wire Cable from Home Power Supply to 4-Wire Cable from Cooktop ½" (1.3 cm) 3-wire ¹⁄₂" (1.3 cm) 4-Wire Cable from Cooktop For cooktops with a 3-wire cable: Electrical...If your type of electrical connection. WARNING 3. Electrically ground cooktop. Failure to 3-Wire Cable from Home Power Supply to follow these instructions can result in death, fire, or electrical shock. Disconnect power. 2. Connect the cooktop cable to 3-Wire ...


