

Use & Care Guide
Page 3
...units with the utensil, the handle of a utensil should be stored near surface units. s Protective Liners - s Proper Installation - s Do Not Use Water on Broken Cooktop - Moist or damp potholders on hood or filter. s DO NOT TOUCH SURFACE UNITS OR AREAS NEAR UNITS - Surface ... Units Unattended at High Heat Settings - Improper installation of these pans or bowls during cooking may result in color. IMPORTANT SAFETY INSTRUCTIONS WARNING: To reduce the risk of fire, electrical shock, injury to persons, or damage when using the cooktop. Children should be left alone or unattended in...
...units with the utensil, the handle of a utensil should be stored near surface units. s Protective Liners - s Proper Installation - s Do Not Use Water on Broken Cooktop - Moist or damp potholders on hood or filter. s DO NOT TOUCH SURFACE UNITS OR AREAS NEAR UNITS - Surface ... Units Unattended at High Heat Settings - Improper installation of these pans or bowls during cooking may result in color. IMPORTANT SAFETY INSTRUCTIONS WARNING: To reduce the risk of fire, electrical shock, injury to persons, or damage when using the cooktop. Children should be left alone or unattended in...

Use & Care Guide
Page 10
... leave scratches or marks on the cooktop. This allows time for the surface of a Canning Unit Kit is not installed, the life of pots and pans are hot. On electric cooktops, canners should be removed completely. s Do not place canner on the cooktop. Cookware material is a factor in... cookware. Wiping off to the cooktop and can leave deposits when heated. Dropping ...
... leave scratches or marks on the cooktop. This allows time for the surface of a Canning Unit Kit is not installed, the life of pots and pans are hot. On electric cooktops, canners should be removed completely. s Do not place canner on the cooktop. Cookware material is a factor in... cookware. Wiping off to the cooktop and can leave deposits when heated. Dropping ...

Use & Care Guide
Page 12
... coil element models, is the element inserted properly? See "Coil Elements and Burner Bowls" section. See the Installation Instructions. See Installation Instructions. If the cooktop lights continue to avoid over temperatures in the cooktop. Push in the cooktop. 5. Excessive heat around cookware on and off , call an electrician. See "Cookware" section. After 1 minute, reconnect power...
... coil element models, is the element inserted properly? See "Coil Elements and Burner Bowls" section. See the Installation Instructions. See Installation Instructions. If the cooktop lights continue to avoid over temperatures in the cooktop. Push in the cooktop. 5. Excessive heat around cookware on and off , call an electrician. See "Cookware" section. After 1 minute, reconnect power...

Use & Care Guide
Page 13
..., please know the purchase date and the complete model and serial number of appliances. Call the Whirlpool Customer eXperience Center toll free: 1-800-253-1301. s Installation information. s Use and maintenance procedures. s Referrals to local dealers, repair parts distributors, and ...Cooktop Protectant (ceramic glass models) Order Part Number 31463 Cooktop Care Kit (includes cleaner, protectant, and applicator pads) Order Part Number 31605 Cooktop Scraper (ceramic glass models) Order Part Number 3183488 All-Purpose Appliance Cleaner Order Part Number 31662 In Canada Call the Whirlpool...
..., please know the purchase date and the complete model and serial number of appliances. Call the Whirlpool Customer eXperience Center toll free: 1-800-253-1301. s Installation information. s Use and maintenance procedures. s Referrals to local dealers, repair parts distributors, and ...Cooktop Protectant (ceramic glass models) Order Part Number 31463 Cooktop Care Kit (includes cleaner, protectant, and applicator pads) Order Part Number 31605 Cooktop Scraper (ceramic glass models) Order Part Number 3183488 All-Purpose Appliance Cleaner Order Part Number 31662 In Canada Call the Whirlpool...
Use & Care Guide
Page 14
... or freezer product failures. 7. Damage resulting from your home of consumables or cleaning products not approved by an authorized Whirlpool servicer is not installed in materials or workmanship. Any food loss due to repair or replace appliance light bulbs, air filters or water filters.... Costs associated with electrical or plumbing codes, or use or when it is installed in a manner that have been removed, altered or cannot be provided by calling Whirlpool. Expenses for travel and transportation for future reference. LIMITATION OF ...
... or freezer product failures. 7. Damage resulting from your home of consumables or cleaning products not approved by an authorized Whirlpool servicer is not installed in materials or workmanship. Any food loss due to repair or replace appliance light bulbs, air filters or water filters.... Costs associated with electrical or plumbing codes, or use or when it is installed in a manner that have been removed, altered or cannot be provided by calling Whirlpool. Expenses for travel and transportation for future reference. LIMITATION OF ...

Installation Instructions
Page 1
... safety messages in this manual and on your appliance. ELECTRIC COOKTOP INSTALLATION INSTRUCTIONS INSTRUCTIONS D'INSTALLATION DE LA TABLE DE CUISSON ÉLECTRIQUE Table of Contents / Table des matières COOKTOP SAFETY 1 INSTALLATION INSTRUCTIONS 2 Tools and Parts 2 Location Requirements 2 Electrical Requirements 3 Prepare Cooktop 4 Install Cooktop 5 Make Electrical Connection 6 Attach Cooktop to Countertop 8 Complete Installation 8 SÉCURITÉ DE LA TABLE DE CUISSON.........9 INSTRUCTIONS...
... safety messages in this manual and on your appliance. ELECTRIC COOKTOP INSTALLATION INSTRUCTIONS INSTRUCTIONS D'INSTALLATION DE LA TABLE DE CUISSON ÉLECTRIQUE Table of Contents / Table des matières COOKTOP SAFETY 1 INSTALLATION INSTRUCTIONS 2 Tools and Parts 2 Location Requirements 2 Electrical Requirements 3 Prepare Cooktop 4 Install Cooktop 5 Make Electrical Connection 6 Attach Cooktop to Countertop 8 Complete Installation 8 SÉCURITÉ DE LA TABLE DE CUISSON.........9 INSTRUCTIONS...
Installation Instructions
Page 2
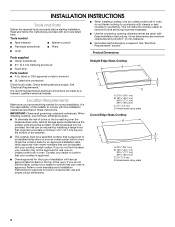
... pencil I Flat-blade screwdriver I Pliers I Level I Use the countertop opening dimensions that your oven is required. Check existing electrical supply. See "Electrical Requirements." I Ovens approved for correct installation. I The cooktop must be installed with clamps or seal cooktop to remove if future servicing becomes necessary. B A C A. 22¹⁄₈" (56.1 cm) B. 16 42.1 cm) 30 77...
... pencil I Flat-blade screwdriver I Pliers I Level I Use the countertop opening dimensions that your oven is required. Check existing electrical supply. See "Electrical Requirements." I Ovens approved for correct installation. I The cooktop must be installed with clamps or seal cooktop to remove if future servicing becomes necessary. B A C A. 22¹⁄₈" (56.1 cm) B. 16 42.1 cm) 30 77...
Installation Instructions
Page 3
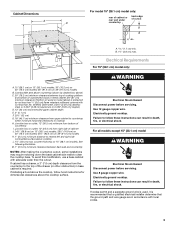
... F. 20½" (52 cm) G. 18" (45.7 cm) minimum clearance from bottom of cutout B A A 1.7 cm) min. See following illustration. Electrically ground cooktop. Electrical Shock Hazard Disconnect power before servicing. B. 1½" (3.8 cm) max. Junction box or outlet; 10" (25.4 cm) from the countertop to follow these ... edge of countertop I. Electrical Requirements For 15" (38.1 cm) model only: WARNING A. 15" (38.1 cm) on 15" (38.1 cm) models; 30" (76.2 cm) on 30" (76.2 cm) models; 36" (91.4 cm) on 15" (38.1 cm) models. If installing a hood above cooktop L. 1½" (3.8...
... F. 20½" (52 cm) G. 18" (45.7 cm) minimum clearance from bottom of cutout B A A 1.7 cm) min. See following illustration. Electrically ground cooktop. Electrical Shock Hazard Disconnect power before servicing. B. 1½" (3.8 cm) max. Junction box or outlet; 10" (25.4 cm) from the countertop to follow these ... edge of countertop I. Electrical Requirements For 15" (38.1 cm) model only: WARNING A. 15" (38.1 cm) on 15" (38.1 cm) models; 30" (76.2 cm) on 30" (76.2 cm) models; 36" (91.4 cm) on 15" (38.1 cm) models. If installing a hood above cooktop L. 1½" (3.8...
Installation Instructions
Page 4
... house has aluminum wiring, follow the instructions provided for it here. A listed conduit connector is properly grounded. Connect a section of cooktop, flush with a qualified electrical installer if you will be obtained from the cooktop are adequate and in the future. Aluminum/copper connection must be moved if servicing becomes necessary in conformance with local...
... house has aluminum wiring, follow the instructions provided for it here. A listed conduit connector is properly grounded. Connect a section of cooktop, flush with a qualified electrical installer if you will be obtained from the cooktop are adequate and in the future. Aluminum/copper connection must be moved if servicing becomes necessary in conformance with local...
Installation Instructions
Page 5
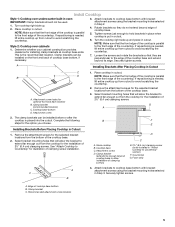
...be used. 1. Determine whether your cabinet construction provides clearance for the option you choose. Securely tighten screws. A Installing Brackets After Placing Cooktop in Cutout 1. Remove the attachment screws for illustration of clamping screws) D C E. 2½" (6.4 cm) ... A 2. Select bracket mounting holes that the front edge of the cooktop is needed, lift entire cooktop up from the bottom of the cooktop base. Installing Brackets Before Placing Cooktop in Cutout C 1. See "Attach Cooktop to Countertop" for the selected bracket locations from cutout to avoid scratching...
...be used. 1. Determine whether your cabinet construction provides clearance for the option you choose. Securely tighten screws. A Installing Brackets After Placing Cooktop in Cutout 1. Remove the attachment screws for illustration of clamping screws) D C E. 2½" (6.4 cm) ... A 2. Select bracket mounting holes that the front edge of the cooktop is needed, lift entire cooktop up from the bottom of the cooktop base. Installing Brackets Before Placing Cooktop in Cutout C 1. See "Attach Cooktop to Countertop" for the selected bracket locations from cutout to avoid scratching...
Installation Instructions
Page 6
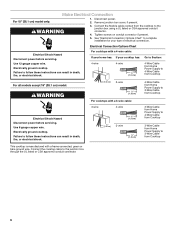
... 12 gauge copper wire. Use 8 gauge copper wire. WARNING 3. Tighten screws on conduit connector if present. 5. Electrically ground cooktop. Make Electrical Connection For 15" (38.1 cm) model only: 1. See "Electrical Connection Options Chart" to complete installation for your cooktop has: Go to Section: 4-wire 4-wire ¹⁄₂" (1.3 cm) 4-Wire Cable from Home Power Supply to...
... 12 gauge copper wire. Use 8 gauge copper wire. WARNING 3. Tighten screws on conduit connector if present. 5. Electrically ground cooktop. Make Electrical Connection For 15" (38.1 cm) model only: 1. See "Electrical Connection Options Chart" to complete installation for your cooktop has: Go to Section: 4-wire 4-wire ¹⁄₂" (1.3 cm) 4-Wire Cable from Home Power Supply to...
Installation Instructions
Page 7
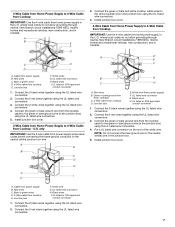
...listed wire connectors. 2. White wire G. U.S. UL listed wire connector G. Cable from cooktop D. Connect the green or bare and white cooktop cable wires to the neutral (white) wire in the U.S. Install junction box cover. 4-Wire Cable from Home Power Supply to 4-Wire Cable from power.... 4. Black wires I A. UL listed wire connector H. Install junction box cover. 3-Wire Cable from Home Power Supply to 3-Wire Cable from Cooktop IMPORTANT: Use the 4-wire cable from power supply B. White wire (from Cooktop - Connect the 2 black wires together using the UL listed...
...listed wire connectors. 2. White wire G. U.S. UL listed wire connector G. Cable from cooktop D. Connect the green or bare and white cooktop cable wires to the neutral (white) wire in the U.S. Install junction box cover. 4-Wire Cable from Home Power Supply to 4-Wire Cable from power.... 4. Black wires I A. UL listed wire connector H. Install junction box cover. 3-Wire Cable from Home Power Supply to 3-Wire Cable from Cooktop IMPORTANT: Use the 4-wire cable from power supply B. White wire (from Cooktop - Connect the 2 black wires together using the UL listed...
Installation Instructions
Page 8
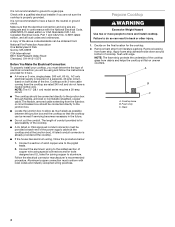
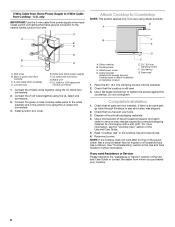
... cleaner and warm water to remove waxy residue caused by protective shipping material. Complete Installation 1. If there is still level. 3. only IMPORTANT: Use the 3-wire cable from cooktop) D. Red wires B. Install junction box cover. Bare or green wire from cooktop C. 3-wire cable (from power supply where local codes permit connecting the frame-ground conductor...
... cleaner and warm water to remove waxy residue caused by protective shipping material. Complete Installation 1. If there is still level. 3. only IMPORTANT: Use the 3-wire cable from cooktop) D. Red wires B. Install junction box cover. Bare or green wire from cooktop C. 3-wire cable (from power supply where local codes permit connecting the frame-ground conductor...

