
Use & Care Guide
Page 4
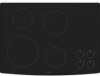
... function) B. Right rear touch control (simmer function; Hot surface indicator light E. Right rear touch control (simmer function; Increase/decrease temperature touch control Cooktops 36" (91.4 cm) Touch-Activated Electronic Control Model shown B C D E. Right front touch control (simmer function; Left rear touch control (simmer function; dualsize element) C. Center rear surface cooking area (with...
... function) B. Right rear touch control (simmer function; Hot surface indicator light E. Right rear touch control (simmer function; Increase/decrease temperature touch control Cooktops 36" (91.4 cm) Touch-Activated Electronic Control Model shown B C D E. Right front touch control (simmer function; Left rear touch control (simmer function; dualsize element) C. Center rear surface cooking area (with...
Use & Care Guide
Page 6
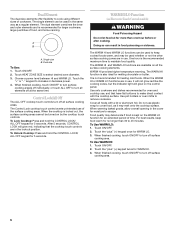
.... 2. Choose a power level between HI and WARM LO. The Control Lock cooktop touch control averts unintended use . To Use WARM LO: 1. After 5 seconds, CONTROL LOCK will glow on Electronic Touch Control models) WARNING Food Poisoning Hazard Do not let food sit for no longer than one...the WARM HI or WARM LO functions are in the lockout position. Cover all the surface cooking elements. Food quality may melt onto the cooktop surface. Touch ON/OFF. 2. Single size B. When finished cooking, touch ON/OFF to turn off surface cooking area. When finished ...
.... 2. Choose a power level between HI and WARM LO. The Control Lock cooktop touch control averts unintended use . To Use WARM LO: 1. After 5 seconds, CONTROL LOCK will glow on Electronic Touch Control models) WARNING Food Poisoning Hazard Do not let food sit for no longer than one...the WARM HI or WARM LO functions are in the lockout position. Cover all the surface cooking elements. Food quality may melt onto the cooktop surface. Touch ON/OFF. 2. Single size B. When finished cooking, touch ON/OFF to turn off surface cooking area. When finished ...

Use & Care Guide
Page 7
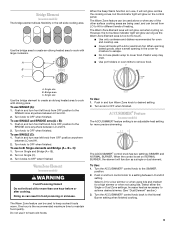
...Hot surface indicator lights B. Right rear control knob (Warm zone control on some models) E. Power on some models) D. Right front surface cooking area E G. The cooktop you have purchased may not match those of the items listed. Left front ...174; control knob D. Control panel F. Left rear control knob B. Model and serial number plate (located underneath cooktop on light E. Control Panels Model GJC3654 (36" [91.4 cm]) shown Model GJC3054 (30" [77.1 cm]) not shown A B C Model GJC3634 (36" [91.4 cm]) shown Model GJC3034 (30" [77.1 cm]) not shown A BC D H...
...Hot surface indicator lights B. Right rear control knob (Warm zone control on some models) E. Power on some models) D. Right front surface cooking area E G. The cooktop you have purchased may not match those of the items listed. Left front ...174; control knob D. Control panel F. Left rear control knob B. Model and serial number plate (located underneath cooktop on light E. Control Panels Model GJC3654 (36" [91.4 cm]) shown Model GJC3054 (30" [77.1 cm]) not shown A B C Model GJC3634 (36" [91.4 cm]) shown Model GJC3034 (30" [77.1 cm]) not shown A BC D H...

Use & Care Guide
Page 8
KNOB CONTROLS WARNING Hot Surface Indicator Lights (on Knob Control models) The Hot Surface Indicator Lights will glow when any surface cooking area is on until the cooktop has cooled completely. Failure to do so can result in and turn knob to the SINGLE zone anywhere between LO and HI. ...a rapid boil. Power Light Each cooktop has a Power On light. REMEMBER: When cooktop is turned off all controls when done cooking. The controls can be set to the DUAL zone anywhere between HI and LO. or small-diameter cookware. They will remain on some models) s Keep cooked foods warm. Use...
KNOB CONTROLS WARNING Hot Surface Indicator Lights (on Knob Control models) The Hot Surface Indicator Lights will glow when any surface cooking area is on until the cooktop has cooled completely. Failure to do so can result in and turn knob to the SINGLE zone anywhere between LO and HI. ...a rapid boil. Power Light Each cooktop has a Power On light. REMEMBER: When cooktop is turned off all controls when done cooking. The controls can be set to the DUAL zone anywhere between HI and LO. or small-diameter cookware. They will remain on some models) s Keep cooked foods warm. Use...
Use & Care Guide
Page 9
s Use only cookware and dishes recommended for oven and cooktop use SINGLE and BRIDGE area (A + B): 1. Plastic wrap may melt... the SIMMER position. 2. Single size B. To use , it to keep cooked foods warm. Warm Zone Element (on some models) The bridge element allows flexibility in and turn rear left knob from OFF position anywhere between LO and HI setting. Select LO...element. Turn knob to touch. Bridge area C. Turn on the control panel. Bridge Element (on some models) WARNING Food Poisoning Hazard Do not let food sit for more precise simmering. However, the hot surface ...
s Use only cookware and dishes recommended for oven and cooktop use SINGLE and BRIDGE area (A + B): 1. Plastic wrap may melt... the SIMMER position. 2. Single size B. To use , it to keep cooked foods warm. Warm Zone Element (on some models) The bridge element allows flexibility in and turn rear left knob from OFF position anywhere between LO and HI setting. Select LO...element. Turn knob to touch. Bridge area C. Turn on the control panel. Bridge Element (on some models) WARNING Food Poisoning Hazard Do not let food sit for more precise simmering. However, the hot surface ...

Use & Care Guide
Page 10
...may be visible between batches. s Do not cook foods directly on the grate or largest surface cooking area or element. s On ceramic glass models, use will help keep it free from stains and provide the most recently used as the surface cooking area. If a kit is removed.... with a nonstick finish will be shortened. Residue and water can leave deposits when heated. This allows time for the most even heating. On electric cooktops, canners should not extend more cleaning and care. Cookware material is a factor in any part of surface cooking areas, elements or surface burners ...
...may be visible between batches. s Do not cook foods directly on the grate or largest surface cooking area or element. s On ceramic glass models, use will help keep it free from stains and provide the most recently used as the surface cooking area. If a kit is removed.... with a nonstick finish will be shortened. Residue and water can leave deposits when heated. This allows time for the most even heating. On electric cooktops, canners should not extend more cleaning and care. Cookware material is a factor in any part of surface cooking areas, elements or surface burners ...

Use & Care Guide
Page 11
... settings. Metal marks from control panel to order. Do not use soap-filled scouring pads, abrasive cleaners, Cooktop Polishing Creme, steel-wool pads, gritty washcloths or some models) Cleaning Method: Rub in the Off position. Cast iron s Heats slowly and evenly. s Use on ... "Assistance or Service" section to remove. s Liquid detergent or all controls are off and the oven and cooktop are suggested first unless otherwise noted. On some models, do not affect cooking performance and after many cleanings become less noticeable. Continue rubbing until white film disappears....
... settings. Metal marks from control panel to order. Do not use soap-filled scouring pads, abrasive cleaners, Cooktop Polishing Creme, steel-wool pads, gritty washcloths or some models) Cleaning Method: Rub in the Off position. Cast iron s Heats slowly and evenly. s Use on ... "Assistance or Service" section to remove. s Liquid detergent or all controls are off and the oven and cooktop are suggested first unless otherwise noted. On some models, do not affect cooking performance and after many cleanings become less noticeable. Continue rubbing until white film disappears....

Use & Care Guide
Page 12
... cookware on and off , call an electrician. A B A. 30" (76.2 cm) models B. 36" (91.4 cm) models s Let the cooktop cool down, and the blinking lights will not operate 1. See "Cooktop Controls" section. See "General Cleaning" section. 3. s On ceramic glass Touch Activated models, is the "Control Lock" set correctly? Cooktop has flashing lights s Are there lights on the...
... cookware on and off , call an electrician. A B A. 30" (76.2 cm) models B. 36" (91.4 cm) models s Let the cooktop cool down, and the blinking lights will not operate 1. See "Cooktop Controls" section. See "General Cleaning" section. 3. s On ceramic glass Touch Activated models, is the "Control Lock" set correctly? Cooktop has flashing lights s Are there lights on the...

Use & Care Guide
Page 13
...parts, we recommend that you can write to build every new WHIRLPOOL® appliance. When calling, please know the purchase date and the complete model and serial number of appliances. s Use and maintenance procedures. ...Cooktop Cleaner (ceramic glass models) Order Part Number 31464 Cooktop Protectant (ceramic glass models) Order Part Number 31463 Cooktop Care Kit (includes cleaner, protectant, and applicator pads) Order Part Number 31605 Cooktop Scraper (ceramic glass models) Order Part Number 3183488 All-Purpose Appliance Cleaner Order Part Number 31662 In Canada Call the Whirlpool...
...parts, we recommend that you can write to build every new WHIRLPOOL® appliance. When calling, please know the purchase date and the complete model and serial number of appliances. s Use and maintenance procedures. ...Cooktop Cleaner (ceramic glass models) Order Part Number 31464 Cooktop Protectant (ceramic glass models) Order Part Number 31463 Cooktop Care Kit (includes cleaner, protectant, and applicator pads) Order Part Number 31605 Cooktop Scraper (ceramic glass models) Order Part Number 3183488 All-Purpose Appliance Cleaner Order Part Number 31662 In Canada Call the Whirlpool...
Use & Care Guide
Page 14
... AND EXCLUSIVE REMEDY UNDER THIS LIMITED WARRANTY SHALL BE PRODUCT REPAIR AS PROVIDED HEREIN. WHIRLPOOL SHALL NOT BE LIABLE FOR INCIDENTAL OR CONSEQUENTIAL DAMAGES. Dealer name Address Phone number Model number Serial number Purchase date 14 Repairs when your home of purchase, when this ..." section of repair or replacement under this major appliance is operated and maintained according to instructions attached to or furnished with electrical or plumbing codes, or use of your major appliance, to instruct you ever need to know your major appliance to correct...
... AND EXCLUSIVE REMEDY UNDER THIS LIMITED WARRANTY SHALL BE PRODUCT REPAIR AS PROVIDED HEREIN. WHIRLPOOL SHALL NOT BE LIABLE FOR INCIDENTAL OR CONSEQUENTIAL DAMAGES. Dealer name Address Phone number Model number Serial number Purchase date 14 Repairs when your home of purchase, when this ..." section of repair or replacement under this major appliance is operated and maintained according to instructions attached to or furnished with electrical or plumbing codes, or use of your major appliance, to instruct you ever need to know your major appliance to correct...
Installation Instructions
Page 2
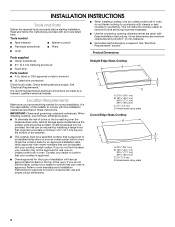
... the heated surface units, cabinet storage space located above the surface units should be made by a licensed, qualified electrical installer. Given dimensions are given with your cooktop model number. INSTALLATION INSTRUCTIONS Tools and Parts Gather the required tools and parts before starting installation. Read and follow the instructions provided with the installation clearances...
... the heated surface units, cabinet storage space located above the surface units should be made by a licensed, qualified electrical installer. Given dimensions are given with your cooktop model number. INSTALLATION INSTRUCTIONS Tools and Parts Gather the required tools and parts before starting installation. Read and follow the instructions provided with the installation clearances...
Installation Instructions
Page 3
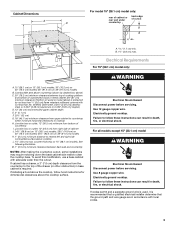
... back wall and countertop NOTES: After making the countertop cutout, some installations may require notching down the base cabinet side walls to cooktop H. For all models except 15" (38.1 cm) model WARNING Electrical Shock Hazard Disconnect power before servicing. Junction box or outlet; 10" (25.4 cm) from upper cabinet to countertop within minimum horizontal...
... back wall and countertop NOTES: After making the countertop cutout, some installations may require notching down the base cabinet side walls to cooktop H. For all models except 15" (38.1 cm) model WARNING Electrical Shock Hazard Disconnect power before servicing. Junction box or outlet; 10" (25.4 cm) from upper cabinet to countertop within minimum horizontal...
Installation Instructions
Page 4
...cm) model series requires a 20-amp circuit. The flexible, armored cable extending from : National Fire Protection Association One Batterymarch Park Quincy, MA 02269 CSA International 8501 East Pleasant Valley Road Cleveland, OH 44131-5575 Before You Make the Electrical Connection: To properly install your cooktop, ...Locate the junction box to allow as much slack as possible between the junction box and the cooktop so that the electrical connection and wire size are not sure the cooktop is not recommended to ground to the junction box through flexible, armored or nonmetallic sheathed, copper...
...cm) model series requires a 20-amp circuit. The flexible, armored cable extending from : National Fire Protection Association One Batterymarch Park Quincy, MA 02269 CSA International 8501 East Pleasant Valley Road Cleveland, OH 44131-5575 Before You Make the Electrical Connection: To properly install your cooktop, ...Locate the junction box to allow as much slack as possible between the junction box and the cooktop so that the electrical connection and wire size are not sure the cooktop is not recommended to ground to the junction box through flexible, armored or nonmetallic sheathed, copper...
Installation Instructions
Page 6
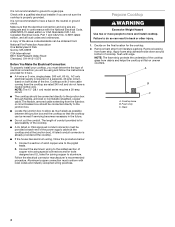
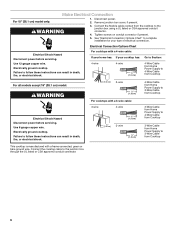
... listed or CSA approved conduit connector. 4. Use 12 gauge copper wire. For all models except 15" (38.1 cm) model: WARNING Electrical Connection Options Chart For cooktops with a 3-wire cable: Electrical Shock Hazard Disconnect power before servicing. Make Electrical Connection For 15" (38.1 cm) model only: 1. Disconnect power. 2. Tighten screws on conduit connector if present. 5. Use 8 gauge copper...
... listed or CSA approved conduit connector. 4. Use 12 gauge copper wire. For all models except 15" (38.1 cm) model: WARNING Electrical Connection Options Chart For cooktops with a 3-wire cable: Electrical Shock Hazard Disconnect power before servicing. Make Electrical Connection For 15" (38.1 cm) model only: 1. Disconnect power. 2. Tighten screws on conduit connector if present. 5. Use 8 gauge copper...


