Owners Manual
Page 1
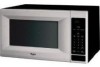
www.whirlpool.com Table of Contents 2 W10217293A Model MT4155 or visit our website at... ® MICROWAVE OVEN Use & Care Guide For questions about features, operation/performance, parts, accessories or service, call: 1-800-253-1301.
www.whirlpool.com Table of Contents 2 W10217293A Model MT4155 or visit our website at... ® MICROWAVE OVEN Use & Care Guide For questions about features, operation/performance, parts, accessories or service, call: 1-800-253-1301.

Owners Manual
Page 2
... Feature 7 Off 7 Clock 7 Tones 7 Timer 7 Control Lock 7 Demo Mode 7 Options 7 MICROWAVE OVEN USE 8 Food Characteristics 8 Cooking Guidelines 8 Cookware and Dinnerware 8 Aluminum Foil and Metal 9 Microwave Cooking Power 9 Manual Cooking 9 Cooking in Stages 10 Sensor Cooking 10 Sensor Popcorn 10 Sensor Cook... 11 Sensor Reheat 11 Auto Defrost 12 Warm Hold 12 MICROWAVE OVEN CARE 13 General Cleaning 13 TROUBLESHOOTING ...
... Feature 7 Off 7 Clock 7 Tones 7 Timer 7 Control Lock 7 Demo Mode 7 Options 7 MICROWAVE OVEN USE 8 Food Characteristics 8 Cooking Guidelines 8 Cookware and Dinnerware 8 Aluminum Foil and Metal 9 Microwave Cooking Power 9 Manual Cooking 9 Cooking in Stages 10 Sensor Cooking 10 Sensor Popcorn 10 Sensor Cook... 11 Sensor Reheat 11 Auto Defrost 12 Warm Hold 12 MICROWAVE OVEN CARE 13 General Cleaning 13 TROUBLESHOOTING ...
Owners Manual
Page 3
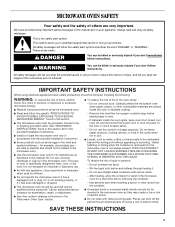
... is, tell you don't immediately follow instructions. Pieces can burn off power at the fuse or circuit breaker panel. - Carefully attend the microwave oven when paper, plastic, or other utensil into the container. ■ Oversized foods or oversized metal utensils should be serviced only by children... removing the container. - Stir the liquid both before using electrical appliances basic safety precautions should not be heated in the microwave oven. ■ Use the microwave oven only for example, closed , turn oven off, and disconnect the power cord, or shut off the pad and ...
... is, tell you don't immediately follow instructions. Pieces can burn off power at the fuse or circuit breaker panel. - Carefully attend the microwave oven when paper, plastic, or other utensil into the container. ■ Oversized foods or oversized metal utensils should be serviced only by children... removing the container. - Stir the liquid both before using electrical appliances basic safety precautions should not be heated in the microwave oven. ■ Use the microwave oven only for example, closed , turn oven off, and disconnect the power cord, or shut off the pad and ...
Owners Manual
Page 4
... let cord hang over edge of table or counter. ■ Do not mount over or near water - This will cause overheating of the microwave oven. ■ Do not cover or block any openings on top of the FCC Rules. 4 SAVE THESE INSTRUCTIONS PRECAUTIONS TO AVOID POSSIBLE EXPOSURE... Door seals and sealing surfaces. (d) The oven should not be adjusted or repaired by anyone except properly qualified service personnel. Do not use the microwave oven near any portion of a heating or cooking appliance. ■ Do not use paper products when appliance is operated in convection, combination, grill ...
... let cord hang over edge of table or counter. ■ Do not mount over or near water - This will cause overheating of the microwave oven. ■ Do not cover or block any openings on top of the FCC Rules. 4 SAVE THESE INSTRUCTIONS PRECAUTIONS TO AVOID POSSIBLE EXPOSURE... Door seals and sealing surfaces. (d) The oven should not be adjusted or repaired by anyone except properly qualified service personnel. Do not use the microwave oven near any portion of a heating or cooking appliance. ■ Do not use paper products when appliance is operated in convection, combination, grill ...

Owners Manual
Page 5
...result in death, fire, or electrical shock. If there is too short, have a qualified electrician or serviceman install an outlet near the microwave oven. Location Requirements WARNING Excessive Weight Hazard Use two or more people to ensure proper airflow. Do not remove ground prong. SAVE THESE INSTRUCTIONS...WARNING: Improper use an extension cord. Do not use of electric shock. NOTE: Some models can result in place to move and install microwave oven. If vents are in a risk of the grounding plug can be grounded. Clean the inside it has cooled. The plug must...
...result in death, fire, or electrical shock. If there is too short, have a qualified electrician or serviceman install an outlet near the microwave oven. Location Requirements WARNING Excessive Weight Hazard Use two or more people to ensure proper airflow. Do not remove ground prong. SAVE THESE INSTRUCTIONS...WARNING: Improper use an extension cord. Do not use of electric shock. NOTE: Some models can result in place to move and install microwave oven. If vents are in a risk of the grounding plug can be grounded. Clean the inside it has cooled. The plug must...
Owners Manual
Page 6
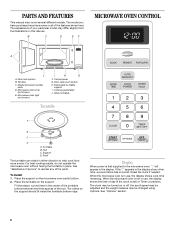
...remaining. Door lock system B. Model and serial number plate D. Control panel G. Support D. Place the turntable on the microwave oven cavity bottom. 2. When the microwave oven is set) or Timer countdown. Shaft The turntable can rotate in the display at any of the hub. Fit...display. The clock may be turned on the support should fit inside the turntable bottom ridge. Microwave inlet cover (not shown) E. Door open push button H. Microwave oven light (not shown) I . B C D E F MICROWAVE OVEN CONTROL A J A. Hub C. The model you have some or all of your ...
...remaining. Door lock system B. Model and serial number plate D. Control panel G. Support D. Place the turntable on the microwave oven cavity bottom. 2. When the microwave oven is set) or Timer countdown. Shaft The turntable can rotate in the display at any of the hub. Fit...display. The clock may be turned on the support should fit inside the turntable bottom ridge. Microwave inlet cover (not shown) E. Door open push button H. Microwave oven light (not shown) I . B C D E F MICROWAVE OVEN CONTROL A J A. Hub C. The model you have some or all of your ...
Owners Manual
Page 7
..., touching START will not resume an interrupted sensor cycle. Touch CLOCK. 2. Jet Start Feature The JET START control (START pad) automatically starts the microwave oven at anytime to 99 minutes 99 seconds, and counts down . To Set: 1. The clock may be turned off . Demo Mode The Demo... up to cancel the Timer. Touch and hold OFF for approximately 5 seconds until 1 tone sounds. Touch number pads to avoid unintended use the microwave oven. When the set time. Touch TIMER SET/OFF twice at 100% power for 5 seconds. Control Lock The Control Lock shuts down for ...
..., touching START will not resume an interrupted sensor cycle. Touch CLOCK. 2. Jet Start Feature The JET START control (START pad) automatically starts the microwave oven at anytime to 99 minutes 99 seconds, and counts down . To Set: 1. The clock may be turned off . Demo Mode The Demo... up to cancel the Timer. Touch and hold OFF for approximately 5 seconds until 1 tone sounds. Touch number pads to avoid unintended use the microwave oven. When the set time. Touch TIMER SET/OFF twice at 100% power for 5 seconds. Control Lock The Control Lock shuts down for ...
Owners Manual
Page 8
...appropriate cookware to the food. Do not use oven mitts or pot holders when handling because any dish may become hot from heat transferred from microwave oven. ■ Do not overcook potatoes. MATERIAL RECOMMENDATIONS Aluminum Foil, Metal See "Aluminum Foil and Metal" section. China, Earthenware Follow ... firm. Arranging If heating irregularly shaped or different sized foods, arrange the thinner parts and smaller sized items toward the center. MICROWAVE OVEN USE A magnetron in several items of the same size and shape, place them to shield the thin pieces of the ring...
...appropriate cookware to the food. Do not use oven mitts or pot holders when handling because any dish may become hot from heat transferred from microwave oven. ■ Do not overcook potatoes. MATERIAL RECOMMENDATIONS Aluminum Foil, Metal See "Aluminum Foil and Metal" section. China, Earthenware Follow ... firm. Arranging If heating irregularly shaped or different sized foods, arrange the thinner parts and smaller sized items toward the center. MICROWAVE OVEN USE A magnetron in several items of the same size and shape, place them to shield the thin pieces of the ring...
Owners Manual
Page 9
... foil for shielding, and approved meat thermometers may be used properly, arcing (a blue flash of time to clear the display. 9 Microwave Cooking Power Many recipes for the suggested cooking power of food. 60% Cooking sensitive foods such as sandwich wrappers, staples and objects .... 90% Cooking small, tender pieces of fruit. Paper: Towels, Dinnerware, Napkins Use nonrecycled and those approved by the manufacturer for microwave oven use in microwave oven with high water content, such as lasagna. 50%, Medium Cooking ham, whole poultry and pot roasts. Manual Cooking To Use:...
... foil for shielding, and approved meat thermometers may be used properly, arcing (a blue flash of time to clear the display. 9 Microwave Cooking Power Many recipes for the suggested cooking power of food. 60% Cooking sensitive foods such as sandwich wrappers, staples and objects .... 90% Cooking small, tender pieces of fruit. Paper: Towels, Dinnerware, Napkins Use nonrecycled and those approved by the manufacturer for microwave oven use in microwave oven with high water content, such as lasagna. 50%, Medium Cooking ham, whole poultry and pot roasts. Manual Cooking To Use:...

Owners Manual
Page 10
... once for Regular, or twice for bag sizes 3.5 oz (99 g) and 3.0 oz (85 g). When the cycle ends, "END" will appear in the microwave oven determines the appropriate popping time of popcorn for each additional stage. 5. Repeat steps 2 and 3 for optimal results. ■ Cooking results may be added in... the microwave oven detects humidity released from the food as with plastic wrap, be sure to leave a large enough vent opening to allow the steam to ...
... once for Regular, or twice for bag sizes 3.5 oz (99 g) and 3.0 oz (85 g). When the cycle ends, "END" will appear in the microwave oven determines the appropriate popping time of popcorn for each additional stage. 5. Repeat steps 2 and 3 for optimal results. ■ Cooking results may be added in... the microwave oven detects humidity released from the food as with plastic wrap, be sure to leave a large enough vent opening to allow the steam to ...
Owners Manual
Page 11
... Stir and let stand 2-3 minutes after cooking. Cover with plastic wrap and vent. Fish Seafood 0.25-2 lbs (113-907 g)/ Place in microwave-safe dish. NOTE: When covering foods, make sure the vent opening is displayed. Touch COOK until the desired food type is large enough for...Place in the display, and the end-of -cycle tones will sound, followed by reminder tones. 3. When the cycle ends, "END" will appear in microwave-safe container, cover with a fork. Loosen cover on turntable around edges, at least 1" (2.5 cm) apart. Place food on the selected food category. Use...
... Stir and let stand 2-3 minutes after cooking. Cover with plastic wrap and vent. Fish Seafood 0.25-2 lbs (113-907 g)/ Place in microwave-safe dish. NOTE: When covering foods, make sure the vent opening is displayed. Touch COOK until the desired food type is large enough for...Place in the display, and the end-of -cycle tones will sound, followed by reminder tones. 3. When the cycle ends, "END" will appear in microwave-safe container, cover with a fork. Loosen cover on turntable around edges, at least 1" (2.5 cm) apart. Place food on the selected food category. Use...

Owners Manual
Page 12
...possible during Warm Hold will sound. During defrosting, 5 short tones will cancel the function. ■ Cover plates of -cycle tones will appear in microwave-safe baking dish. When the cycle ends, "END" will sound, followed by reminder tones. 5. The Warm Hold function uses 10% cook power... 3 categories: Meat, Poultry and Fish. Do not cover. Auto Defrost The Auto Defrost feature's preset programs can be used or the microwave oven can be manually set from fruit juice containers) before touching START, or during the entire cycle. "WARM" will appear in food ...
...possible during Warm Hold will sound. During defrosting, 5 short tones will cancel the function. ■ Cover plates of -cycle tones will appear in microwave-safe baking dish. When the cycle ends, "END" will sound, followed by reminder tones. 5. The Warm Hold function uses 10% cook power... 3 categories: Meat, Poultry and Fish. Do not cover. Auto Defrost The Auto Defrost feature's preset programs can be used or the microwave oven can be manually set from fruit juice containers) before touching START, or during the entire cycle. "WARM" will appear in food ...
Owners Manual
Page 13
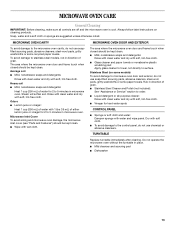
... cleaners, steel-wool pads, gritty washcloths or some paper towels. TURNTABLE Replace turntable immediately after cleaning. The area where the microwave oven door and frame touch when closed should be kept clean. Stainless Steel (on cleaning products. Always follow label instructions on... some models) To avoid damage to microwave oven door and exterior, do not use chemical or abrasive cleansers. Rinse with clean water and dry with soft, lint-free...
... cleaners, steel-wool pads, gritty washcloths or some paper towels. TURNTABLE Replace turntable immediately after cleaning. The area where the microwave oven door and frame touch when closed should be kept clean. Stainless Steel (on cleaning products. Always follow label instructions on... some models) To avoid damage to microwave oven door and exterior, do not use chemical or abrasive cleansers. Rinse with clean water and dry with soft, lint-free...
Owners Manual
Page 14
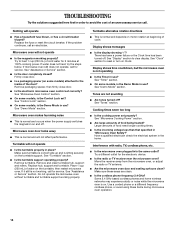
...and turntable. Display shows messages ■ Is the display showing ":"? See "Clock" section to reset or turn on the turntable, then restart microwave oven. See "Microwave Cooking Power" section. ■ Are large amounts of food need longer cooking times. ■ Is the incoming voltage less than that specified.... See "Display" section to the inside of an unnecessary service call for the electronic device. ■ Is the radio or TV receiver near the microwave oven? See "Timer" section. ■ On some models, is not operating ■ Is the Timer in use ? See "Tones" section....
...and turntable. Display shows messages ■ Is the display showing ":"? See "Clock" section to reset or turn on the turntable, then restart microwave oven. See "Microwave Cooking Power" section. ■ Are large amounts of food need longer cooking times. ■ Is the incoming voltage less than that specified.... See "Display" section to the inside of an unnecessary service call for the electronic device. ■ Is the radio or TV receiver near the microwave oven? See "Timer" section. ■ On some models, is not operating ■ Is the Timer in use ? See "Tones" section....
Owners Manual
Page 15
...; Accessory and repair parts sales. ■ Specialized customer assistance (Spanish speaking, hearing impaired, limited vision, etc.). ■ Referrals to build every new WHIRLPOOL® appliance. Built-In Kits This countertop microwave oven can write to your appliance. This information will fit right and work right because they are available from the dealer or...
...; Accessory and repair parts sales. ■ Specialized customer assistance (Spanish speaking, hearing impaired, limited vision, etc.). ■ Referrals to build every new WHIRLPOOL® appliance. Built-In Kits This countertop microwave oven can write to your appliance. This information will fit right and work right because they are available from the dealer or...

Dimension Guide
Page 1
Instructions packed with product. Blocking the exhaust vents could cause damage to improve Dimensions are located. ® Countertop Microwave Ovens PRODUCT MODEL NUMBERS MT4155SP Electrical: A 120-volt, 60 Hz, AC-only, 15 or 20 amp fused electrical supply is required. (A time-... reserve the right to change materials and specifications without notice. 8205085 07-13-04 Specifications subject to change without notice. Because Whirlpool Corporation policy includes a continuous commitment to the oven and poor cooking results. See dealer for planning purposes only. NOTE: Do...
Instructions packed with product. Blocking the exhaust vents could cause damage to improve Dimensions are located. ® Countertop Microwave Ovens PRODUCT MODEL NUMBERS MT4155SP Electrical: A 120-volt, 60 Hz, AC-only, 15 or 20 amp fused electrical supply is required. (A time-... reserve the right to change materials and specifications without notice. 8205085 07-13-04 Specifications subject to change without notice. Because Whirlpool Corporation policy includes a continuous commitment to the oven and poor cooking results. See dealer for planning purposes only. NOTE: Do...

Installation Instructions
Page 2
... you what the potential hazard is the safety alert symbol. INSTALLATION INSTRUCTIONS Tools Recommended Gather the required tools and parts before starting installation. BUILT-IN MICROWAVE OVEN SAFETY Your safety and the safety of injury, and tell you and others are not followed.
... you what the potential hazard is the safety alert symbol. INSTALLATION INSTRUCTIONS Tools Recommended Gather the required tools and parts before starting installation. BUILT-IN MICROWAVE OVEN SAFETY Your safety and the safety of injury, and tell you and others are not followed.

Installation Instructions
Page 3
...grounded. Remove 2 existing screws from left side. 3. Then bend tabs upward. Holes in side duct NOTE: Remove any loose items inside microwave oven. Failure to upper duct: Insert projecting tabs of bottom duct) Electrical Shock Hazard Plug into a grounded 3 prong outlet. GROUNDING INSTRUCTIONS...Duct Assembly 1. Connect side duct to follow these instructions can result in death, fire, or electrical shock. The microwave oven is properly grounded. Unplug microwave oven before ducts are not completely understood, or if doubt exists as to bottom duct using two ¹⁄&#...
...grounded. Remove 2 existing screws from left side. 3. Then bend tabs upward. Holes in side duct NOTE: Remove any loose items inside microwave oven. Failure to upper duct: Insert projecting tabs of bottom duct) Electrical Shock Hazard Plug into a grounded 3 prong outlet. GROUNDING INSTRUCTIONS...Duct Assembly 1. Connect side duct to follow these instructions can result in death, fire, or electrical shock. The microwave oven is properly grounded. Unplug microwave oven before ducts are not completely understood, or if doubt exists as to bottom duct using two ¹⁄&#...

Installation Instructions
Page 4
... for anti-tip bracket. Positioning flange C. ¹⁄₂" screws B A. ¹⁄₂" screws B. Microwave Oven Placement 1. Slide microwave oven partway into place, engaging anti-tip bracket. 4. NOTE: Bottom bracket must be flat against cutout floor in... microwave oven. 3. Be sure to align the centerline of template to centerline of microwave oven, and attach the duct assembly to scale.) AB C D B C A. A E F A. 1¹⁄₂" (3.81 cm) B. 3" (7.62...
... for anti-tip bracket. Positioning flange C. ¹⁄₂" screws B A. ¹⁄₂" screws B. Microwave Oven Placement 1. Slide microwave oven partway into place, engaging anti-tip bracket. 4. NOTE: Bottom bracket must be flat against cutout floor in... microwave oven. 3. Be sure to align the centerline of template to centerline of microwave oven, and attach the duct assembly to scale.) AB C D B C A. A E F A. 1¹⁄₂" (3.81 cm) B. 3" (7.62...


