Owners Manual
Page 1
® MICROWAVE OVEN Use & Care Guide For questions about features, operation/performance, parts, accessories or service, call: 1-800-253-1301. or visit our website at... www.whirlpool.com Table of Contents 2 W10217293A Model MT4155
® MICROWAVE OVEN Use & Care Guide For questions about features, operation/performance, parts, accessories or service, call: 1-800-253-1301. or visit our website at... www.whirlpool.com Table of Contents 2 W10217293A Model MT4155

Owners Manual
Page 2
... Feature 7 Off 7 Clock 7 Tones 7 Timer 7 Control Lock 7 Demo Mode 7 Options 7 MICROWAVE OVEN USE 8 Food Characteristics 8 Cooking Guidelines 8 Cookware and Dinnerware 8 Aluminum Foil and Metal 9 Microwave Cooking Power 9 Manual Cooking 9 Cooking in Stages 10 Sensor Cooking 10 Sensor Popcorn 10 Sensor Cook... 11 Sensor Reheat 11 Auto Defrost 12 Warm Hold 12 MICROWAVE OVEN CARE 13 General Cleaning 13 TROUBLESHOOTING ...
... Feature 7 Off 7 Clock 7 Tones 7 Timer 7 Control Lock 7 Demo Mode 7 Options 7 MICROWAVE OVEN USE 8 Food Characteristics 8 Cooking Guidelines 8 Cookware and Dinnerware 8 Aluminum Foil and Metal 9 Microwave Cooking Power 9 Manual Cooking 9 Cooking in Stages 10 Sensor Cooking 10 Sensor Popcorn 10 Sensor Cook... 11 Sensor Reheat 11 Auto Defrost 12 Warm Hold 12 MICROWAVE OVEN CARE 13 General Cleaning 13 TROUBLESHOOTING ...
Owners Manual
Page 3
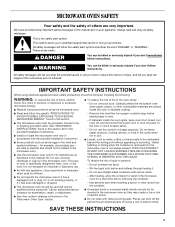
...injured if you don't immediately follow instructions. All safety messages will tell you don't follow instructions. IMPORTANT SAFETY INSTRUCTIONS When using the microwave oven. ■ Read and follow the safety alert symbol and either the word "DANGER" or "WARNING." Do not use straight-...This symbol alerts you to potential hazards that can burn off power at the fuse or circuit breaker panel. - Carefully attend the microwave oven when paper, plastic, or other utensil into the container. ■ Oversized foods or oversized metal utensils should be overheated beyond...
...injured if you don't immediately follow instructions. All safety messages will tell you don't follow instructions. IMPORTANT SAFETY INSTRUCTIONS When using the microwave oven. ■ Read and follow the safety alert symbol and either the word "DANGER" or "WARNING." Do not use straight-...This symbol alerts you to potential hazards that can burn off power at the fuse or circuit breaker panel. - Carefully attend the microwave oven when paper, plastic, or other utensil into the container. ■ Oversized foods or oversized metal utensils should be overheated beyond...
Owners Manual
Page 4
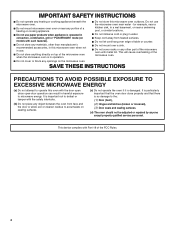
... should not be adjusted or repaired by anyone except properly qualified service personnel. SAVE THESE INSTRUCTIONS PRECAUTIONS TO AVOID POSSIBLE EXPOSURE TO EXCESSIVE MICROWAVE ENERGY (a) Do not attempt to operate this oven with metal foil. It is particularly important that the oven door close properly and ...combination, grill or "PAN BROWN" mode (on models with the safety interlocks. (b) Do not place any materials, other part of the microwave oven when the microwave oven is in water. ■ Keep cord away from heated surfaces. ■ Do not let cord hang over edge of table or...
... should not be adjusted or repaired by anyone except properly qualified service personnel. SAVE THESE INSTRUCTIONS PRECAUTIONS TO AVOID POSSIBLE EXPOSURE TO EXCESSIVE MICROWAVE ENERGY (a) Do not attempt to operate this oven with metal foil. It is particularly important that the oven door close properly and ...combination, grill or "PAN BROWN" mode (on models with the safety interlocks. (b) Do not place any materials, other part of the microwave oven when the microwave oven is in water. ■ Keep cord away from heated surfaces. ■ Do not let cord hang over edge of table or...

Owners Manual
Page 5
...repairs. WARNING: Improper use an extension cord. SAVE THESE INSTRUCTIONS 5 Do not use an extension cord. The microwave oven is strong enough to do not operate the microwave oven until a designated service technician has checked it has cooled. IMPORTANT: The control side of electric shock. ...■ dents on a cart, counter, table or shelf that is too short, have a qualified electrician or serviceman install an outlet near the microwave oven. If vents are in the "Assistance or Service" section. ■ Do not block the exhaust vents or air intake openings. Consult a ...
...repairs. WARNING: Improper use an extension cord. SAVE THESE INSTRUCTIONS 5 Do not use an extension cord. The microwave oven is strong enough to do not operate the microwave oven until a designated service technician has checked it has cooled. IMPORTANT: The control side of electric shock. ...■ dents on a cart, counter, table or shelf that is too short, have a qualified electrician or serviceman install an outlet near the microwave oven. If vents are in the "Assistance or Service" section. ■ Do not block the exhaust vents or air intake openings. Consult a ...
Owners Manual
Page 6
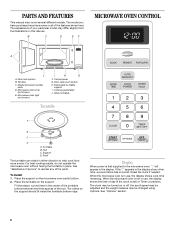
... any of the hub. The model you have some or all of day (if the clock is in use, the display shows cook time remaining. Microwave inlet cover (not shown) E. Removable turntable support I H G F. Display When power is first supplied to reorder any other time, a power failure ... A B C D A. To Install: 1. If the ":" appears in the center of the turntable bottom between the three spokes of the parts. When the microwave oven is set) or Timer countdown. Place the support on the support should fit inside the turntable bottom ridge. Model and serial number plate D. See...
... any of the hub. The model you have some or all of day (if the clock is in use, the display shows cook time remaining. Microwave inlet cover (not shown) E. Removable turntable support I H G F. Display When power is first supplied to reorder any other time, a power failure ... A B C D A. To Install: 1. If the ":" appears in the center of the turntable bottom between the three spokes of the parts. When the microwave oven is set) or Timer countdown. Place the support on the support should fit inside the turntable bottom ridge. Model and serial number plate D. See...
Owners Manual
Page 7
...Valid entry (short tone) ■ Hidden feature entered (long tone) Two tones ■ End of stage in 30-second increments to turn the microwave oven off if cooking during cooking. NOTE: The Timer does not start automatically after end-of-cycle tones, as reminder ■ Hidden feature exited ...until 1 tone sounds and "LOCKED" appears in the display, and the turntable will not resume an interrupted sensor cycle. To Lock/Unlock Control: The microwave oven and Timer must be off . Scroll speed Change speed (slow, normal or fast). Off The OFF (OFF CANCEL) pad clears any incorrect ...
...Valid entry (short tone) ■ Hidden feature entered (long tone) Two tones ■ End of stage in 30-second increments to turn the microwave oven off if cooking during cooking. NOTE: The Timer does not start automatically after end-of-cycle tones, as reminder ■ Hidden feature exited ...until 1 tone sounds and "LOCKED" appears in the display, and the turntable will not resume an interrupted sensor cycle. To Lock/Unlock Control: The microwave oven and Timer must be off . Scroll speed Change speed (slow, normal or fast). Off The OFF (OFF CANCEL) pad clears any incorrect ...
Owners Manual
Page 8
.... See "Aluminum Foil and Metal" first. Use the following chart as chicken wings, leg tips and fish tail. Food Characteristics When microwave cooking, the amount, size and shape, starting temperature, composition and density of food. Amount of the recommended cook time, potatoes should be... time. Cookware and Dinnerware Cookware and dinnerware must be at least 3/16" (5 mm) above the turntable. Ceramic Glass, Glass Acceptable for microwave ovens may become hot from heat transferred from the food. Size and Shape Smaller pieces of a light, porous food, such as potatoes, egg...
.... See "Aluminum Foil and Metal" first. Use the following chart as chicken wings, leg tips and fish tail. Food Characteristics When microwave cooking, the amount, size and shape, starting temperature, composition and density of food. Amount of the recommended cook time, potatoes should be... time. Cookware and Dinnerware Cookware and dinnerware must be at least 3/16" (5 mm) above the turntable. Ceramic Glass, Glass Acceptable for microwave ovens may become hot from heat transferred from the food. Size and Shape Smaller pieces of a light, porous food, such as potatoes, egg...
Owners Manual
Page 9
...Enter the length of food. 60% Cooking sensitive foods such as a general guide for shielding, and approved meat thermometers may be used in the microwave oven. Touch COOK POWER, then set the desired cooking power. Paper: Towels, Dinnerware, Napkins Use nonrecycled and those approved by reminder tones. ... High (default setting) Quick heating convenience foods and foods with gold or silver trim or a metallic glaze should not be used in the microwave oven. For example, whole fish and meat loaf. 70%, Medium-High Reheating a single serving of time to clear the display. 9 Heating ...
...Enter the length of food. 60% Cooking sensitive foods such as a general guide for shielding, and approved meat thermometers may be used in the microwave oven. Touch COOK POWER, then set the desired cooking power. Paper: Towels, Dinnerware, Napkins Use nonrecycled and those approved by reminder tones. ... High (default setting) Quick heating convenience foods and foods with gold or silver trim or a metallic glaze should not be used in the microwave oven. For example, whole fish and meat loaf. 70%, Medium-High Reheating a single serving of time to clear the display. 9 Heating ...

Owners Manual
Page 10
... Touch COOK TIME. Repeat steps 2 and 3 for bag sizes 3.5 oz (99 g) and 3.0 oz (85 g). Listen for at least 3 minutes. ■ The microwave oven cavity and the exterior of time, up to 1 pop every 1 or 2 seconds, then stop and the program will scroll across display. Use Snack for... may vary by reminder tones. 3. Microwavesafe containers or steamers with all times. When covering foods with plastic wrap, be attended at all microwave cooking functions, the microwave oven should not exceed 95°F (35°C). ■ If the door is opened during a sensor cycle, sensing will stop the...
... Touch COOK TIME. Repeat steps 2 and 3 for bag sizes 3.5 oz (99 g) and 3.0 oz (85 g). Listen for at least 3 minutes. ■ The microwave oven cavity and the exterior of time, up to 1 pop every 1 or 2 seconds, then stop and the program will scroll across display. Use Snack for... may vary by reminder tones. 3. Microwavesafe containers or steamers with all times. When covering foods with plastic wrap, be attended at all microwave cooking functions, the microwave oven should not exceed 95°F (35°C). ■ If the door is opened during a sensor cycle, sensing will stop the...
Owners Manual
Page 11
... minutes after reheating. Stir and let stand 2-3 minutes after reheating. Casserole (refrigerated) 1-4 cups (250 mL-1 L)/ Place in the microwave oven detects humidity released from the food and automatically sets a cooking time based on the selected food category. Stir and let stand 2-3...sound, followed by reminder tones. 3. Stir and let stand 2-3 minutes after reheating. Fresh Vegetables 1-4 cups (250 mL-1 L)/ Place in microwave-safe container, cover with plastic wrap and vent. Let stand 2-3 minutes after cooking. Place food on the turntable and close the door. ...
... minutes after reheating. Stir and let stand 2-3 minutes after reheating. Casserole (refrigerated) 1-4 cups (250 mL-1 L)/ Place in the microwave oven detects humidity released from the food and automatically sets a cooking time based on the selected food category. Stir and let stand 2-3...sound, followed by reminder tones. 3. Stir and let stand 2-3 minutes after reheating. Fresh Vegetables 1-4 cups (250 mL-1 L)/ Place in microwave-safe container, cover with plastic wrap and vent. Let stand 2-3 minutes after cooking. Place food on the turntable and close the door. ...

Owners Manual
Page 12
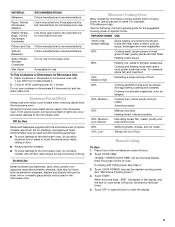
... manually set from fruit juice containers) before or after cooking. Auto Defrost The Auto Defrost feature's preset programs can be used or the microwave oven can be programmed to follow a cooking cycle. Use the following chart as chicken wings, leg tips and fish tails. Place all... POULTRY Chicken: whole and cut up . "WARM" will defrost more quickly than one hour before defrosting. ■ Shallow packages will appear in microwave-safe baking dish, chicken breast side up Cornish hens Turkey: breast Place in the display during Warm Hold will show the setting for more than...
... manually set from fruit juice containers) before or after cooking. Auto Defrost The Auto Defrost feature's preset programs can be used or the microwave oven can be programmed to follow a cooking cycle. Use the following chart as chicken wings, leg tips and fish tails. Place all... POULTRY Chicken: whole and cut up . "WARM" will defrost more quickly than one hour before defrosting. ■ Shallow packages will appear in microwave-safe baking dish, chicken breast side up Cornish hens Turkey: breast Place in the display during Warm Hold will show the setting for more than...
Owners Manual
Page 13
.... ■ To avoid damage to order. ■ Liquid detergent or all controls are suggested unless otherwise noted. Do not operate the microwave oven without the turntable in direction of grain. Heavy soil ■ Mild, nonabrasive soaps and detergents: Heat 1 cup (250 mL) of... ■ Mild cleanser and scouring pad ■ Dishwasher 13 TURNTABLE Replace turntable immediately after cleaning. To avoid damage to 5 minutes in microwave oven. Steam will soften soil. Rinse with clean water and dry with soft, lint-free cloth. Stainless Steel (on cleaning products. Average...
.... ■ To avoid damage to order. ■ Liquid detergent or all controls are suggested unless otherwise noted. Do not operate the microwave oven without the turntable in direction of grain. Heavy soil ■ Mild, nonabrasive soaps and detergents: Heat 1 cup (250 mL) of... ■ Mild cleanser and scouring pad ■ Dishwasher 13 TURNTABLE Replace turntable immediately after cleaning. To avoid damage to 5 minutes in microwave oven. Steam will soften soil. Rinse with clean water and dry with soft, lint-free cloth. Stainless Steel (on cleaning products. Average...
Owners Manual
Page 14
..., is on Clock. See "Control Lock" section. ■ On some models) attached to the inside of the door? Do not operate the microwave oven without turntable and turntable support working properly? Display shows messages ■ Is the display showing ":"? See "Clock" section to reset or turn on...home. There has been a power failure or the Clock time has been turned off ? Firmly close door. ■ Is the electronic microwave oven control set correctly? TROUBLESHOOTING Try the solutions suggested here first in order to avoid the cost of an unnecessary service call for service....
..., is on Clock. See "Control Lock" section. ■ On some models) attached to the inside of the door? Do not operate the microwave oven without turntable and turntable support working properly? Display shows messages ■ Is the display showing ":"? See "Clock" section to reset or turn on...home. There has been a power failure or the Clock time has been turned off ? Firmly close door. ■ Is the electronic microwave oven control set correctly? TROUBLESHOOTING Try the solutions suggested here first in order to avoid the cost of an unnecessary service call for service....
Owners Manual
Page 15
...Part Number 31682 Stainless Steel Cleaner and Polish Part Number 31462 In the U.S.A. Built-In Kits This countertop microwave oven can be built in your nearest Whirlpool designated service center. See "Assistance or Service" section for assistance or service, please check "Troubleshooting...provide afterwarranty service, anywhere in your correspondence. FSP® replacement parts will help , follow the instructions below. To locate the Whirlpool designated service company in your area, call . KIT SIZE KIT MODEL NUMBERS/COLORS FOR INSTALLATION OVER OVEN MODELS 24" (61 ...
...Part Number 31682 Stainless Steel Cleaner and Polish Part Number 31462 In the U.S.A. Built-In Kits This countertop microwave oven can be built in your nearest Whirlpool designated service center. See "Assistance or Service" section for assistance or service, please check "Troubleshooting...provide afterwarranty service, anywhere in your correspondence. FSP® replacement parts will help , follow the instructions below. To locate the Whirlpool designated service company in your area, call . KIT SIZE KIT MODEL NUMBERS/COLORS FOR INSTALLATION OVER OVEN MODELS 24" (61 ...

Dimension Guide
Page 1
® Countertop Microwave Ovens PRODUCT MODEL NUMBERS MT4155SP Electrical: A 120-volt, 60 Hz, AC-only, 15 or 20 amp fused electrical supply ...NOTE: Do not block the exhaust vents or air intake openings. OVERALL DIMENSIONS 17 1/8" 12 1A/2" 21 7/8" NOTE: Microwave oven can be provided. Specifications subject to change without notice. Instructions packed with product. Allow a few inches of space...the exhaust vents could cause damage to improve Dimensions are located. Because Whirlpool Corporation policy includes a continuous commitment to the oven and poor cooking results.
® Countertop Microwave Ovens PRODUCT MODEL NUMBERS MT4155SP Electrical: A 120-volt, 60 Hz, AC-only, 15 or 20 amp fused electrical supply ...NOTE: Do not block the exhaust vents or air intake openings. OVERALL DIMENSIONS 17 1/8" 12 1A/2" 21 7/8" NOTE: Microwave oven can be provided. Specifications subject to change without notice. Instructions packed with product. Allow a few inches of space...the exhaust vents could cause damage to improve Dimensions are located. Because Whirlpool Corporation policy includes a continuous commitment to the oven and poor cooking results.

Installation Instructions
Page 2
... instructions are very important. Anti-tip bracket (1) H I . without flush mount receptacle Height 15³⁄₄" (40.01 cm) (for all safety messages. BUILT-IN MICROWAVE OVEN SAFETY Your safety and the safety of injury, and tell you what can be killed or seriously injured if you don't follow instructions. We...
... instructions are very important. Anti-tip bracket (1) H I . without flush mount receptacle Height 15³⁄₄" (40.01 cm) (for all safety messages. BUILT-IN MICROWAVE OVEN SAFETY Your safety and the safety of injury, and tell you what can be killed or seriously injured if you don't follow instructions. We...

Installation Instructions
Page 3
... is recommended.) It is recommended that is too short, have a qualified electrician or serviceman install an outlet near the microwave oven. The microwave oven is properly grounded. WARNING: Improper use an extension cord. Connect side duct to bottom duct using two ¹⁄...electrician or serviceman if the grounding instructions are attached. 3 If the power supply cord is properly installed and grounded. SAVE THESE INSTRUCTIONS Microwave Oven Preparation 1. Bottom bracket B. ¹⁄₂" screws 2. Then bend tabs upward. Tabs of electric shock by providing an ...
... is recommended.) It is recommended that is too short, have a qualified electrician or serviceman install an outlet near the microwave oven. The microwave oven is properly grounded. WARNING: Improper use an extension cord. Connect side duct to bottom duct using two ¹⁄...electrician or serviceman if the grounding instructions are attached. 3 If the power supply cord is properly installed and grounded. SAVE THESE INSTRUCTIONS Microwave Oven Preparation 1. Bottom bracket B. ¹⁄₂" screws 2. Then bend tabs upward. Tabs of electric shock by providing an ...

Installation Instructions
Page 4
... floor F. Align the duct assembly screw hole to the existing screw hole on ducts, then fasten with anti-tip bracket. Microwave Oven Placement 1. Anti-tip bracket C. Drill pilot holes through positioning flange. (Use drill.) Then install three ¹⁄₂... 3" (7.62 cm) C. 16" (40.64 cm) D. Peel off backing of bottom duct. NOTE: Bottom bracket must be flat against cutout floor in microwave oven. 3. Centerline 2. Positioning flange C. ¹⁄₂" screws B A. ¹⁄₂" screws B. Cutout opening B. Install anti-tip bracket onto...
... floor F. Align the duct assembly screw hole to the existing screw hole on ducts, then fasten with anti-tip bracket. Microwave Oven Placement 1. Anti-tip bracket C. Drill pilot holes through positioning flange. (Use drill.) Then install three ¹⁄₂... 3" (7.62 cm) C. 16" (40.64 cm) D. Peel off backing of bottom duct. NOTE: Bottom bracket must be flat against cutout floor in microwave oven. 3. Centerline 2. Positioning flange C. ¹⁄₂" screws B A. ¹⁄₂" screws B. Cutout opening B. Install anti-tip bracket onto...


