Owners Manual
Page 1
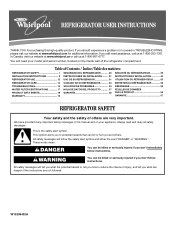
... safety messages in TROUBLESHOOTING, please visit our website at www.whirlpool.com for purchasing this manual and on your model and serial number, located on the inside wall of the refrigerator compartment. All safety messages will tell you what can kill ... if the instructions are very important. Table of Contents / Índice / Table des matières REFRIGERATOR SAFETY 1 INSTALLATION INSTRUCTIONS 2 REFRIGERATOR USE 12 REFRIGERATOR CARE 14 TROUBLESHOOTING 15 WATER FILTER CERTIFICATIONS 17 PRODUCT DATA SHEETS 18 WARRANTY 19 SEGURIDAD DEL REFRIGERADOR 20 INSTRUCCIONES DE...
... safety messages in TROUBLESHOOTING, please visit our website at www.whirlpool.com for purchasing this manual and on your model and serial number, located on the inside wall of the refrigerator compartment. All safety messages will tell you what can kill ... if the instructions are very important. Table of Contents / Índice / Table des matières REFRIGERATOR SAFETY 1 INSTALLATION INSTRUCTIONS 2 REFRIGERATOR USE 12 REFRIGERATOR CARE 14 TROUBLESHOOTING 15 WATER FILTER CERTIFICATIONS 17 PRODUCT DATA SHEETS 18 WARRANTY 19 SEGURIDAD DEL REFRIGERADOR 20 INSTRUCCIONES DE...
Owners Manual
Page 2
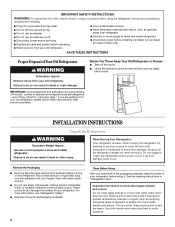
...; Take off the doors. ■ Leave the shelves in back or other injury. Remove the Packaging ■ Remove tape and glue residue from refrigerator. ■ Use two or more people to move it . Rub a small amount of liquid dish soap over the adhesive with warm water when ...in place so that children may break if exposed to sudden temperature changes or impact, such as gasoline, away from surfaces before using the refrigerator, follow these instructions to help prevent accidents. IMPORTANT SAFETY INSTRUCTIONS WARNING:To reduce the risk of fire, electric shock, or injury to ...
...; Take off the doors. ■ Leave the shelves in back or other injury. Remove the Packaging ■ Remove tape and glue residue from refrigerator. ■ Use two or more people to move it . Rub a small amount of liquid dish soap over the adhesive with warm water when ...in place so that children may break if exposed to sudden temperature changes or impact, such as gasoline, away from surfaces before using the refrigerator, follow these instructions to help prevent accidents. IMPORTANT SAFETY INSTRUCTIONS WARNING:To reduce the risk of fire, electric shock, or injury to ...
Owners Manual
Page 3
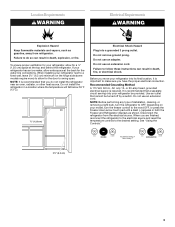
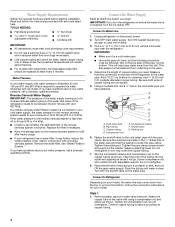
...;" (6.3 cm) minimum on the hinge side (some models require more) to allow extra space at the top and behind the refrigerator. Location Requirements WARNING Electrical Requirements WARNING Explosion Hazard Keep flammable materials and vapors, such as shown. To ensure proper ventilation for the... final location, it is recommended that cannot be provided. It is important to do not install the refrigerator near an oven, radiator, or other heat source. Do not install the refrigerator in death, fire, or electrical shock. See "Using the Controls." 2¹⁄₂" (6.3 cm...
...;" (6.3 cm) minimum on the hinge side (some models require more) to allow extra space at the top and behind the refrigerator. Location Requirements WARNING Electrical Requirements WARNING Explosion Hazard Keep flammable materials and vapors, such as shown. To ensure proper ventilation for the... final location, it is recommended that cannot be provided. It is important to do not install the refrigerator near an oven, radiator, or other heat source. Do not install the refrigerator in death, fire, or electrical shock. See "Using the Controls." 2¹⁄₂" (6.3 cm...
Owners Manual
Page 4
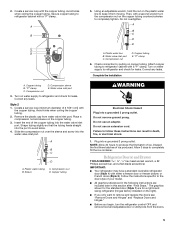
... kPa): ■ Check to be replaced at least every 6 months. If the water pressure to the reverse osmosis system is connected to Refrigerator Depending on copper tubing. 4 Replace the filter if necessary. ■ Allow the storage tank on the copper tubing as shown. See ... cold water pipe with water filters, the disposable water filter should be between 35 and 120 psi (241 and 827 kPa) is connected, turn the refrigerator on the water pipe. Use ¹⁄₄" (6.35 mm) O.D. (outside diameter) copper tubing. A B C A. Cold water pipe B. Compression nut D E F G E....
... kPa): ■ Check to be replaced at least every 6 months. If the water pressure to the reverse osmosis system is connected to Refrigerator Depending on copper tubing. 4 Replace the filter if necessary. ■ Allow the storage tank on the copper tubing as shown. See ... cold water pipe with water filters, the disposable water filter should be between 35 and 120 psi (241 and 827 kPa) is connected, turn the refrigerator on the water pipe. Use ¹⁄₄" (6.35 mm) O.D. (outside diameter) copper tubing. A B C A. Cold water pipe B. Compression nut D E F G E....
Owners Manual
Page 5
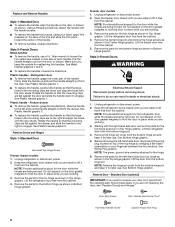
... B C D A. Allow 3 days to follow these instructions can result in this section after "Final Steps." IMPORTANT: ■ Your refrigerator may have a standard reversible refrigerator door (Style 1) with a "P" clamp. The graphics shown for the standard door (Style 1) are included later in death, fire, ...completely fill the ice container. Do not remove ground prong. Do not use an adapter. Follow the instructions specific to refrigerator cabinet with the copper tubing. Copper tubing E. Style 2 1. Copper tubing WARNING Electrical Shock Hazard Plug into the port ...
... B C D A. Allow 3 days to follow these instructions can result in this section after "Final Steps." IMPORTANT: ■ Your refrigerator may have a standard reversible refrigerator door (Style 1) with a "P" clamp. The graphics shown for the standard door (Style 1) are included later in death, fire, ...completely fill the ice container. Do not remove ground prong. Do not use an adapter. Follow the instructions specific to refrigerator cabinet with the copper tubing. Copper tubing E. Style 2 1. Copper tubing WARNING Electrical Shock Hazard Plug into the port ...
Owners Manual
Page 6
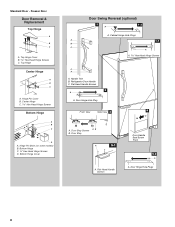
.... Make sure you are being moved. See Metal Handle graphics 1 and 2. ■ To replace the handles, reverse the directions. Lift the refrigerator door from the bottom hinge pin. If you want to the left -hand side door top hinge as shown in the Top Hinge graphic. Lift... grasp the handle firmly, slide the handle to reverse your door so it free from the cabinet. Freezer door models 1. Failure to engage. Unplug refrigerator or disconnect power. 2. Style 2-French Doors Metal handles ■ To remove the handle, use . Rotate the handle so that the mounting clips are...
.... Make sure you are being moved. See Metal Handle graphics 1 and 2. ■ To replace the handles, reverse the directions. Lift the refrigerator door from the bottom hinge pin. If you want to the left -hand side door top hinge as shown in the Top Hinge graphic. Lift... grasp the handle firmly, slide the handle to reverse your door so it free from the cabinet. Freezer door models 1. Failure to engage. Unplug refrigerator or disconnect power. 2. Style 2-French Doors Metal handles ■ To remove the handle, use . Rotate the handle so that the mounting clips are...
Owners Manual
Page 7
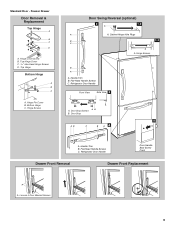
...hinge screws from cabinet top and move them to opposite side of the drawer front into the slots in the drawer brackets. Remove the refrigerator handle assembly as shown. Remove the door stop . Freezer door 1. Move to opposite side hinge holes as shown in Graphic 5-1. Tighten... while you are working . 2. Remove cabinet hinge hole plugs from handle side and move them to hold the door in Graphic 1-2. Refrigerator door 1. Move to refrigerator. 7 Keep all parts together. 2. Lift drawer front upward and off the screws. Do not use an extension cord. Return all ...
...hinge screws from cabinet top and move them to opposite side of the drawer front into the slots in the drawer brackets. Remove the refrigerator handle assembly as shown. Remove the door stop . Freezer door 1. Move to opposite side hinge holes as shown in Graphic 5-1. Tighten... while you are working . 2. Remove cabinet hinge hole plugs from handle side and move them to hold the door in Graphic 1-2. Refrigerator door 1. Move to refrigerator. 7 Keep all parts together. 2. Lift drawer front upward and off the screws. Do not use an extension cord. Return all ...
Owners Manual
Page 8
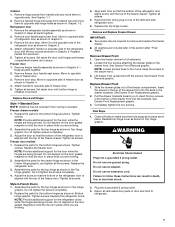
... Screws Bottom Hinge A B C D A. Bottom Hinge C. ³⁄₈" Hex-Head Hinge Screws D. Hinge Pin Shim (on some models) B. Bottom Hinge Cover Door Swing Reversal (optional) 2 1-2 A A. Refrigerator Door Handle C. Door Stop Screws A B B. Door Stop A 5-1 A.
... Screws Bottom Hinge A B C D A. Bottom Hinge C. ³⁄₈" Hex-Head Hinge Screws D. Hinge Pin Shim (on some models) B. Bottom Hinge Cover Door Swing Reversal (optional) 2 1-2 A A. Refrigerator Door Handle C. Door Stop Screws A B B. Door Stop A 5-1 A.
Owners Manual
Page 9
... Front View Side View 3 A. Handle Trim B. Top Hinge Cover C. 5/16" Hex-Head Hinge Screws D. Door Stop Screws A B B. Top Hinge Bottom Hinge A B C A. Flat-Head Handle Screws C. Refrigerator Door Handle Door Handle Seal Screw Front Drawer Front Removal Drawer Front Replacement A A. Hinge Pin Cover B. Bottom Hinge C. Door Stop 5 AB C B A4 A. Loosen 4 Door Bracket...
... Front View Side View 3 A. Handle Trim B. Top Hinge Cover C. 5/16" Hex-Head Hinge Screws D. Door Stop Screws A B B. Top Hinge Bottom Hinge A B C A. Flat-Head Handle Screws C. Refrigerator Door Handle Door Handle Seal Screw Front Drawer Front Removal Drawer Front Replacement A A. Hinge Pin Cover B. Bottom Hinge C. Door Stop 5 AB C B A4 A. Loosen 4 Door Bracket...
Owners Manual
Page 11
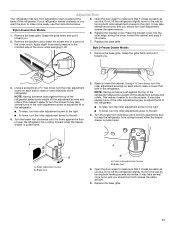
...easily as you should turn both leveling screws clockwise. It may take several turns of the roller adjustment screw to adjust the tilt of the refrigerator. ■ To raise, turn the roller adjustment screw to the right. ■ To lower, turn the roller adjustment screw to the... screws It may take several more easily, use the instructions below. Roller adjustment screw B. Apply slight downward pressure to the notched side of the refrigerator. ■ To raise, turn the roller adjustment screw to the right. ■ To lower, turn the roller adjustment screw to the right....
...easily as you should turn both leveling screws clockwise. It may take several turns of the roller adjustment screw to adjust the tilt of the refrigerator. ■ To raise, turn the roller adjustment screw to the right. ■ To lower, turn the roller adjustment screw to the... screws It may take several more easily, use the instructions below. Roller adjustment screw B. Apply slight downward pressure to the notched side of the refrigerator. ■ To raise, turn the roller adjustment screw to the right. ■ To lower, turn the roller adjustment screw to the right....
Owners Manual
Page 12
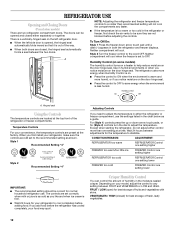
...as cold as a guide. Use in humid environments or when you add food before adjusting the controls. Temperature Controls For your refrigerator, make sure the controls are still set correctly when milk or juice is less humid. Style 1 Recommended Setting "4" Style ...2 Recommended Setting "4" Adjusting Controls If you first install your convenience, the temperature controls are two refrigerator compartment doors. For (Style 1) controls press the up or down arrow touch pad until a dash (-) appears in the moisture-sealed crisper...
...as cold as a guide. Use in humid environments or when you add food before adjusting the controls. Temperature Controls For your refrigerator, make sure the controls are still set correctly when milk or juice is less humid. Style 1 Recommended Setting "4" Style ...2 Recommended Setting "4" Adjusting Controls If you first install your convenience, the temperature controls are two refrigerator compartment doors. For (Style 1) controls press the up or down arrow touch pad until a dash (-) appears in the moisture-sealed crisper...
Owners Manual
Page 13
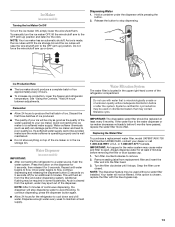
... dispenser button again. ■ Allow 24 hours for 5 seconds. IMPORTANT: The disposable water filter should produce a complete batch of the refrigerator compartment. Replacing the Water Filter To purchase a replacement water filter, model UKF8001AXX-750 Part Number UKF8001AXX, contact your ice will not be ...required in the upper right-hand corner of ice approximately every 3 hours. ■ To increase ice production, lower the freezer and refrigerator temperature. Systems certified for an additional 2 minutes. Your water will be only as good as salt) can damage parts of the ...
... dispenser button again. ■ Allow 24 hours for 5 seconds. IMPORTANT: The disposable water filter should produce a complete batch of the refrigerator compartment. Replacing the Water Filter To purchase a replacement water filter, model UKF8001AXX-750 Part Number UKF8001AXX, contact your ice will not be ...required in the upper right-hand corner of ice approximately every 3 hours. ■ To increase ice production, lower the freezer and refrigerator temperature. Systems certified for an additional 2 minutes. Your water will be only as good as salt) can damage parts of the ...
Owners Manual
Page 14
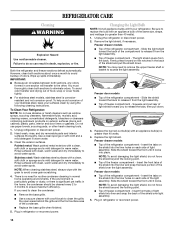
...force the shield beyond the locking point. ■ Top of light shield toward the front until it from the back. Both the refrigerator and freezer sections defrost automatically. Wipe up spills immediately. IMPORTANT: ■ Because air circulates between both sections about once a month to...bleaches or cleansers containing petroleum products on each side of the same size, shape, and wattage (no greater than 40 watts). 1. Unplug refrigerator or disconnect power. 2. Painted metal: Wash painted metal exteriors with the grain to avoid water spots. Plug in the back of freezer...
...force the shield beyond the locking point. ■ Top of light shield toward the front until it from the back. Both the refrigerator and freezer sections defrost automatically. Wipe up spills immediately. IMPORTANT: ■ Because air circulates between both sections about once a month to...bleaches or cleansers containing petroleum products on each side of the same size, shape, and wattage (no greater than 40 watts). 1. Unplug refrigerator or disconnect power. 2. Painted metal: Wash painted metal exteriors with the grain to avoid water spots. Plug in the back of freezer...
Owners Manual
Page 15
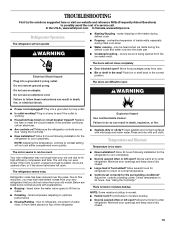
... the correct position. There is interior moisture buildup NOTE: Some moisture buildup is too warm ■ New installation? In the U.S.A., www.whirlpool.com In Canada, www.whirlpool.ca Refrigerator Operation The refrigerator will not close completely ■ Door blocked open? Failure to do so can result in a lamp to cool completely. occurs as ice...
... the correct position. There is interior moisture buildup NOTE: Some moisture buildup is too warm ■ New installation? In the U.S.A., www.whirlpool.com In Canada, www.whirlpool.ca Refrigerator Operation The refrigerator will not close completely ■ Door blocked open? Failure to do so can result in a lamp to cool completely. occurs as ice...
Owners Manual
Page 16
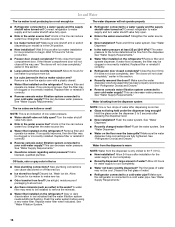
..."Water Supply Requirements." The ice cubes are fully tightened. Straighten the water source line. ■ Water filter installed on the refrigerator? Call a licensed, qualified plumber. New plumbing connections can decrease water pressure. A water filter may be clogged or incorrectly installed...your cold water supply? If the freezer compartment door will not close the freezer compartment door. See "Water Supply Requirements." Connect refrigerator to 50°F (10°C). ■ New installation? Flush the water system. See "Water Supply Requirements." ■ Questions...
..."Water Supply Requirements." The ice cubes are fully tightened. Straighten the water source line. ■ Water filter installed on the refrigerator? Call a licensed, qualified plumber. New plumbing connections can decrease water pressure. A water filter may be clogged or incorrectly installed...your cold water supply? If the freezer compartment door will not close the freezer compartment door. See "Water Supply Requirements." Connect refrigerator to 50°F (10°C). ■ New installation? Flush the water system. See "Water Supply Requirements." ■ Questions...

Owners Manual
Page 19
...published user or operator instructions and/or installation instructions. 2. ITEMS EXCLUDED FROM WARRANTY This limited warranty does not cover: 1. Service calls to refrigerator or freezer product failures. 7. Damage resulting from accident, alteration, misuse, abuse, fire, flood, acts of your home. 8. Pickup and...Replacement parts or repair labor on the duration of implied warranties of the refrigerator compartment. Have your model number and serial number on the label, located on how to Whirlpool with original model/serial numbers that have other than normal, single-family ...
...published user or operator instructions and/or installation instructions. 2. ITEMS EXCLUDED FROM WARRANTY This limited warranty does not cover: 1. Service calls to refrigerator or freezer product failures. 7. Damage resulting from accident, alteration, misuse, abuse, fire, flood, acts of your home. 8. Pickup and...Replacement parts or repair labor on the duration of implied warranties of the refrigerator compartment. Have your model number and serial number on the label, located on how to Whirlpool with original model/serial numbers that have other than normal, single-family ...
Dimension Guide
Page 1
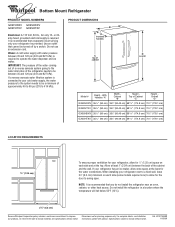
... (241 and 827 kPa). Allow at the back for the water connections. Do not install the refrigerator in a location where the temperature will fall below 55°F (13°C). 2¹⁄₂" (6.3 cm) Because Whirlpool Corporation policy includes a continuous commitment to improve Dimensions are for the door to be between the back...
... (241 and 827 kPa). Allow at the back for the water connections. Do not install the refrigerator in a location where the temperature will fall below 55°F (13°C). 2¹⁄₂" (6.3 cm) Because Whirlpool Corporation policy includes a continuous commitment to improve Dimensions are for the door to be between the back...
Energy Guide
Page 1
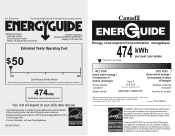
...és Numéro du modèle Removal of this appliance compares to other similar models. Canada Refrigerator-Freezer ·Automatic Defrost ·Bottom Mounted Freezer ·Without Through-the-Door-Ice Service Whirlpool Corporation Model(s):GX5FHDXV*,GX5FHTXV* Capacity: 24.8 Cubic Feet Estimated Yearly Operating Cost $50 $51 $63 Cost Range...
...és Numéro du modèle Removal of this appliance compares to other similar models. Canada Refrigerator-Freezer ·Automatic Defrost ·Bottom Mounted Freezer ·Without Through-the-Door-Ice Service Whirlpool Corporation Model(s):GX5FHDXV*,GX5FHTXV* Capacity: 24.8 Cubic Feet Estimated Yearly Operating Cost $50 $51 $63 Cost Range...
Warranty
Page 1
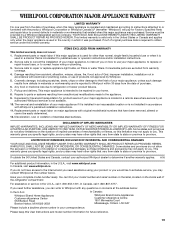
.... 9. This major appliance is intended to be repaired in a remote area where service by a Whirlpool designated service company. Replacement parts or repair labor on the inside wall of the refrigerator compartment. This warranty gives you specific legal rights, and you also may have other damage to the... finish of your home. 8. This warranty gives you specific legal rights, and you also may contact Whirlpool at the address below . Have ...
.... 9. This major appliance is intended to be repaired in a remote area where service by a Whirlpool designated service company. Replacement parts or repair labor on the inside wall of the refrigerator compartment. This warranty gives you specific legal rights, and you also may have other damage to the... finish of your home. 8. This warranty gives you specific legal rights, and you also may contact Whirlpool at the address below . Have ...


