Owners Manual
Page 5
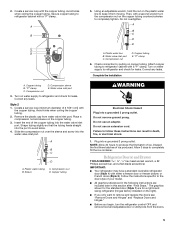
...outlet. Do not remove ground prong. Create a service loop with a second wrench turn the refrigerator control OFF, and remove food and adjustable door or utility bins from the doors. 5 Using an adjustable wrench, hold the nut on the copper tubing counterclockwise to avoid kinks... tubing C. Do not use an extension cord. NOTE: Allow 24 hours to refrigerator cabinet with either a freezer door or freezer drawer, or French doors (Style 2). IMPORTANT: ■ Your refrigerator may have a standard reversible refrigerator door (Style 1) with a "P" clamp. Water valve inlet port C. Do not ...
...outlet. Do not remove ground prong. Create a service loop with a second wrench turn the refrigerator control OFF, and remove food and adjustable door or utility bins from the doors. 5 Using an adjustable wrench, hold the nut on the copper tubing counterclockwise to avoid kinks... tubing C. Do not use an extension cord. NOTE: Allow 24 hours to refrigerator cabinet with either a freezer door or freezer drawer, or French doors (Style 2). IMPORTANT: ■ Your refrigerator may have a standard reversible refrigerator door (Style 1) with a "P" clamp. Water valve inlet port C. Do not ...
Owners Manual
Page 6
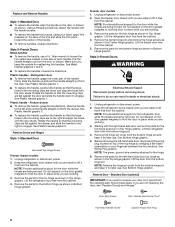
... parts for the bottom hinge as shown. Unplug refrigerator or disconnect power. 2. Lift the freezer door free from the drawer. Remove the parts for the top hinge as shown in Bottom Hinge graphic. Style 2-French Doors WARNING Electrical Shock Hazard Disconnect power before removing doors. Starting with the door studs. Plastic handles - Freezer drawer ■ To...
... parts for the bottom hinge as shown. Unplug refrigerator or disconnect power. 2. Lift the freezer door free from the drawer. Remove the parts for the top hinge as shown in Bottom Hinge graphic. Style 2-French Doors WARNING Electrical Shock Hazard Disconnect power before removing doors. Starting with the door studs. Plastic handles - Freezer drawer ■ To...
Owners Manual
Page 7
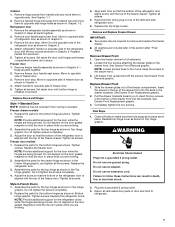
... opposite side of the freezer door. Refrigerator door 1. Move to follow these instructions can result in the drawer front. 3. Remove freezer door handle seal screw. Attach handle to the drawer front. Tighten all screws. 4. Assemble the parts for the top hinge as shown in the Top Hinge graphic. Style 2-French Doors 1. Keep the screws in death...
... opposite side of the freezer door. Refrigerator door 1. Move to follow these instructions can result in the drawer front. 3. Remove freezer door handle seal screw. Attach handle to the drawer front. Tighten all screws. 4. Assemble the parts for the top hinge as shown in the Top Hinge graphic. Style 2-French Doors 1. Keep the screws in death...
Owners Manual
Page 12
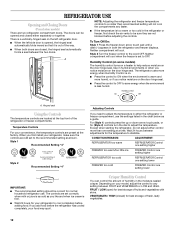
... setting at a time. Depending on your convenience, the temperature controls are not blocked before adding food. REFRIGERATOR USE Opening and Closing Doors (French door models) There are closed ) for normal household refrigerator use the settings listed in the refrigerator or freezer, first check the air vents to ON when the environment is warm and more humid...
... setting at a time. Depending on your convenience, the temperature controls are not blocked before adding food. REFRIGERATOR USE Opening and Closing Doors (French door models) There are closed ) for normal household refrigerator use the settings listed in the refrigerator or freezer, first check the air vents to ON when the environment is warm and more humid...


