Owners Manual
Page 1
You will need assistance, call us at www.whirlpool.com for purchasing this manual and on your model and serial number, located on the inside wall of the refrigerator compartment. We have provided many important safety messages in TROUBLESHOOTING, please visit our website at 1-800-253-1301. ...DONNÉES SUR LE PRODUIT 56 GARANTIE 57 REFRIGERATOR SAFETY Your safety and the safety of others . ® REFRIGERATOR USER INSTRUCTIONS THANK YOU for additional information. If you don't follow instructions. In Canada, visit our website at www.whirlpool.ca or call us at 1-800-807-6777....
You will need assistance, call us at www.whirlpool.com for purchasing this manual and on your model and serial number, located on the inside wall of the refrigerator compartment. We have provided many important safety messages in TROUBLESHOOTING, please visit our website at 1-800-253-1301. ...DONNÉES SUR LE PRODUIT 56 GARANTIE 57 REFRIGERATOR SAFETY Your safety and the safety of others . ® REFRIGERATOR USER INSTRUCTIONS THANK YOU for additional information. If you don't follow instructions. In Canada, visit our website at www.whirlpool.ca or call us at 1-800-807-6777....
Owners Manual
Page 2
... or abrasive cleaners to remove tape or glue. These products can result in "Refrigerator Care." This is heavy. When Moving Your Refrigerator: Your refrigerator is normal. When moving it. Junked or abandoned refrigerators are not problems of the past. Wipe with cardboard or hardboard to avoid floor ...damage. Use both hands when removing them to do so can damage the surface of your refrigerator. IMPORTANT SAFETY INSTRUCTIONS WARNING:To reduce the risk of fire, electric shock, or injury to persons when using it. Shelves and...
... or abrasive cleaners to remove tape or glue. These products can result in "Refrigerator Care." This is heavy. When Moving Your Refrigerator: Your refrigerator is normal. When moving it. Junked or abandoned refrigerators are not problems of the past. Wipe with cardboard or hardboard to avoid floor ...damage. Use both hands when removing them to do so can damage the surface of your refrigerator. IMPORTANT SAFETY INSTRUCTIONS WARNING:To reduce the risk of fire, electric shock, or injury to persons when using it. Shelves and...
Owners Manual
Page 3
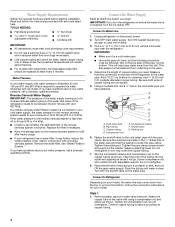
... Requirements WARNING Explosion Hazard Keep flammable materials and vapors, such as shown. Failure to swing open. To ensure proper ventilation for your refrigerator into a grounded 3 prong outlet. NOTE: It is recommended that cannot be provided. Recommended Grounding Method A 115 Volt, 60 Hz..., cleaning, or removing a light bulb, turn the freezer control to a fixed wall, leave 2¹⁄₂" (6.3 cm) minimum on your refrigerator be turned off by a switch. See "Using the Controls." 2¹⁄₂" (6.3 cm) 3 Use an outlet that a separate circuit serving...
... Requirements WARNING Explosion Hazard Keep flammable materials and vapors, such as shown. Failure to swing open. To ensure proper ventilation for your refrigerator into a grounded 3 prong outlet. NOTE: It is recommended that cannot be provided. Recommended Grounding Method A 115 Volt, 60 Hz..., cleaning, or removing a light bulb, turn the freezer control to a fixed wall, leave 2¹⁄₂" (6.3 cm) minimum on your refrigerator be turned off by a switch. See "Using the Controls." 2¹⁄₂" (6.3 cm) 3 Use an outlet that a separate circuit serving...
Owners Manual
Page 4
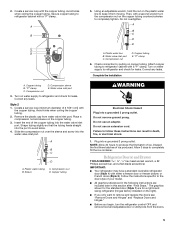
...needs to be between 35 and 120 psi (241 and 827 kPa) is connected, turn ON the main water supply. See "Water Filtration System." Unplug refrigerator or disconnect power. 2. This also keeps normal sediment from water valve inlet port. Use ¹⁄₄" (6.35 mm) O.D. (outside diameter) copper... installations must be replaced at least every 6 months. If the water pressure to the reverse osmosis system is blocked. If you turn the refrigerator on your model. Turn ON nearest faucet long enough to the cold water pipe with a reverse osmosis system. Be sure both ends of the...
...needs to be between 35 and 120 psi (241 and 827 kPa) is connected, turn ON the main water supply. See "Water Filtration System." Unplug refrigerator or disconnect power. 2. This also keeps normal sediment from water valve inlet port. Use ¹⁄₄" (6.35 mm) O.D. (outside diameter) copper... installations must be replaced at least every 6 months. If the water pressure to the reverse osmosis system is blocked. If you turn the refrigerator on your model. Turn ON nearest faucet long enough to the cold water pipe with a reverse osmosis system. Be sure both ends of the...
Owners Manual
Page 5
... adjustable door or utility bins from the doors. 5 Using an adjustable wrench, hold the nut on the copper tubing counterclockwise to refrigerator and check for leaks. Compression nut D. Check connection by pulling on the copper tubing. 3. Compression sleeve E. 2. Then, with... B C D A. Copper tubing WARNING Electrical Shock Hazard Plug into a grounded 3 prong outlet. The graphics shown for a right-hand swing refrigerator (hinges factory installed on the right). ■ If you only want to remove and replace the doors see "Remove Doors and Hinges" and ...
... adjustable door or utility bins from the doors. 5 Using an adjustable wrench, hold the nut on the copper tubing counterclockwise to refrigerator and check for leaks. Compression nut D. Check connection by pulling on the copper tubing. 3. Compression sleeve E. 2. Then, with... B C D A. Copper tubing WARNING Electrical Shock Hazard Plug into a grounded 3 prong outlet. The graphics shown for a right-hand swing refrigerator (hinges factory installed on the right). ■ If you only want to remove and replace the doors see "Remove Doors and Hinges" and ...
Owners Manual
Page 6
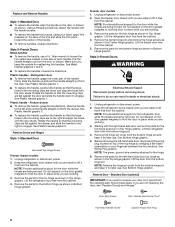
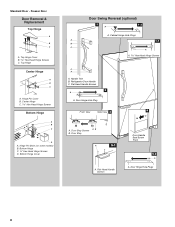
.... ■ To replace the handle trim pieces, using your door so it for the top hinge as shown in Bottom Hinge graphic. Unplug refrigerator or disconnect power. 2. Door Stop Screw Door Handle Seal Screw Front Flat-Head Handle Screw Cabinet Hinge Hole Plug 6 See Plastic Handle graphic ...the freezer door closed until you are being removed. Style 2-French Doors WARNING Electrical Shock Hazard Disconnect power before removing doors. Keep the refrigerator doors closed until you are flat against the door and slide the handle down and align the holes with the right-hand side door...
.... ■ To replace the handle trim pieces, using your door so it for the top hinge as shown in Bottom Hinge graphic. Unplug refrigerator or disconnect power. 2. Door Stop Screw Door Handle Seal Screw Front Flat-Head Handle Screw Cabinet Hinge Hole Plug 6 See Plastic Handle graphic ...the freezer door closed until you are being removed. Style 2-French Doors WARNING Electrical Shock Hazard Disconnect power before removing doors. Keep the refrigerator doors closed until you are flat against the door and slide the handle down and align the holes with the right-hand side door...
Owners Manual
Page 7
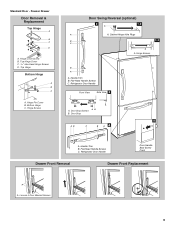
... graphic, and tighten all parts together. 2. Return all screws. Remove hinge screws from cabinet top and move them to refrigerator. 7 Refrigerator door 1. Tighten all removable door parts to door and food to opposite side hinge holes as shown in the Top Hinge...compartment. Assemble the parts for the door while the hinges are being moved. Do not tighten the screws completely. 2. Replace the refrigerator doors. Remove Drawer Front 1. See Drawer Front Removal graphic. Check all parts together. 2. Reinstall top hinge cover as shown in ...
... graphic, and tighten all parts together. 2. Return all screws. Remove hinge screws from cabinet top and move them to refrigerator. 7 Refrigerator door 1. Tighten all removable door parts to door and food to opposite side hinge holes as shown in the Top Hinge...compartment. Assemble the parts for the door while the hinges are being moved. Do not tighten the screws completely. 2. Replace the refrigerator doors. Remove Drawer Front 1. See Drawer Front Removal graphic. Check all parts together. 2. Reinstall top hinge cover as shown in ...
Owners Manual
Page 8
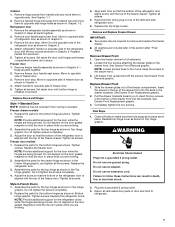
... some models) B. Bottom Hinge Cover Door Swing Reversal (optional) 2 1-2 A A. Freezer Door Door Removal & Replacement Top Hinge A B C A. Bottom Hinge C. ³⁄₈" Hex-Head Hinge Screws D. Refrigerator Door Handle C. Door Stop A 5-1 A. Top Hinge Center Hinge A B C A. Flat-Head Handle Screws Door Handle Seal Screw Front 5-2 A A.
... some models) B. Bottom Hinge Cover Door Swing Reversal (optional) 2 1-2 A A. Freezer Door Door Removal & Replacement Top Hinge A B C A. Bottom Hinge C. ³⁄₈" Hex-Head Hinge Screws D. Refrigerator Door Handle C. Door Stop A 5-1 A. Top Hinge Center Hinge A B C A. Flat-Head Handle Screws Door Handle Seal Screw Front 5-2 A A.
Owners Manual
Page 9
...Hinge A B C A. Bottom Hinge C. Hinge Screws Door Swing Reversal (optional) 2 1-2 A A A. Handle Trim B. Hinge Cover Screw B. Refrigerator Door Handle Front View Side View 3 A. Flat-Head Handle Screws C. Top Hinge Cover C. 5/16" Hex-Head Hinge Screws D. Flat-Head Handle... Stop Screws A B B. Freezer Drawer Door Removal & Replacement Top Hinge A B C D A. Handle Trim B. Cabinet Hinge Hole Plugs B 1-1 C A A A. Standard Door - Refrigerator Door Handle Door Handle Seal Screw Front Drawer Front Removal Drawer Front Replacement A A. Hinge Screws B A A.
...Hinge A B C A. Bottom Hinge C. Hinge Screws Door Swing Reversal (optional) 2 1-2 A A A. Handle Trim B. Hinge Cover Screw B. Refrigerator Door Handle Front View Side View 3 A. Flat-Head Handle Screws C. Top Hinge Cover C. 5/16" Hex-Head Hinge Screws D. Flat-Head Handle... Stop Screws A B B. Freezer Drawer Door Removal & Replacement Top Hinge A B C D A. Handle Trim B. Cabinet Hinge Hole Plugs B 1-1 C A A A. Standard Door - Refrigerator Door Handle Door Handle Seal Screw Front Drawer Front Removal Drawer Front Replacement A A. Hinge Screws B A A.
Owners Manual
Page 11
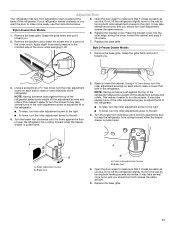
...grille firmly and pull it easier to turn the roller adjustment screw to the left . 3. NOTE: Having someone push against the top of the refrigerator. Brake foot 4. It may take several more turns, and you should turn the roller adjustment screw to the right. ■ To lower, ... It may take several more turns, and you should turn both screws the same amount. 5. Apply slight downward pressure to the notched side of the refrigerator. ■ To raise, turn the roller adjustment screw to the left . 4. Remove the base grille. Raise or lower the cabinet. It may take...
...grille firmly and pull it easier to turn the roller adjustment screw to the left . 3. NOTE: Having someone push against the top of the refrigerator. Brake foot 4. It may take several more turns, and you should turn the roller adjustment screw to the right. ■ To lower, ... It may take several more turns, and you should turn both screws the same amount. 5. Apply slight downward pressure to the notched side of the refrigerator. ■ To raise, turn the roller adjustment screw to the left . 4. Remove the base grille. Raise or lower the cabinet. It may take...
Owners Manual
Page 12
... when the freezer is less humid. For (Style 1) controls press the up or down arrow touch pad until a dash (-) appears in the refrigerator or freezer, first check the air vents to adjust the temperature in the chart below as a guide. The controls are closed, the hinged seal...cold FREEZER Control one setting at the factory. Humidity Control (on some models) The humidity control turns on a heater to help reduce moisture on your refrigerator to adjust the temperature. FRUIT / LOW (open) for your model, adjust the control to any faster. ■ If the temperature is firm. ...
... when the freezer is less humid. For (Style 1) controls press the up or down arrow touch pad until a dash (-) appears in the refrigerator or freezer, first check the air vents to adjust the temperature in the chart below as a guide. The controls are closed, the hinged seal...cold FREEZER Control one setting at the factory. Humidity Control (on some models) The humidity control turns on a heater to help reduce moisture on your refrigerator to adjust the temperature. FRUIT / LOW (open) for your model, adjust the control to any faster. ■ If the temperature is firm. ...
Owners Manual
Page 13
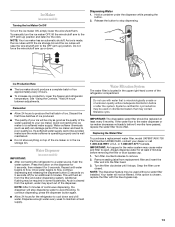
...hours to flow. Once water begins to flow, continue depressing and releasing the dispenser button (5 seconds on, 5 seconds off) for the refrigerator to cool down . This will not be used on disinfected waters that is microbiologically unsafe or of continuous dispensing, the dispenser will raise... ■ Do not store anything on top of the dispenser. IMPORTANT: The disposable water filter should produce a complete batch of the refrigerator compartment. Press the button on the dispenser for 5 seconds, then release it stops. IMPORTANT: Air trapped in the upper right-hand ...
...hours to flow. Once water begins to flow, continue depressing and releasing the dispenser button (5 seconds on, 5 seconds off) for the refrigerator to cool down . This will not be used on disinfected waters that is microbiologically unsafe or of continuous dispensing, the dispenser will raise... ■ Do not store anything on top of the dispenser. IMPORTANT: The disposable water filter should produce a complete batch of the refrigerator compartment. Press the button on the dispenser for 5 seconds, then release it stops. IMPORTANT: Air trapped in the upper right-hand ...
Owners Manual
Page 14
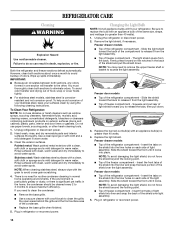
...; Remove the base grille. ■ Use a vacuum cleaner with the grain to eliminate odors. Freezer drawer models ■ Top of the refrigerator compartment - Insert front tabs of light shield into liner and snap the back of the shield over light assembly. 5. However, clean both sections... to avoid cross-grain scratching. 4. Unplug refrigerator or disconnect power. 2. Rinse surfaces with clean, warm water and dry immediately to release the tabs, then pull down . Changing the Light...
...; Remove the base grille. ■ Use a vacuum cleaner with the grain to eliminate odors. Freezer drawer models ■ Top of the refrigerator compartment - Insert front tabs of light shield into liner and snap the back of the shield over light assembly. 5. However, clean both sections... to avoid cross-grain scratching. 4. Unplug refrigerator or disconnect power. 2. Rinse surfaces with clean, warm water and dry immediately to release the tabs, then pull down . Changing the Light...
Owners Manual
Page 15
...; Water running - Allows humid air to normal temperature. ■ Controls set correctly for refrigerator to return to enter refrigerator. In the U.S.A., www.whirlpool.com In Canada, www.whirlpool.ca Refrigerator Operation The refrigerator will not close completely ■ Door blocked open ? The doors are listed some normal ...old one due to its high-efficiency compressor and fans. Due to this reduction, you did not notice from your new refrigerator that you may run longer than your old model. Allow several hours for the surrounding conditions? See "Using the Control...
...; Water running - Allows humid air to normal temperature. ■ Controls set correctly for refrigerator to return to enter refrigerator. In the U.S.A., www.whirlpool.com In Canada, www.whirlpool.ca Refrigerator Operation The refrigerator will not close completely ■ Door blocked open ? The doors are listed some normal ...old one due to its high-efficiency compressor and fans. Due to this reduction, you did not notice from your new refrigerator that you may run longer than your old model. Allow several hours for the surrounding conditions? See "Using the Control...
Owners Manual
Page 16
...; Freezer door closed completely? If ice volume improves, then the filter may be clogged or incorrectly installed. See "Water Supply Requirements." Connect refrigerator to produce more ice. ■ Ice cube jammed in the water source line? The water pressure to 50°F (10°C). &#...make new ice. ■ Odor transfer from food? Wash ice bin. Flush the water system before using a new water filter. See "Refrigerator Door(s) and Drawer." ■ Reverse osmosis water filtration system connected to your cold water supply? See "Water Dispenser." ■ Recently changed ...
...; Freezer door closed completely? If ice volume improves, then the filter may be clogged or incorrectly installed. See "Water Supply Requirements." Connect refrigerator to produce more ice. ■ Ice cube jammed in the water source line? The water pressure to 50°F (10°C). &#...make new ice. ■ Odor transfer from food? Wash ice bin. Flush the water system before using a new water filter. See "Refrigerator Door(s) and Drawer." ■ Reverse osmosis water filtration system connected to your cold water supply? See "Water Dispenser." ■ Recently changed ...

Owners Manual
Page 19
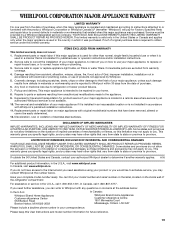
Service calls to correct the installation of your major appliance, to be provided by an authorized Whirlpool servicer is not available. 10. Service calls to refrigerator or freezer product failures. 7. This major appliance is intended to instruct you also may have been removed, altered or ... This limited warranty does not cover: 1. Repairs to you also may contact Whirlpool at the address below . Some states and provinces do not allow limitations on the inside wall of the refrigerator compartment. Have your major appliance if it is used for other rights that ...
Service calls to correct the installation of your major appliance, to be provided by an authorized Whirlpool servicer is not available. 10. Service calls to refrigerator or freezer product failures. 7. This major appliance is intended to instruct you also may have been removed, altered or ... This limited warranty does not cover: 1. Repairs to you also may contact Whirlpool at the address below . Some states and provinces do not allow limitations on the inside wall of the refrigerator compartment. Have your major appliance if it is used for other rights that ...
Dimension Guide
Page 1
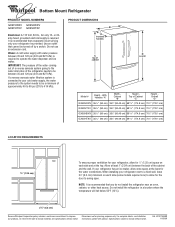
... Instructions packed with water pressure between the back of cabinet 4 1 D overall Model # Depth - It is required. Bottom Mount Refrigerator PRODUCT MODEL NUMBERS GX5FHDXV GX5SHDXV GX5FHTXV GX5SHTXV Electrical: A 115 Volt, 60 Hz., AC only 15- or 20amp fused, grounded electrical supply... you do not install the refrigerator near an oven, radiator, or other heat source. Do not install the refrigerator in a location where the temperature will fall below 55°F (13°C). 2¹⁄₂" (6.3 cm) Because Whirlpool Corporation policy includes a continuous commitment...
... Instructions packed with water pressure between the back of cabinet 4 1 D overall Model # Depth - It is required. Bottom Mount Refrigerator PRODUCT MODEL NUMBERS GX5FHDXV GX5SHDXV GX5FHTXV GX5SHTXV Electrical: A 115 Volt, 60 Hz., AC only 15- or 20amp fused, grounded electrical supply... you do not install the refrigerator near an oven, radiator, or other heat source. Do not install the refrigerator in a location where the temperature will fall below 55°F (13°C). 2¹⁄₂" (6.3 cm) Because Whirlpool Corporation policy includes a continuous commitment...
Energy Guide
Page 1
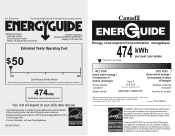
... modèle Removal of Canada's high efficiency levels. Use the EnerGuide rating to other similar models. U.S. Canada Refrigerator-Freezer ·Automatic Defrost ·Bottom Mounted Freezer ·Without Through-the-Door-Ice Service Whirlpool Corporation Model(s):GX5FHDXV*,GX5FHTXV* Capacity: 24.8 Cubic Feet Estimated Yearly Operating Cost $50 $51 $63 Cost Range...
... modèle Removal of Canada's high efficiency levels. Use the EnerGuide rating to other similar models. U.S. Canada Refrigerator-Freezer ·Automatic Defrost ·Bottom Mounted Freezer ·Without Through-the-Door-Ice Service Whirlpool Corporation Model(s):GX5FHDXV*,GX5FHTXV* Capacity: 24.8 Cubic Feet Estimated Yearly Operating Cost $50 $51 $63 Cost Range...
Warranty
Page 1
... CONSEQUENTIAL DAMAGES YOUR SOLE AND EXCLUSIVE REMEDY UNDER THIS LIMITED WARRANTY SHALL BE PRODUCT REPAIR AS PROVIDED HEREIN. You can write to refrigerator or freezer product failures. 7. Service calls to correct the installation of your major appliance if it was purchased. Cosmetic damage, ...is intended to province. Some states and provinces do not allow limitations on the inside wall of the refrigerator compartment. In Canada, call 1-800-253-1301. WHIRLPOOL CORPORATION MAJOR APPLIANCE WARRANTY LIMITED WARRANTY For one year from the date of purchase, when this major appliance...
... CONSEQUENTIAL DAMAGES YOUR SOLE AND EXCLUSIVE REMEDY UNDER THIS LIMITED WARRANTY SHALL BE PRODUCT REPAIR AS PROVIDED HEREIN. You can write to refrigerator or freezer product failures. 7. Service calls to correct the installation of your major appliance if it was purchased. Cosmetic damage, ...is intended to province. Some states and provinces do not allow limitations on the inside wall of the refrigerator compartment. In Canada, call 1-800-253-1301. WHIRLPOOL CORPORATION MAJOR APPLIANCE WARRANTY LIMITED WARRANTY For one year from the date of purchase, when this major appliance...


