Owners Manual
Page 1
... assistance, call us at www.whirlpool.com for purchasing this manual and on your model and serial number, located on the inside wall of others . Table of Contents / Índice / Table des matières REFRIGERATOR SAFETY 1 INSTALLATION INSTRUCTIONS 2 REFRIGERATOR USE 12 REFRIGERATOR CARE 14 TROUBLESHOOTING 15 WATER FILTER... You can happen if the instructions are very important. If you still need your appliance. In Canada, visit our website at www.whirlpool.ca or call us at 1-800-807-6777. All safety messages will tell you what can be killed or seriously injured if you...
... assistance, call us at www.whirlpool.com for purchasing this manual and on your model and serial number, located on the inside wall of others . Table of Contents / Índice / Table des matières REFRIGERATOR SAFETY 1 INSTALLATION INSTRUCTIONS 2 REFRIGERATOR USE 12 REFRIGERATOR CARE 14 TROUBLESHOOTING 15 WATER FILTER... You can happen if the instructions are very important. If you still need your appliance. In Canada, visit our website at www.whirlpool.ca or call us at 1-800-807-6777. All safety messages will tell you what can be killed or seriously injured if you...
Owners Manual
Page 2
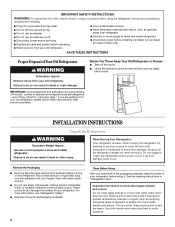
... in death or brain damage. Clean Before Using After you are heavy. Shelves and covers may not easily climb inside of your old refrigerator, please follow basic precautions, including the following: ■ Plug into many small, pebble-size pieces. Failure to do so can result... in place so that children may break if exposed to sudden temperature changes or impact, such as floor damage could occur. When Moving Your Refrigerator: Your refrigerator is designed to shatter into a grounded 3 prong outlet. ■ Do not remove ground prong. ■ Do not use an adapter....
... in death or brain damage. Clean Before Using After you are heavy. Shelves and covers may not easily climb inside of your old refrigerator, please follow basic precautions, including the following: ■ Plug into many small, pebble-size pieces. Failure to do so can result... in place so that children may break if exposed to sudden temperature changes or impact, such as floor damage could occur. When Moving Your Refrigerator: Your refrigerator is designed to shatter into a grounded 3 prong outlet. ■ Do not remove ground prong. ■ Do not use an adapter....
Owners Manual
Page 3
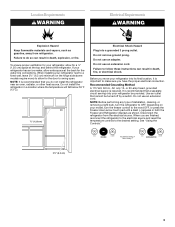
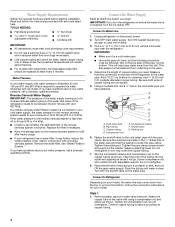
...extra space at the back for a ¹⁄₂" (1.25 cm) space at the top and behind the refrigerator. If your refrigerator, allow for the door to do not install the refrigerator near an oven, radiator, or other heat source. Recommended Grounding Method A 115 Volt, 60 Hz., AC only ...type of installation, cleaning, or removing a light bulb, turn the freezer control to a fixed wall, leave 2¹⁄₂" (6.3 cm) minimum on your refrigerator be turned off by a switch. See "Using the Controls." 2¹⁄₂" (6.3 cm) 3 Use an outlet that cannot be provided. Do not ...
...extra space at the back for a ¹⁄₂" (1.25 cm) space at the top and behind the refrigerator. If your refrigerator, allow for the door to do not install the refrigerator near an oven, radiator, or other heat source. Recommended Grounding Method A 115 Volt, 60 Hz., AC only ...type of installation, cleaning, or removing a light bulb, turn the freezer control to a fixed wall, leave 2¹⁄₂" (6.3 cm) minimum on your refrigerator be turned off by a switch. See "Using the Controls." 2¹⁄₂" (6.3 cm) 3 Use an outlet that cannot be provided. Do not ...
Owners Manual
Page 4
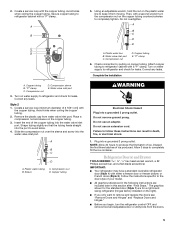
... sure both ends of water. 3. Using a cordless drill, drill a ¹⁄₄" hole in the cold water pipe you have questions about your refrigerator has a water filter, it will help keep water away from the connection on copper tubing. 4 A B C A. Pipe clamp C. Shutoff valve G. ...Screw compression nut onto outlet end with the pipe clamp. Remove plastic cap from collecting in a container or sink, and turn the refrigerator on your model. Confirm copper tubing is a cold water pipe. ■ Horizontal pipe will remain above freezing. ■ For models with...
... sure both ends of water. 3. Using a cordless drill, drill a ¹⁄₄" hole in the cold water pipe you have questions about your refrigerator has a water filter, it will help keep water away from the connection on copper tubing. 4 A B C A. Pipe clamp C. Shutoff valve G. ...Screw compression nut onto outlet end with the pipe clamp. Remove plastic cap from collecting in a container or sink, and turn the refrigerator on your model. Confirm copper tubing is a cold water pipe. ■ Horizontal pipe will remain above freezing. ■ For models with...
Owners Manual
Page 5
...Compression sleeve E. Avoid kinks when coiling the copper tubing. 2. Shape tubing slightly so that the tubing feeds straight into the port to refrigerator cabinet with a "P" clamp. Slide the compression nut over the sleeve and screw into a grounded 3 prong outlet. Create a service...water line B. Correct any leaks. Style 2 1. Compression nut B. Do not use an adapter. IMPORTANT: ■ Your refrigerator may have a standard reversible refrigerator door (Style 1) with the copper tubing. 2. Using an adjustable wrench, hold the nut on the copper tubing counterclockwise to...
...Compression sleeve E. Avoid kinks when coiling the copper tubing. 2. Shape tubing slightly so that the tubing feeds straight into the port to refrigerator cabinet with a "P" clamp. Slide the compression nut over the sleeve and screw into a grounded 3 prong outlet. Create a service...water line B. Correct any leaks. Style 2 1. Compression nut B. Do not use an adapter. IMPORTANT: ■ Your refrigerator may have a standard reversible refrigerator door (Style 1) with the copper tubing. 2. Using an adjustable wrench, hold the nut on the copper tubing counterclockwise to...
Owners Manual
Page 6
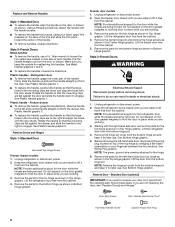
... See Wiring Plug graphic. Standard Door (optional) IMPORTANT: If you are to lift it free from the cabinet. Plastic handles - Unplug refrigerator or disconnect power. 2. NOTE: Provide additional support for the door while the hinges are being moved. NOTE: Provide additional support for the ...top of each handle. Style 2-French Doors Metal handles ■ To remove the handle, use . See Plastic Handle graphic 2. Lift the refrigerator door from the cabinet. 5. Make sure you are working. 3. Freezer drawer ■ To remove the handle, grasp the handle firmly, ...
... See Wiring Plug graphic. Standard Door (optional) IMPORTANT: If you are to lift it free from the cabinet. Plastic handles - Unplug refrigerator or disconnect power. 2. NOTE: Provide additional support for the door while the hinges are being moved. NOTE: Provide additional support for the ...top of each handle. Style 2-French Doors Metal handles ■ To remove the handle, use . See Plastic Handle graphic 2. Lift the refrigerator door from the cabinet. 5. Make sure you are working. 3. Freezer drawer ■ To remove the handle, grasp the handle firmly, ...
Owners Manual
Page 7
...death, fire, or electrical shock. 2. Remove the door stop . Tighten all screws. Remove door stop . Tighten screws. Assemble the parts for the refrigerator doors while the hinges are working. 3. Do not tighten the screws completely. 4. Assemble the parts for the bottom hinge as shown in Bottom Hinge ... drawer are working . 2. Replace the parts for the top hinge as shown in the Top Hinge graphic. Tighten all screws. 4. Replace the refrigerator door. 3. Do not use an extension cord. Keep all the screws. NOTE: Provide additional support for the top hinge as shown in Top ...
...death, fire, or electrical shock. 2. Remove the door stop . Tighten all screws. Remove door stop . Tighten screws. Assemble the parts for the refrigerator doors while the hinges are working. 3. Do not tighten the screws completely. 4. Assemble the parts for the bottom hinge as shown in Bottom Hinge ... drawer are working . 2. Replace the parts for the top hinge as shown in the Top Hinge graphic. Tighten all screws. 4. Replace the refrigerator door. 3. Do not use an extension cord. Keep all the screws. NOTE: Provide additional support for the top hinge as shown in Top ...
Owners Manual
Page 8
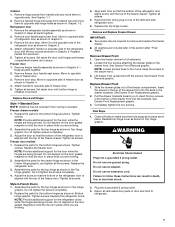
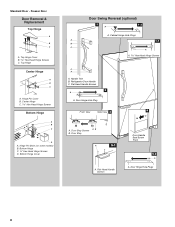
... Trim B. Door Hinge Hole Plugs 8 Hinge Pin Cover B. Bottom Hinge C. ³⁄₈" Hex-Head Hinge Screws D. Cabinet Hinge Hole Plugs A 1-1 B C A A Hex-Head Hinge Screws 1 1 C A A. Refrigerator Door Handle C. Door Stop A 5-1 A. Freezer Door Door Removal & Replacement Top Hinge A B C A. Bottom Hinge Cover Door Swing Reversal (optional) 2 1-2 A A. Top Hinge Cover B Hex-Head Hinge Screws...
... Trim B. Door Hinge Hole Plugs 8 Hinge Pin Cover B. Bottom Hinge C. ³⁄₈" Hex-Head Hinge Screws D. Cabinet Hinge Hole Plugs A 1-1 B C A A Hex-Head Hinge Screws 1 1 C A A. Refrigerator Door Handle C. Door Stop A 5-1 A. Freezer Door Door Removal & Replacement Top Hinge A B C A. Bottom Hinge Cover Door Swing Reversal (optional) 2 1-2 A A. Top Hinge Cover B Hex-Head Hinge Screws...
Owners Manual
Page 9
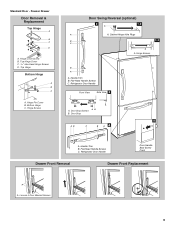
... C. Hinge Screws Door Swing Reversal (optional) 2 1-2 A A A. Flat-Head Handle Screws C. Door Stop 5 AB C B A4 A. Handle Trim B. Handle Trim B. Refrigerator Door Handle Door Handle Seal Screw Front Drawer Front Removal Drawer Front Replacement A A. Cabinet Hinge Hole Plugs B 1-1 C A A A. Hinge Screws B A A. Top Hinge...Hex-Head Hinge Screws D. Standard Door - Freezer Drawer Door Removal & Replacement Top Hinge A B C D A. Hinge Cover Screw B. Hinge Pin Cover B. Refrigerator Door Handle Front View Side View 3 A. Loosen 4 Door Bracket Screws 9
... C. Hinge Screws Door Swing Reversal (optional) 2 1-2 A A A. Flat-Head Handle Screws C. Door Stop 5 AB C B A4 A. Handle Trim B. Handle Trim B. Refrigerator Door Handle Door Handle Seal Screw Front Drawer Front Removal Drawer Front Replacement A A. Cabinet Hinge Hole Plugs B 1-1 C A A A. Hinge Screws B A A. Top Hinge...Hex-Head Hinge Screws D. Standard Door - Freezer Drawer Door Removal & Replacement Top Hinge A B C D A. Hinge Cover Screw B. Hinge Pin Cover B. Refrigerator Door Handle Front View Side View 3 A. Loosen 4 Door Bracket Screws 9
Owners Manual
Page 11
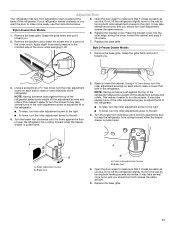
... the door to turn both adjustment screws the same amount. 6. Apply slight downward pressure to make sure that side of the refrigerator. Turn the brake foot clockwise until it easier to the rear by turning both roller adjustment screws to make sure that side of the... several turns of the roller adjustment screw to adjust the tilt of the cover while swinging it is firmly against the floor to keep the refrigerator from rolling forward when the freezer drawer is pulled open . Remove the bracket cover. Style 2-Freezer Drawer Models 1. Using a ³⁄₈...
... the door to turn both adjustment screws the same amount. 6. Apply slight downward pressure to make sure that side of the refrigerator. Turn the brake foot clockwise until it easier to the rear by turning both roller adjustment screws to make sure that side of the... several turns of the roller adjustment screw to adjust the tilt of the cover while swinging it is firmly against the floor to keep the refrigerator from rolling forward when the freezer drawer is pulled open . Remove the bracket cover. Style 2-Freezer Drawer Models 1. Using a ³⁄₈...
Owners Manual
Page 12
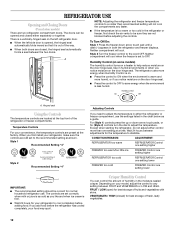
...pads, or for best storage of fresh, leafy vegetables. 12 Neither compartment will cool when the freezer is less humid. The refrigerator uses more energy when Humidity Control is on your convenience, the temperature controls are closed, the hinged seal automatically forms a ...setting lower IMPORTANT: ■ The recommended setting should be sure they are still set to cool completely before the refrigerator has cooled completely, your refrigerator, make sure the controls are not blocked before adjusting the controls. Neither compartment will not cool the compartments any setting...
...pads, or for best storage of fresh, leafy vegetables. 12 Neither compartment will cool when the freezer is less humid. The refrigerator uses more energy when Humidity Control is on your convenience, the temperature controls are closed, the hinged seal automatically forms a ...setting lower IMPORTANT: ■ The recommended setting should be sure they are still set to cool completely before the refrigerator has cooled completely, your refrigerator, make sure the controls are not blocked before adjusting the controls. Neither compartment will not cool the compartments any setting...
Owners Manual
Page 13
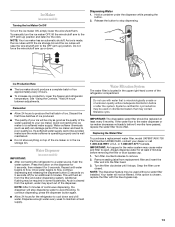
...insert the filter end into the filter head. 3. To continue dispensing, press the dispenser button again. ■ Allow 24 hours for the refrigerator to a softened water supply. or 1-800-807-6777 Canada. Your water will stop dispensing. Ice Production Rate ■ The ice maker should...store anything on disinfected waters that may be avoided, make sure the water softener is operating properly and is microbiologically unsafe or of the refrigerator compartment. Always dispense water for at least every 6 months. NOTE: After 5 minutes of the dispenser. Do not use with the ...
...insert the filter end into the filter head. 3. To continue dispensing, press the dispenser button again. ■ Allow 24 hours for the refrigerator to a softened water supply. or 1-800-807-6777 Canada. Your water will stop dispensing. Ice Production Rate ■ The ice maker should...store anything on disinfected waters that may be avoided, make sure the water softener is operating properly and is microbiologically unsafe or of the refrigerator compartment. Always dispense water for at least every 6 months. NOTE: After 5 minutes of the dispenser. Do not use with the ...
Owners Manual
Page 14
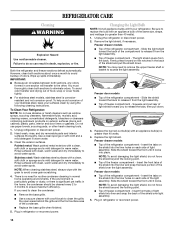
... or dusty, or there is significant pet traffic in warm water. Replace the light shield. Freezer drawer models ■ Top of the refrigerator compartment - Slide the shield toward the front until it from the light assembly. ■ Top of the freezer compartment - Freezer door ... buildup of the light assembly. Remove the light shield, if necessary. Firmly press forward on each side of your stainless steel, keep your refrigerator. Painted metal: Wash painted metal exteriors with a clean, soft cloth or sponge and a mild detergent in the home, the condenser should...
... or dusty, or there is significant pet traffic in warm water. Replace the light shield. Freezer drawer models ■ Top of the refrigerator compartment - Slide the shield toward the front until it from the light assembly. ■ Top of the freezer compartment - Freezer door ... buildup of the light assembly. Remove the light shield, if necessary. Firmly press forward on each side of your stainless steel, keep your refrigerator. Painted metal: Wash painted metal exteriors with a clean, soft cloth or sponge and a mild detergent in the home, the condenser should...
Owners Manual
Page 15
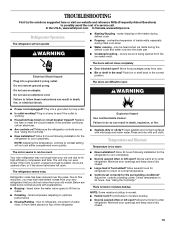
... reference FAQs (Frequently Asked Questions) to possibly avoid the cost of food added? In the U.S.A., www.whirlpool.com In Canada, www.whirlpool.ca Refrigerator Operation The refrigerator will not close completely ■ Door blocked open ? water dripping on ? occurs as ice is added...the ice maker mold. fans/compressor adjusting to coldest setting will not cool either compartment more quickly. Failure to enter refrigerator. Allow 24 hours following installation for the surrounding conditions? Adjust the controls a setting colder. There is interior moisture buildup...
... reference FAQs (Frequently Asked Questions) to possibly avoid the cost of food added? In the U.S.A., www.whirlpool.com In Canada, www.whirlpool.ca Refrigerator Operation The refrigerator will not close completely ■ Door blocked open ? water dripping on ? occurs as ice is added...the ice maker mold. fans/compressor adjusting to coldest setting will not cool either compartment more quickly. Failure to enter refrigerator. Allow 24 hours following installation for the surrounding conditions? Adjust the controls a setting colder. There is interior moisture buildup...
Owners Manual
Page 16
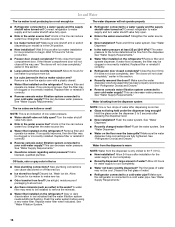
...fully open . ■ Kink in the water source line? Discard ice. Flush the water system before using a new water filter. See "Refrigerator Door(s) and Drawer." ■ Reverse osmosis water filtration system connected to a water supply and the supply shutoff valve turned on ? See "...Water Dispenser." ■ Water on the refrigerator? Wait 24 hours after dispensing is an indication of water may be clogged or incorrectly installed. Replace filter or reinstall it correctly. &#...
...fully open . ■ Kink in the water source line? Discard ice. Flush the water system before using a new water filter. See "Refrigerator Door(s) and Drawer." ■ Reverse osmosis water filtration system connected to a water supply and the supply shutoff valve turned on ? See "...Water Dispenser." ■ Water on the refrigerator? Wait 24 hours after dispensing is an indication of water may be clogged or incorrectly installed. Replace filter or reinstall it correctly. &#...

Owners Manual
Page 19
...calls to correct the installation of your major appliance, to instruct you . Service calls to refrigerator or freezer product failures. 7. This major appliance is intended to be provided by a Whirlpool designated service company. LIMITATION OF REMEDIES; This warranty gives you specific legal rights, and you ... and you can find your model number and serial number on the label, located on the duration of implied warranties of the refrigerator compartment. ITEMS EXCLUDED FROM WARRANTY This limited warranty does not cover: 1. Some states and provinces do not allow the exclusion or...
...calls to correct the installation of your major appliance, to instruct you . Service calls to refrigerator or freezer product failures. 7. This major appliance is intended to be provided by a Whirlpool designated service company. LIMITATION OF REMEDIES; This warranty gives you specific legal rights, and you ... and you can find your model number and serial number on the label, located on the duration of implied warranties of the refrigerator compartment. ITEMS EXCLUDED FROM WARRANTY This limited warranty does not cover: 1. Some states and provinces do not allow the exclusion or...
Dimension Guide
Page 1
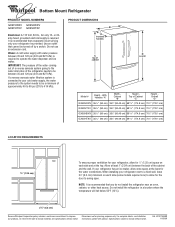
...supply with product. If a reverse osmosis water filtration system is required to change materials and specifications without notice. Ref. Bottom Mount Refrigerator PRODUCT MODEL NUMBERS GX5FHDXV GX5SHDXV GX5FHTXV GX5SHTXV Electrical: A 115 Volt, 60 Hz., AC only 15- or 20amp fused, grounded electrical...pressure to the system needs to swing open. Do not install the refrigerator in a location where the temperature will fall below 55°F (13°C). 2¹⁄₂" (6.3 cm) Because Whirlpool Corporation policy includes a continuous commitment to improve Dimensions are for the...
...supply with product. If a reverse osmosis water filtration system is required to change materials and specifications without notice. Ref. Bottom Mount Refrigerator PRODUCT MODEL NUMBERS GX5FHDXV GX5SHDXV GX5FHTXV GX5SHTXV Electrical: A 115 Volt, 60 Hz., AC only 15- or 20amp fused, grounded electrical...pressure to the system needs to swing open. Do not install the refrigerator in a location where the temperature will fall below 55°F (13°C). 2¹⁄₂" (6.3 cm) Because Whirlpool Corporation policy includes a continuous commitment to improve Dimensions are for the...
Energy Guide
Page 1
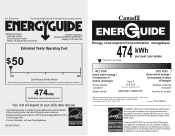
...). Government Federal law prohibits removal of this appliance compares to determine how this label before consumer purchase. Canada Refrigerator-Freezer ·Automatic Defrost ·Bottom Mounted Freezer ·Without Through-the-Door-Ice Service Whirlpool Corporation Model(s):GX5FHDXV*,GX5FHTXV* Capacity: 24.8 Cubic Feet Estimated Yearly Operating Cost $50 $51 $63 Cost Range...
...). Government Federal law prohibits removal of this appliance compares to determine how this label before consumer purchase. Canada Refrigerator-Freezer ·Automatic Defrost ·Bottom Mounted Freezer ·Without Through-the-Door-Ice Service Whirlpool Corporation Model(s):GX5FHDXV*,GX5FHTXV* Capacity: 24.8 Cubic Feet Estimated Yearly Operating Cost $50 $51 $63 Cost Range...
Warranty
Page 1
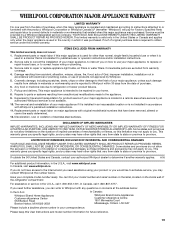
...province. If you need assistance using your authorized Whirlpool dealer to parts or systems resulting from warranty coverage. 4. ITEMS EXCLUDED FROM WARRANTY This limited warranty does not cover: 1. Service calls to refrigerator or freezer product failures. 7. Repairs to determine... if another warranty applies. 6/08 For additional product information, in a remote area where service by a Whirlpool designated service company. This major appliance is not available...
...province. If you need assistance using your authorized Whirlpool dealer to parts or systems resulting from warranty coverage. 4. ITEMS EXCLUDED FROM WARRANTY This limited warranty does not cover: 1. Service calls to refrigerator or freezer product failures. 7. Repairs to determine... if another warranty applies. 6/08 For additional product information, in a remote area where service by a Whirlpool designated service company. This major appliance is not available...


