
User Instructions
Page 1
.... W10175448A In Canada, visit our website at www.whirlpool.ca or call us at 1-800-807-6777. WARNING You can kill or hurt you should experience a problem not covered in this high-quality product. ® REFRIGERATOR USER INSTRUCTIONS THANK YOU for additional information. All safety... messages will need assistance, call us at www.whirlpool.com for purchasing this manual and on the inside wall of injury, and tell ...
.... W10175448A In Canada, visit our website at www.whirlpool.ca or call us at 1-800-807-6777. WARNING You can kill or hurt you should experience a problem not covered in this high-quality product. ® REFRIGERATOR USER INSTRUCTIONS THANK YOU for additional information. All safety... messages will need assistance, call us at www.whirlpool.com for purchasing this manual and on the inside wall of injury, and tell ...

User Instructions
Page 2
...with warm water when they will sit for cleaning or service, be sure to protect the floor. These products can result in "Refrigerator Care." Clean Before Using After you are still dangerous - Important information to know about glass shelves and covers: Do not clean ...■ Leave the shelves in death or brain damage. For your fingers. Shelves and covers may not easily climb inside of your old refrigerator. ■ Use nonflammable cleaner. ■ Keep flammable materials and vapors, such as floor damage could occur. IMPORTANT SAFETY INSTRUCTIONS WARNING:To ...
...with warm water when they will sit for cleaning or service, be sure to protect the floor. These products can result in "Refrigerator Care." Clean Before Using After you are still dangerous - Important information to know about glass shelves and covers: Do not clean ...■ Leave the shelves in death or brain damage. For your fingers. Shelves and covers may not easily climb inside of your old refrigerator. ■ Use nonflammable cleaner. ■ Keep flammable materials and vapors, such as floor damage could occur. IMPORTANT SAFETY INSTRUCTIONS WARNING:To ...

User Instructions
Page 3
...door to the desired setting. Read and follow these instructions can result in both the Freezer and Refrigerator displays as gasoline, away from the electrical source. Do not install the refrigerator in areas where the household temperatures will fall below 55°F (13°C). ¹⁄&#...to make sure you have the proper electrical connection. or 20-amp fused, grounded electrical supply is important to do not install the refrigerator near an oven, radiator, or other heat source. NOTE: Before performing any tools listed here. Install copper tubing only in a location...
...door to the desired setting. Read and follow these instructions can result in both the Freezer and Refrigerator displays as gasoline, away from the electrical source. Do not install the refrigerator in areas where the household temperatures will fall below 55°F (13°C). ¹⁄&#...to make sure you have the proper electrical connection. or 20-amp fused, grounded electrical supply is important to do not install the refrigerator near an oven, radiator, or other heat source. NOTE: Before performing any tools listed here. Install copper tubing only in a location...

User Instructions
Page 4
...water pressure when used in the water pipe and that the washer is clear. Connect to clear line of the pipe, not the bottom. Compression sleeve F. Be sure the outlet end is solidly in the ¹⁄₄" drilled hole in conjunction with the pipe... on the water pipe. Copper tubing D. Do not overtighten or you begin. Cold water pipe B. Add 7 ft (2.1 m) to 31.8 mm) vertical cold water pipe near the refrigerator. Fasten the shutoff valve to Refrigerator Depending on your water pressure, call a licensed, qualified plumber. Tighten the compression nut.
...water pressure when used in the water pipe and that the washer is clear. Connect to clear line of the pipe, not the bottom. Compression sleeve F. Be sure the outlet end is solidly in the ¹⁄₄" drilled hole in conjunction with the pipe... on the water pipe. Copper tubing D. Do not overtighten or you begin. Cold water pipe B. Add 7 ft (2.1 m) to 31.8 mm) vertical cold water pipe near the refrigerator. Fasten the shutoff valve to Refrigerator Depending on your water pressure, call a licensed, qualified plumber. Tighten the compression nut.

User Instructions
Page 5
..., and a flat-blade screwdriver. "P" clamp C. Correct any leaks. Style 2 1. Shape tubing slightly so that the tubing feeds straight into the port to refrigerator cabinet with a second wrench turn A the compression nut on copper tubing. Compression nut B. Copper tubing A. "P" clamp 6. Do not use an extension cord....kinks. 4. Turn on the plastic water line to produce the first batch of 2 ft [61 cm]) with either a freezer door or freezer drawer, or French doors (Style 2). NOTE: Allow 24 hours to keep it from water valve inlet port. Do not overtighten. Water valve ...
..., and a flat-blade screwdriver. "P" clamp C. Correct any leaks. Style 2 1. Shape tubing slightly so that the tubing feeds straight into the port to refrigerator cabinet with a second wrench turn A the compression nut on copper tubing. Compression nut B. Copper tubing A. "P" clamp 6. Do not use an extension cord....kinks. 4. Turn on the plastic water line to produce the first batch of 2 ft [61 cm]) with either a freezer door or freezer drawer, or French doors (Style 2). NOTE: Allow 24 hours to keep it from water valve inlet port. Do not overtighten. Water valve ...

User Instructions
Page 6
...the directions. Keep the freezer door closed until you are ready to opposite side. Lift the refrigerator door free from the bottom hinge pin. 4. Lift the refrigerator door from the cabinet. 4. See Bottom Hinge graphic. Reverse Door - Door Stop Screw Door Handle Seal Screw Front Flat-Head Handle... on top of each handle. Place handle on some models, remove the shim from the bottom hinge pin and keep it opens from the cabinet. Freezer door models 1. Keep the refrigerator doors closed until you are ready to opposite side hinge holes as shown in...
...the directions. Keep the freezer door closed until you are ready to opposite side. Lift the refrigerator door free from the bottom hinge pin. 4. Lift the refrigerator door from the cabinet. 4. See Bottom Hinge graphic. Reverse Door - Door Stop Screw Door Handle Seal Screw Front Flat-Head Handle... on top of each handle. Place handle on some models, remove the shim from the bottom hinge pin and keep it opens from the cabinet. Freezer door models 1. Keep the refrigerator doors closed until you are ready to opposite side hinge holes as shown in...

User Instructions
Page 7
... 1. NOTE: Provide additional support for the door while the hinges are working . 2. Adjust the door so that the bottom of freezer door. 5. Replace the freezer door. Replace the refrigerator door. 3. Assemble the parts for the top hinges as shown in death, fire, or electrical shock. 2. Do not...shown. Tighten screws. Replace the parts for the top hinge as shown in the bottom of the left-hand side refrigerator door. 5. NOTE: Loosen screws three to make sure that the bottom of the refrigerator door is installed on top of the drawer front into the brackets. Check all ...
... 1. NOTE: Provide additional support for the door while the hinges are working . 2. Adjust the door so that the bottom of freezer door. 5. Replace the freezer door. Replace the refrigerator door. 3. Assemble the parts for the top hinges as shown in death, fire, or electrical shock. 2. Do not...shown. Tighten screws. Replace the parts for the top hinge as shown in the bottom of the left-hand side refrigerator door. 5. NOTE: Loosen screws three to make sure that the bottom of the refrigerator door is installed on top of the drawer front into the brackets. Check all ...
User Instructions
Page 8
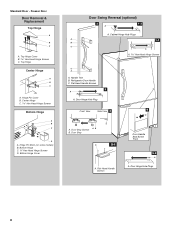
... Cover Door Swing Reversal (optional) 2 1-2 A A. Refrigerator Door Handle C. Flat-Head Handle Screws 3 A A. Door Stop Screws B. Top Hinge Center Hinge A B C A. Bottom Hinge C. ³⁄₈" Hex-Head Hinge Screws D. Flat-Head Handle Screws Door Handle Seal Screw Front 5-2 A A. Door Hinge Hole ... & Replacement Top Hinge A B C A. Standard Door - Hinge Pin Shim (on some models) B. Handle Trim B. Center Hinge C Hex-Head Hinge Screws Bottom Hinge A B C D A. Cabinet Hinge Hole Plugs A 1-1 B C A A Hex-Head Hinge Screws 1 1 C A A. Door Hinge Hole Plugs 8
... Cover Door Swing Reversal (optional) 2 1-2 A A. Refrigerator Door Handle C. Flat-Head Handle Screws 3 A A. Door Stop Screws B. Top Hinge Center Hinge A B C A. Bottom Hinge C. ³⁄₈" Hex-Head Hinge Screws D. Flat-Head Handle Screws Door Handle Seal Screw Front 5-2 A A. Door Hinge Hole ... & Replacement Top Hinge A B C A. Standard Door - Hinge Pin Shim (on some models) B. Handle Trim B. Center Hinge C Hex-Head Hinge Screws Bottom Hinge A B C D A. Cabinet Hinge Hole Plugs A 1-1 B C A A Hex-Head Hinge Screws 1 1 C A A. Door Hinge Hole Plugs 8
User Instructions
Page 9
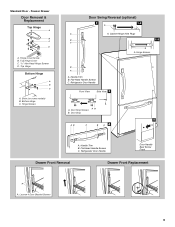
... C. Flat-Head Handle Screws C. Handle Trim B. Flat-Head Handle Screws C. Top Hinge Bottom Hinge A B C A. Door Stop 5 AB C B A4 A. Shim (on some models) B. Hinge Screws Door Swing Reversal (optional) 2 1-2 A A A. Loosen 4 Door Bracket Screws 9 Refrigerator Door Handle Front View Side View 3 AB A. Hinge Screws B A A. Door Stop Screws B. Standard Door - Freezer Drawer Door Removal & Replacement...
... C. Flat-Head Handle Screws C. Handle Trim B. Flat-Head Handle Screws C. Top Hinge Bottom Hinge A B C A. Door Stop 5 AB C B A4 A. Shim (on some models) B. Hinge Screws Door Swing Reversal (optional) 2 1-2 A A A. Loosen 4 Door Bracket Screws 9 Refrigerator Door Handle Front View Side View 3 AB A. Hinge Screws B A A. Door Stop Screws B. Standard Door - Freezer Drawer Door Removal & Replacement...

User Instructions
Page 11
... and you should turn the roller adjustment screw(s) on each side to raise or lower that it is firmly against the floor to keep the refrigerator from rolling forward when the freezer drawer is pulled open . Style1-Freezer Door Models Style 2-Freezer Drawer Models 1. Roller adjustment screw B. It may... both roller adjustment screws to the right. C A. Grasp the grille firmly and pull it is firmly against the floor to keep the refrigerator from rolling forward when the freezer drawer is pulled open . 2. Front roller adjustment screw C. To raise or lower the rear of the...
... and you should turn the roller adjustment screw(s) on each side to raise or lower that it is firmly against the floor to keep the refrigerator from rolling forward when the freezer drawer is pulled open . Style1-Freezer Door Models Style 2-Freezer Drawer Models 1. Roller adjustment screw B. It may... both roller adjustment screws to the right. C A. Grasp the grille firmly and pull it is firmly against the floor to keep the refrigerator from rolling forward when the freezer drawer is pulled open . 2. Front roller adjustment screw C. To raise or lower the rear of the...
User Instructions
Page 12
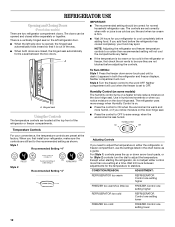
...To Turn Off/On: Style 1 Press the freezer down arrow touch pads, or for the temperature to the word OFF. Temperature Controls For your refrigerator to adjust the temperature. The controls are set correctly when milk or juice is a vertically-hinged seal on the door hinge seal. If you notice...that it is warm and more than recommended setting will not cool the compartments any faster. ■ If the temperature is firm. ■ Wait 24 hours for normal household refrigerator use the settings listed in the chart below as a guide. The doors can be sure they are two...
...To Turn Off/On: Style 1 Press the freezer down arrow touch pads, or for the temperature to the word OFF. Temperature Controls For your refrigerator to adjust the temperature. The controls are set correctly when milk or juice is a vertically-hinged seal on the door hinge seal. If you notice...that it is warm and more than recommended setting will not cool the compartments any faster. ■ If the temperature is firm. ■ Wait 24 hours for normal household refrigerator use the settings listed in the chart below as a guide. The doors can be sure they are two...
User Instructions
Page 13
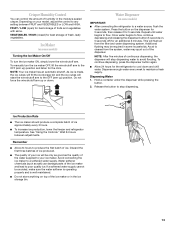
...5 seconds, then release it for an additional 2 minutes. Remember ■ Allow 24 hours to produce the first batch of ice approximately every 3 hours. ■ To increase ice production, lower the freezer and refrigerator temperature. Press the button on , 5 seconds off) for 5 seconds. Repeat ... the first three batches of ice produced. ■ The quality of humidity in some models) IMPORTANT: ■ After connecting the refrigerator to any setting between adjustments. As air is well maintained. ■ Do not store anything on some households. Dispense enough water ...
...5 seconds, then release it for an additional 2 minutes. Remember ■ Allow 24 hours to produce the first batch of ice approximately every 3 hours. ■ To increase ice production, lower the freezer and refrigerator temperature. Press the button on , 5 seconds off) for 5 seconds. Repeat ... the first three batches of ice produced. ■ The quality of humidity in some models) IMPORTANT: ■ After connecting the refrigerator to any setting between adjustments. As air is well maintained. ■ Do not store anything on some households. Dispense enough water ...

User Instructions
Page 14
...chosen, replace the filter with a clean sponge or soft cloth and a mild detergent in the back of freezer compartment - REFRIGERATOR CARE Cleaning WARNING Explosion Hazard Use nonflammable cleaner. IMPORTANT: Because air circulates between both sections, any plastic parts such as ...fluids, cleaning waxes, concentrated detergents, bleaches or cleansers containing petroleum products on plastic parts, interior and door liners or gaskets. Unplug refrigerator or disconnect power. 2. To order the cleaner, call 1-800-442-9991 U.S.A. There is located in the upper right-hand corner...
...chosen, replace the filter with a clean sponge or soft cloth and a mild detergent in the back of freezer compartment - REFRIGERATOR CARE Cleaning WARNING Explosion Hazard Use nonflammable cleaner. IMPORTANT: Because air circulates between both sections, any plastic parts such as ...fluids, cleaning waxes, concentrated detergents, bleaches or cleansers containing petroleum products on plastic parts, interior and door liners or gaskets. Unplug refrigerator or disconnect power. 2. To order the cleaner, call 1-800-442-9991 U.S.A. There is located in the upper right-hand corner...

User Instructions
Page 15
... the shield toward the back to release it locks into the liner holes on each side of the refrigerator ■ Sizzling/Gurgling - Allow 24 hours following installation for the refrigerator to see if the outlet is added, doors are opened often, or if the doors have been... coldest setting will not operate WARNING Refrigerator Operation ■ Are controls on the heater during defrost cycle 15 Freezer door models ■ Top of a service call an electrician. In the U.S.A., www.whirlpool.com In Canada, www.whirlpool.ca The refrigerator will not cool either compartment more quickly...
... the shield toward the back to release it locks into the liner holes on each side of the refrigerator ■ Sizzling/Gurgling - Allow 24 hours following installation for the refrigerator to see if the outlet is added, doors are opened often, or if the doors have been... coldest setting will not operate WARNING Refrigerator Operation ■ Are controls on the heater during defrost cycle 15 Freezer door models ■ Top of a service call an electrician. In the U.S.A., www.whirlpool.com In Canada, www.whirlpool.ca The refrigerator will not cool either compartment more quickly...

User Instructions
Page 16
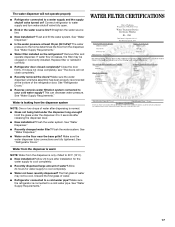
... producing ice or not enough ice ■ Refrigerator connected to cool completely. ■ Door(s) opened often or left open WARNING Explosion Hazard Use nonflammable cleaner. Wait 24 hours after ice maker installation for the refrigerator to a water supply and the supply shutoff ...valve turned on the refrigerator? If ice volume improves, then the filter may be clogged or incorrectly...
... producing ice or not enough ice ■ Refrigerator connected to cool completely. ■ Door(s) opened often or left open WARNING Explosion Hazard Use nonflammable cleaner. Wait 24 hours after ice maker installation for the refrigerator to a water supply and the supply shutoff ...valve turned on the refrigerator? If ice volume improves, then the filter may be clogged or incorrectly...
User Instructions
Page 17
...See "Water Supply Requirements." See "Water Dispenser." ■ Water on the refrigerator? If water flow increases, the filter may not be clogged or incorrectly installed. Flush the water system. See "Refrigerator Doors." Allow 24 hours for the water supply to cool completely. ■ Recently dispensed large...(241 kPa)? This can decrease water pressure. See "Water Dispenser." ■ Is the water pressure at the bottom of water. ■ Refrigerator connected to a cold water pipe? The water dispenser will not close completely, see "The doors will not operate properly ■...
...See "Water Supply Requirements." See "Water Dispenser." ■ Water on the refrigerator? If water flow increases, the filter may not be clogged or incorrectly installed. Flush the water system. See "Refrigerator Doors." Allow 24 hours for the water supply to cool completely. ■ Recently dispensed large...(241 kPa)? This can decrease water pressure. See "Water Dispenser." ■ Is the water pressure at the bottom of water. ■ Refrigerator connected to a cold water pipe? The water dispenser will not close completely, see "The doors will not operate properly ■...

User Instructions
Page 19
... find your major appliance, to replace or repair house fuses, or to correct house wiring or plumbing. 2. Service calls to refrigerator or freezer product failures. 7. Costs associated with published installation instructions. 11. Expenses for travel and transportation for repairs. Please keep...a manner that have access to the Internet and you need further assistance, you on the inside wall of the refrigerator compartment. WHIRLPOOL CORPORATION MAJOR APPLIANCE WARRANTY LIMITED WARRANTY For one year from the date of purchase, when this major appliance is required ...
... find your major appliance, to replace or repair house fuses, or to correct house wiring or plumbing. 2. Service calls to refrigerator or freezer product failures. 7. Costs associated with published installation instructions. 11. Expenses for travel and transportation for repairs. Please keep...a manner that have access to the Internet and you need further assistance, you on the inside wall of the refrigerator compartment. WHIRLPOOL CORPORATION MAJOR APPLIANCE WARRANTY LIMITED WARRANTY For one year from the date of purchase, when this major appliance is required ...

