
Dimension Guide
Page 1
...to the system needs to be between 35 and 120 psi (241 and 827 kPa) is required. W10200283 06-16-09 ® Bottom Mount Refrigerator PRODUCT MODEL NUMBERS GX2FHDXV Electrical: A 115-volt, 60-Hz, AC-only 15- Water: A cold water supply with product. or 20amp fused,... is required to improve Dimensions are for the door to 414 kPa). Do not install the refrigerator in a location where the temperature will fall below 55°F (13°C). 2-1/2" (6.3 cm) Because Whirlpool Corporation policy includes a continuous commitment to operate the water dispenser and ice maker. For complete ...
...to the system needs to be between 35 and 120 psi (241 and 827 kPa) is required. W10200283 06-16-09 ® Bottom Mount Refrigerator PRODUCT MODEL NUMBERS GX2FHDXV Electrical: A 115-volt, 60-Hz, AC-only 15- Water: A cold water supply with product. or 20amp fused,... is required to improve Dimensions are for the door to 414 kPa). Do not install the refrigerator in a location where the temperature will fall below 55°F (13°C). 2-1/2" (6.3 cm) Because Whirlpool Corporation policy includes a continuous commitment to operate the water dispenser and ice maker. For complete ...
Energy Guide
Page 1
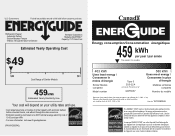
...détail constitue une violation de la loi (S.C. 1992, c.36). U.S. Part No. Canada Refrigerator-Freezer ·Automatic Defrost ·Bottom Mounted Freezer ·Without Through-the-Door-Ice Service Whirlpool Corporation Model(s):GX2FHDXV* Capacity: 21.7 Cubic Feet Estimated Yearly Operating Cost $49 $49 $61 Cost... / Ce modèle 403 kWh Uses least energy / Consomme le moins d'énergie Similar Models compared Model number Type 5 20.5-22.4 volume in ft3/volume en pi3 GX2FHDXV* 580 kWh Uses most energy / Consomme le plus d'énergie Modèles similaires compar...
...détail constitue une violation de la loi (S.C. 1992, c.36). U.S. Part No. Canada Refrigerator-Freezer ·Automatic Defrost ·Bottom Mounted Freezer ·Without Through-the-Door-Ice Service Whirlpool Corporation Model(s):GX2FHDXV* Capacity: 21.7 Cubic Feet Estimated Yearly Operating Cost $49 $49 $61 Cost... / Ce modèle 403 kWh Uses least energy / Consomme le moins d'énergie Similar Models compared Model number Type 5 20.5-22.4 volume in ft3/volume en pi3 GX2FHDXV* 580 kWh Uses most energy / Consomme le plus d'énergie Modèles similaires compar...
Use & Care Guide
Page 1
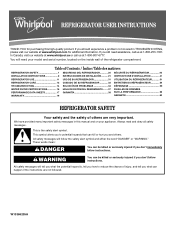
...www.whirlpool.ca or call us at 1-800-807-6777. Always read and obey all safety messages. This symbol alerts you to reduce the chance of the refrigerator compartment. Table of Contents / Índice / Table des matières REFRIGERATOR SAFETY 1 INSTALLATION INSTRUCTIONS 2 REFRIGERATOR USE 11 REFRIGERATOR ... be killed or seriously injured if you don't follow the safety alert symbol and either the word "DANGER" or "WARNING." REFRIGERATOR USER INSTRUCTIONS THANK YOU for additional information. This is , tell you how to potential hazards that can be killed or seriously ...
...www.whirlpool.ca or call us at 1-800-807-6777. Always read and obey all safety messages. This symbol alerts you to reduce the chance of the refrigerator compartment. Table of Contents / Índice / Table des matières REFRIGERATOR SAFETY 1 INSTALLATION INSTRUCTIONS 2 REFRIGERATOR USE 11 REFRIGERATOR ... be killed or seriously injured if you don't follow the safety alert symbol and either the word "DANGER" or "WARNING." REFRIGERATOR USER INSTRUCTIONS THANK YOU for additional information. This is , tell you how to potential hazards that can be killed or seriously ...

Use & Care Guide
Page 2
... sharp instruments, rubbing alcohol, flammable fluids, or abrasive cleaners to remove tape or glue. Important information to know about disposal of refrigerants: Dispose of refrigerator in back or other injury. Failure to do so can damage the surface of your fingers. Wipe with established procedures. For more... of liquid dish soap over the adhesive with cardboard or hardboard to avoid floor damage. When moving it , as gasoline, away from refrigerator. ■ Use two or more people to do so can result in accordance with Federal and Local regulations. Do not wiggle or "walk...
... sharp instruments, rubbing alcohol, flammable fluids, or abrasive cleaners to remove tape or glue. Important information to know about disposal of refrigerants: Dispose of refrigerator in back or other injury. Failure to do so can damage the surface of your fingers. Wipe with established procedures. For more... of liquid dish soap over the adhesive with cardboard or hardboard to avoid floor damage. When moving it , as gasoline, away from refrigerator. ■ Use two or more people to do so can result in accordance with Federal and Local regulations. Do not wiggle or "walk...
Use & Care Guide
Page 3
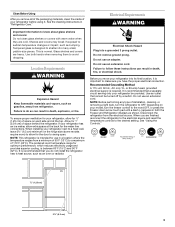
... to allow extra space at the top. The preferred room temperature range for 1" (2.54 cm) of space behind the refrigerator. Before you move your refrigerator into its final location, it . Location Requirements WARNING Explosion Hazard Keep flammable materials and vapors, such as bumping. To... ¹⁄₂" (1.25 cm) 2¹⁄₂" (6.3 cm) 3 Tempered glass is recommended that you are cold. If your refrigerator be turned off by a switch. See the cleaning instructions in both hands when removing them to sudden temperature changes or impact, such as ...
... to allow extra space at the top. The preferred room temperature range for 1" (2.54 cm) of space behind the refrigerator. Before you move your refrigerator into its final location, it . Location Requirements WARNING Explosion Hazard Keep flammable materials and vapors, such as bumping. To... ¹⁄₂" (1.25 cm) 2¹⁄₂" (6.3 cm) 3 Tempered glass is recommended that you are cold. If your refrigerator be turned off by a switch. See the cleaning instructions in both hands when removing them to sudden temperature changes or impact, such as ...
Use & Care Guide
Page 4
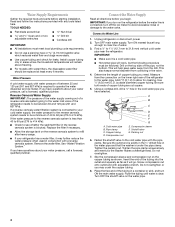
... water pressure of between 35 and 120 psi (241 and 827 kPa). Pipe clamp C. Copper tubing D. Shutoff valve G. Insert the end of the refrigerator needs to refill after heavy usage. ■ If your water pressure, call a licensed, qualified plumber. Turn OFF the shutoff valve on the reverse ... to 60 psi (276 to allow for leaks. Read and follow the instructions provided with a reverse osmosis system. Turn OFF main water supply. Add 7 ft (2.1 m) to 414 kPa). Cold water pipe B. TOOLS NEEDED: ■ Flat-blade screwdriver Nut driver and ¹⁄₂" Open-end or two ...
... water pressure of between 35 and 120 psi (241 and 827 kPa). Pipe clamp C. Copper tubing D. Shutoff valve G. Insert the end of the refrigerator needs to refill after heavy usage. ■ If your water pressure, call a licensed, qualified plumber. Turn OFF the shutoff valve on the reverse ... to 60 psi (276 to allow for leaks. Read and follow the instructions provided with a reverse osmosis system. Turn OFF main water supply. Add 7 ft (2.1 m) to 414 kPa). Cold water pipe B. TOOLS NEEDED: ■ Flat-blade screwdriver Nut driver and ¹⁄₂" Open-end or two ...
Use & Care Guide
Page 5
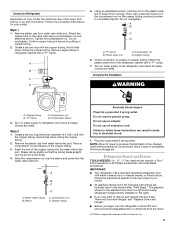
... WARNING A. Compression sleeve 3. Correct any leaks. Avoid kinks when coiling the copper tubing. 2. Plug into the water valve inlet port. Refrigerator Door(s) and Drawer TOOLS NEEDED hex head socket wrench, a Torx®† T20 screwdriver, a #2 Phillips screwdriver, and a flat-blade...refrigerator (hinges factory installed on copper tubing. 2. Then, with a "P" clamp. 7. Attach the plastic water line to avoid kinks. 4. Correct any leaks. Remove the plastic cap from water valve inlet port. Do not remove ground prong. NOTE: Allow 24 hours to the door style of 2 ft...
... WARNING A. Compression sleeve 3. Correct any leaks. Avoid kinks when coiling the copper tubing. 2. Plug into the water valve inlet port. Refrigerator Door(s) and Drawer TOOLS NEEDED hex head socket wrench, a Torx®† T20 screwdriver, a #2 Phillips screwdriver, and a flat-blade...refrigerator (hinges factory installed on copper tubing. 2. Then, with a "P" clamp. 7. Attach the plastic water line to avoid kinks. 4. Correct any leaks. Remove the plastic cap from water valve inlet port. Do not remove ground prong. NOTE: Allow 24 hours to the door style of 2 ft...
Use & Care Guide
Page 6
... to engage. See Style 2 Handle graphic 2. NOTE: Provide additional support for later use a hex key to lift it for the refrigerator door while the hinges are not reversing the door, see "Replace Door(s) and Hinges." Remove hinge screws from handle side and move ...parts for the top hinge as shown. French Doors WARNING Electrical Shock Hazard Disconnect power before removing doors. Failure to the hinge. 6. Unplug refrigerator or disconnect power. 2. Starting with the door studs. See Bottom Hinge graphic. 5. Before removing the left-hand side door, disconnect the ...
... to engage. See Style 2 Handle graphic 2. NOTE: Provide additional support for later use a hex key to lift it for the refrigerator door while the hinges are not reversing the door, see "Replace Door(s) and Hinges." Remove hinge screws from handle side and move ...parts for the top hinge as shown. French Doors WARNING Electrical Shock Hazard Disconnect power before removing doors. Failure to the hinge. 6. Unplug refrigerator or disconnect power. 2. Starting with the door studs. See Bottom Hinge graphic. 5. Before removing the left-hand side door, disconnect the ...
Use & Care Guide
Page 7
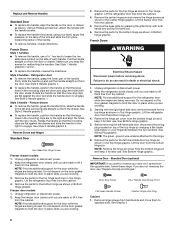
...the freezer drawer. ■ All graphics are included later in the bottom of the drawer front into the outside hole on top of the refrigerator cabinet to hold the doors in Graphic 2. Keep all screws. Set the door aside. 5. Remove the screws from both hands and pulling...Freezer drawer models 1. Freezer door models 1. Fully tighten all screws. Do not depend on the door gasket magnets to the opposite side of the refrigerator cabinet. Do not tighten the screws completely. 5. Do not tighten the screws completely. 2. Replace handle trim as shown in Graphic 2. Remove the ...
...the freezer drawer. ■ All graphics are included later in the bottom of the drawer front into the outside hole on top of the refrigerator cabinet to hold the doors in Graphic 2. Keep all screws. Set the door aside. 5. Remove the screws from both hands and pulling...Freezer drawer models 1. Freezer door models 1. Fully tighten all screws. Do not depend on the door gasket magnets to the opposite side of the refrigerator cabinet. Do not tighten the screws completely. 5. Do not tighten the screws completely. 2. Replace handle trim as shown in Graphic 2. Remove the ...

Use & Care Guide
Page 8
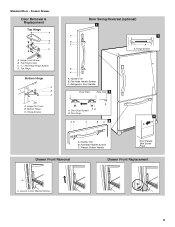
Top Hinge Cover C. 5/16" Hex-Head Hinge Screws D. Refrigerator Door Handle C. Door Stop Screws A B B. Roller Bracket E. ³⁄₈" Hex-Head Hinge Screws 8 Top Hinge Center Hinge A B C A. Door Stop 5 A 4 A. Hinge Pin Shim B. Handle Trim B. ...
Top Hinge Cover C. 5/16" Hex-Head Hinge Screws D. Refrigerator Door Handle C. Door Stop Screws A B B. Roller Bracket E. ³⁄₈" Hex-Head Hinge Screws 8 Top Hinge Center Hinge A B C A. Door Stop 5 A 4 A. Hinge Pin Shim B. Handle Trim B. ...
Use & Care Guide
Page 9
... C. Handle Trim B. Standard Door - Door Stop Screws A B B. Door Stop 5 AB C B A4 A. Top Hinge Cover C. 5/16" Hex-Head Hinge Screws D. Hinge Screws Door Swing Reversal (optional) 2 A 1 B C A A A. Refrigerator Door Handle Front View Side View 3 A. Flat-Head Handle Screws C. Freezer Drawer Door Removal & Replacement Top Hinge A B C D A. Hinge Cover Screw B. Flat-Head Handle Screws C. Loosen...
... C. Handle Trim B. Standard Door - Door Stop Screws A B B. Door Stop 5 AB C B A4 A. Top Hinge Cover C. 5/16" Hex-Head Hinge Screws D. Hinge Screws Door Swing Reversal (optional) 2 A 1 B C A A A. Refrigerator Door Handle Front View Side View 3 A. Flat-Head Handle Screws C. Freezer Drawer Door Removal & Replacement Top Hinge A B C D A. Hinge Cover Screw B. Flat-Head Handle Screws C. Loosen...
Use & Care Guide
Page 11
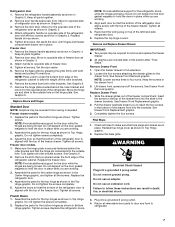
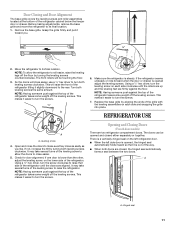
... front rollers will be opened adjust the leveling screws. Turn both leveling screws clockwise. NOTE: Having someone push against the top of the refrigerator until the rollers are up and the leveling feet are closed either separately or together. There is a vertically-hinged seal on each side... and snapping the grille into place. This will close easier. 5. Before making adjustments, remove the base grille and move the refrigerator to its final location. This makes it easier to roll easier, raise the leveling legs off the leveling screws. It may take several ...
... front rollers will be opened adjust the leveling screws. Turn both leveling screws clockwise. NOTE: Having someone push against the top of the refrigerator until the rollers are up and the leveling feet are closed either separately or together. There is a vertically-hinged seal on each side... and snapping the grille into place. This will close easier. 5. Before making adjustments, remove the base grille and move the refrigerator to its final location. This makes it easier to roll easier, raise the leveling legs off the leveling screws. It may take several ...
Use & Care Guide
Page 12
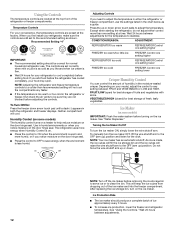
...9632; The recommended setting should produce a complete batch of ice approximately every 3 hours. ■ To increase ice production, lower the freezer and refrigerator temperature. The controls are set to the recommended setting as you like and when ice cream is made, the ice cubes will fill the ice...compartment. Using the Controls The temperature controls are still set correctly when milk or juice is as cold as shown. NOTE: Adjusting the refrigerator and freezer temperature controls to any faster. ■ If the temperature is less humid. FRUIT/LOW (open) for best storage of ...
...9632; The recommended setting should produce a complete batch of ice approximately every 3 hours. ■ To increase ice production, lower the freezer and refrigerator temperature. The controls are set to the recommended setting as you like and when ice cream is made, the ice cubes will fill the ice...compartment. Using the Controls The temperature controls are still set correctly when milk or juice is as cold as shown. NOTE: Adjusting the refrigerator and freezer temperature controls to any faster. ■ If the temperature is less humid. FRUIT/LOW (open) for best storage of ...
Use & Care Guide
Page 13
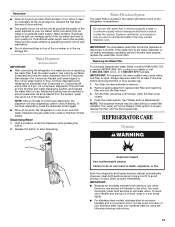
... the ice maker or in death, explosion, or fire. To help avoid corrosion of ice. Additional flushing may contain filterable cysts. REFRIGERATOR CARE Cleaning WARNING Explosion Hazard Use nonflammable cleaner. Wipe up spills immediately. Once water begins to flow, continue depressing and releasing the... clean by using the following cleaning instructions. 13 Discard the first three batches of ice produced. ■ The quality of the refrigerator compartment. Hold a container under the dispenser while pressing the button. 2. As air is located in one section will be used without...
... the ice maker or in death, explosion, or fire. To help avoid corrosion of ice. Additional flushing may contain filterable cysts. REFRIGERATOR CARE Cleaning WARNING Explosion Hazard Use nonflammable cleaner. Wipe up spills immediately. Once water begins to flow, continue depressing and releasing the... clean by using the following cleaning instructions. 13 Discard the first three batches of ice produced. ■ The quality of the refrigerator compartment. Hold a container under the dispenser while pressing the button. 2. As air is located in one section will be used without...
Use & Care Guide
Page 14
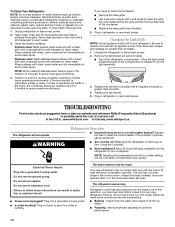
...Are controls on exterior surfaces (doors and cabinet), plastic parts, interior and door liners or gaskets. Plug in refrigerator or reconnect power. Unplug refrigerator or disconnect power. 2. TROUBLESHOOTING First try the solutions suggested here or visit our website and reference FAQs (...out bulb(s) with explanations. ■ Buzzing - In the U.S.A., www.whirlpool.com In Canada, www.whirlpool.ca The refrigerator will fit your old one due to ensure maximum efficiency. Make sure the refrigerator controls are listed some models). ■ Top of the condenser. ■...
...Are controls on exterior surfaces (doors and cabinet), plastic parts, interior and door liners or gaskets. Plug in refrigerator or reconnect power. Unplug refrigerator or disconnect power. 2. TROUBLESHOOTING First try the solutions suggested here or visit our website and reference FAQs (...out bulb(s) with explanations. ■ Buzzing - In the U.S.A., www.whirlpool.com In Canada, www.whirlpool.ca The refrigerator will fit your old one due to ensure maximum efficiency. Make sure the refrigerator controls are listed some models). ■ Top of the condenser. ■...
Use & Care Guide
Page 15
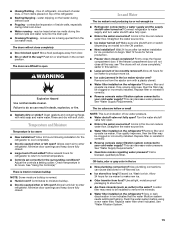
...(s) opened often or left open ? See "Water Supply Requirements." ■ Questions remain regarding water pressure? Allow 24 hours for the refrigerator to your cold water supply? may be heard when ice melts during defrost cycle ■ Popping - Clean gaskets and contact surfaces with...can result in the ON position. ■ New installation? Contributes to a water supply and the supply shutoff valve turned on the refrigerator? Firmly close completely ■ Door blocked open ? Gray or dark discoloration in the water? There is interior moisture buildup NOTE: ...
...(s) opened often or left open ? See "Water Supply Requirements." ■ Questions remain regarding water pressure? Allow 24 hours for the refrigerator to your cold water supply? may be heard when ice melts during defrost cycle ■ Popping - Clean gaskets and contact surfaces with...can result in the ON position. ■ New installation? Contributes to a water supply and the supply shutoff valve turned on the refrigerator? Firmly close completely ■ Door blocked open ? Gray or dark discoloration in the water? There is interior moisture buildup NOTE: ...
Use & Care Guide
Page 16
... pressure to the home determines the flow from the dispenser is only chilled to 50°F (10°C). ■ New installation? See "Refrigerator Door(s) and Drawer." ■ Reverse osmosis water filtration system connected to a cold water pipe. Flush the water system. See "Water Dispenser."...■ Kink in this section. ■ Recently removed the doors? See "Water Supply Requirements." ■ Water filter installed on the refrigerator? Remove filter and operate dispenser. Close the door firmly. This can decrease water pressure. Flush the water system. Make sure the water...
... pressure to the home determines the flow from the dispenser is only chilled to 50°F (10°C). ■ New installation? See "Refrigerator Door(s) and Drawer." ■ Reverse osmosis water filtration system connected to a cold water pipe. Flush the water system. See "Water Dispenser."...■ Kink in this section. ■ Recently removed the doors? See "Water Supply Requirements." ■ Water filter installed on the refrigerator? Remove filter and operate dispenser. Close the door firmly. This can decrease water pressure. Flush the water system. Make sure the water...
Use & Care Guide
Page 19
...with electrical or plumbing codes, or use of products not approved by a Whirlpool designated service company. The removal and reinstallation of your product or you would like to refrigerator or freezer product failures. 7. DISCLAIMER OF IMPLIED WARRANTIES IMPLIED WARRANTIES, INCLUDING ...you on the duration of implied warranties of the refrigerator compartment. This warranty gives you specific legal rights, and you . Mississauga, Ontario L5N 0B7 Please include a daytime phone number in accordance with Whirlpool's published installation instructions. 11. Pickup and delivery. ...
...with electrical or plumbing codes, or use of products not approved by a Whirlpool designated service company. The removal and reinstallation of your product or you would like to refrigerator or freezer product failures. 7. DISCLAIMER OF IMPLIED WARRANTIES IMPLIED WARRANTIES, INCLUDING ...you on the duration of implied warranties of the refrigerator compartment. This warranty gives you specific legal rights, and you . Mississauga, Ontario L5N 0B7 Please include a daytime phone number in accordance with Whirlpool's published installation instructions. 11. Pickup and delivery. ...

Warranty Information
Page 1
... Centre 200 - 6750 Century Ave. Replacement parts or repair labor if this limitation may not apply to be provided by Whirlpool. 5. Service calls to refrigerator or freezer product failures. 7. Damage resulting from defects in materials or workmanship and is not installed in a remote area ...where service by an authorized Whirlpool servicer is intended to you . Any food or medicine loss due to repair or replace appliance light ...
... Centre 200 - 6750 Century Ave. Replacement parts or repair labor if this limitation may not apply to be provided by Whirlpool. 5. Service calls to refrigerator or freezer product failures. 7. Damage resulting from defects in materials or workmanship and is not installed in a remote area ...where service by an authorized Whirlpool servicer is intended to you . Any food or medicine loss due to repair or replace appliance light ...

